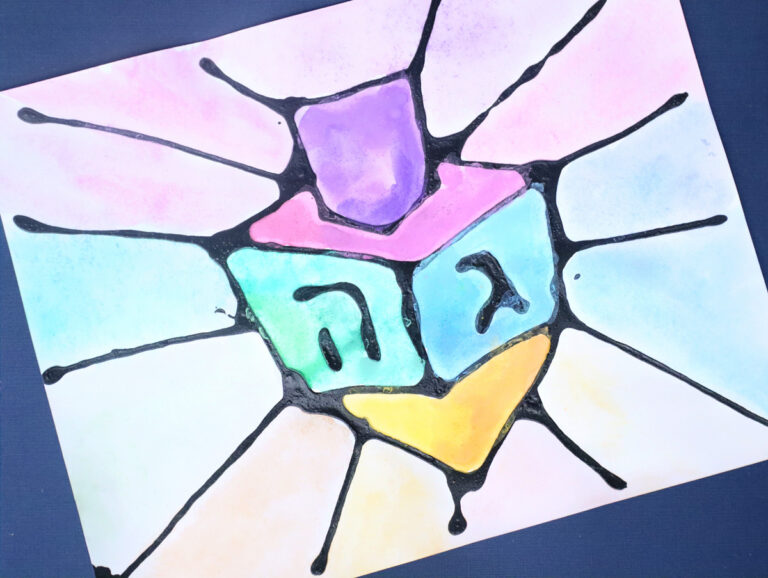
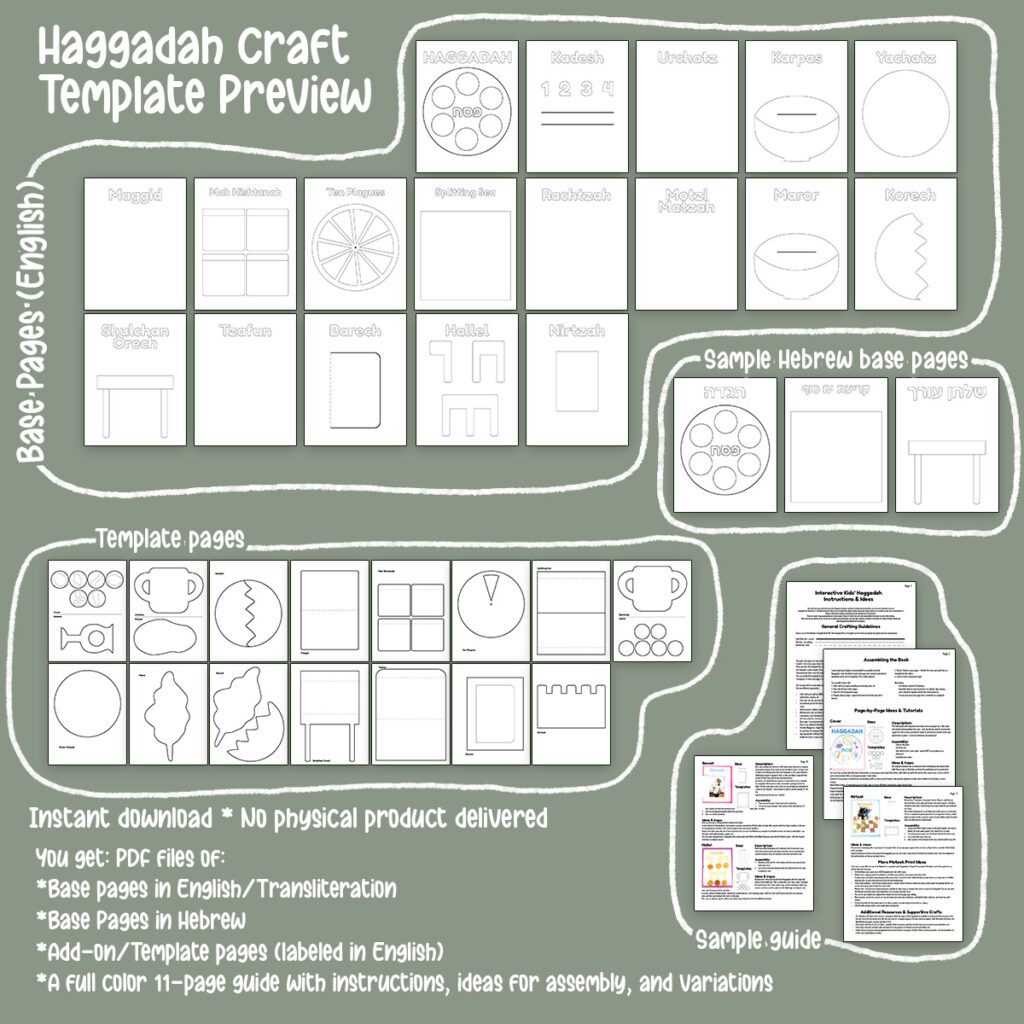
Kids’ Interactive Haggadah Craft Template
This kids’ interactive Haggadah craft template is designed to be crafted scrapbook-style with textures and fun little touches! If you want something simpler, check out this do a dot Haggadah template for preschool. This post contains affiliate links.
For years I’d been planning on doing something like this: creating a template and framework for a kids’ Haggadah craft that’s interactive. Since I created my sensory/quiet book Haggadah template, there has been more demand for a simpler “paper craft” one and I’m finally able to share the results.
The goal: each page is its own mini-craft for kids to complete. You have base pages (with the words of the Seder part in your choice of Hebrew or English). Some base pages have elements and templates in place, and some are blank, depending on the craft.
Next, you have the template file, which has cutouts and such to complete the Haggadah craft.
But possibly the most important part is the instruction booklet which has the steps to assemble your Haggadah craft.
In this post, I’ll be sharing how I assembled it as well – but you WILL get instructions with your download.
Keep in mind that the Haggadah craft template is quite simple. It has literally just the framework for the crafts. It is intentionally simple because the whole goal of this is to provide a framework but leave room for creativity and customizing it to the age group that will be crafting it. This requires less specificity.
You can modify the Haggadah craft template for your own classroom – adding elements such as words, etc. It’s really a framework for further crafting.
It took a LOT to put this together, and you will get loads of instruction and ideas (practically a craft book to go with it) as well so you’re not “left in the lurch”, but the template itself is not ready-to-go, there’s crafting required.
It’s “done for you” in the sense that you have the basic materials prepared and ready for your class (or kid) to craft.
Get the Kids’ Haggadah Craft Template
The Haggadah craft template is available in my Etsy shop and on TpT. Purchasing premium products from me enables me to keep doing what I do, to give more focus to my Jewish blog, creating authentically Jewish resources for educators and parents.
Video Walkthrough
If you prefer to learn that way, here’s the video walkthrough of an assembled Haggadah craft:
Tips for crafting an interactive Haggadah craft for kids
This Haggadah craft template was really designed for a classroom, where from after Purim is over (or maybe Rosh Chodesh Nissan – whatever your approach is), the Haggadah craft is worked on as a daily labor of love.
I designed it so that each page is its “own craft” – meaning there are multiple steps per page. This is not a coloring book – each page is a project.
You can go as all-in as you want, and I recommend catering it to the age of your kids. Here are different approaches:
- Color each part: pull out different media to do so. Try Tempera paint sticks (a personal favorite), Do a Dot markers, kids’ washable paints, watercolors, crayons, etc.
- Trace and cut: you can trace the template on different colored and textured papers to have kids cut out. This can get you gorgeous looks.
- Go minimal: just do the bare basics for completing each page, coloring, cutting, and gluing – like you’ll see my daughter opted to do for the cover.
- Add elements: I added a water splash from tissue paper for urchatz, and a bit of fabric by rachtzah for the towel.
- Moving parts: you can make parts removable or fix them in place. I used brad pins, slits in the page, and Velcro coins to make things movable.
- Laminating: I just laminated the cover and any moving parts that felt like they weren’t stiff enough. You can laminate each part if you have the time, patience, resources, and want it to be more durable.
- Base page: I recommend printing your whole thing on cardstock. It just makes more sense and is much more durable. However, I didn’t do that as my cardstock-friendly printer wasn’t working. Instead, I cut off the edges of each page and backed it on colorful cardstock.
- Putting it all together: I used book rings (highly recommended) however, you can use ribbons too. Or, glue pages into a notebook – or use sheet protectors. You can really play with it and choose your favorite method.
- Detailed Maggid vs. Single Page: I added three more pages in the “maggid” section to outline a few parts of the Haggadah. You can skip these to save time, for younger kids, or if you just want to make it thinner.
- Age appropriate crafting: You’re customizing your craft to cater this to your age group. Add details as needed. All the cutting is designed to be doable for most 4-5 year olds – and is very simple, but they’ll probably need some assistance along the way.
Just a reminder, you can get the Haggadah craft template here or here!
A peek inside the interactive Haggadah craft
Ready to look inside? I’m going to be giving a brief overview of each part before going through the step-by-step because many of you just don’t need the step-by-step!
Since I photographed it in spreads here, I’ll be sharing it by spread not by page. And while you go through, just remember that these are crafting suggestions – do what you want with it!
I’m going to include more Haggadah craft suggestions here (also included in your instructions download!)
Mine was made with four year olds in mind (IE things my daughter would be able to do/is age appropriate). Full disclosure: I crafted most of this – I mean, I needed it to actually happen, and she’s in school most of the day. She did do parts but I did most. I just feel the need to disclose this detail! But the ideas ARE catered to that age group and should for the most part be doable by preschoolers with varying levels of assistance along the way.
Enjoy!
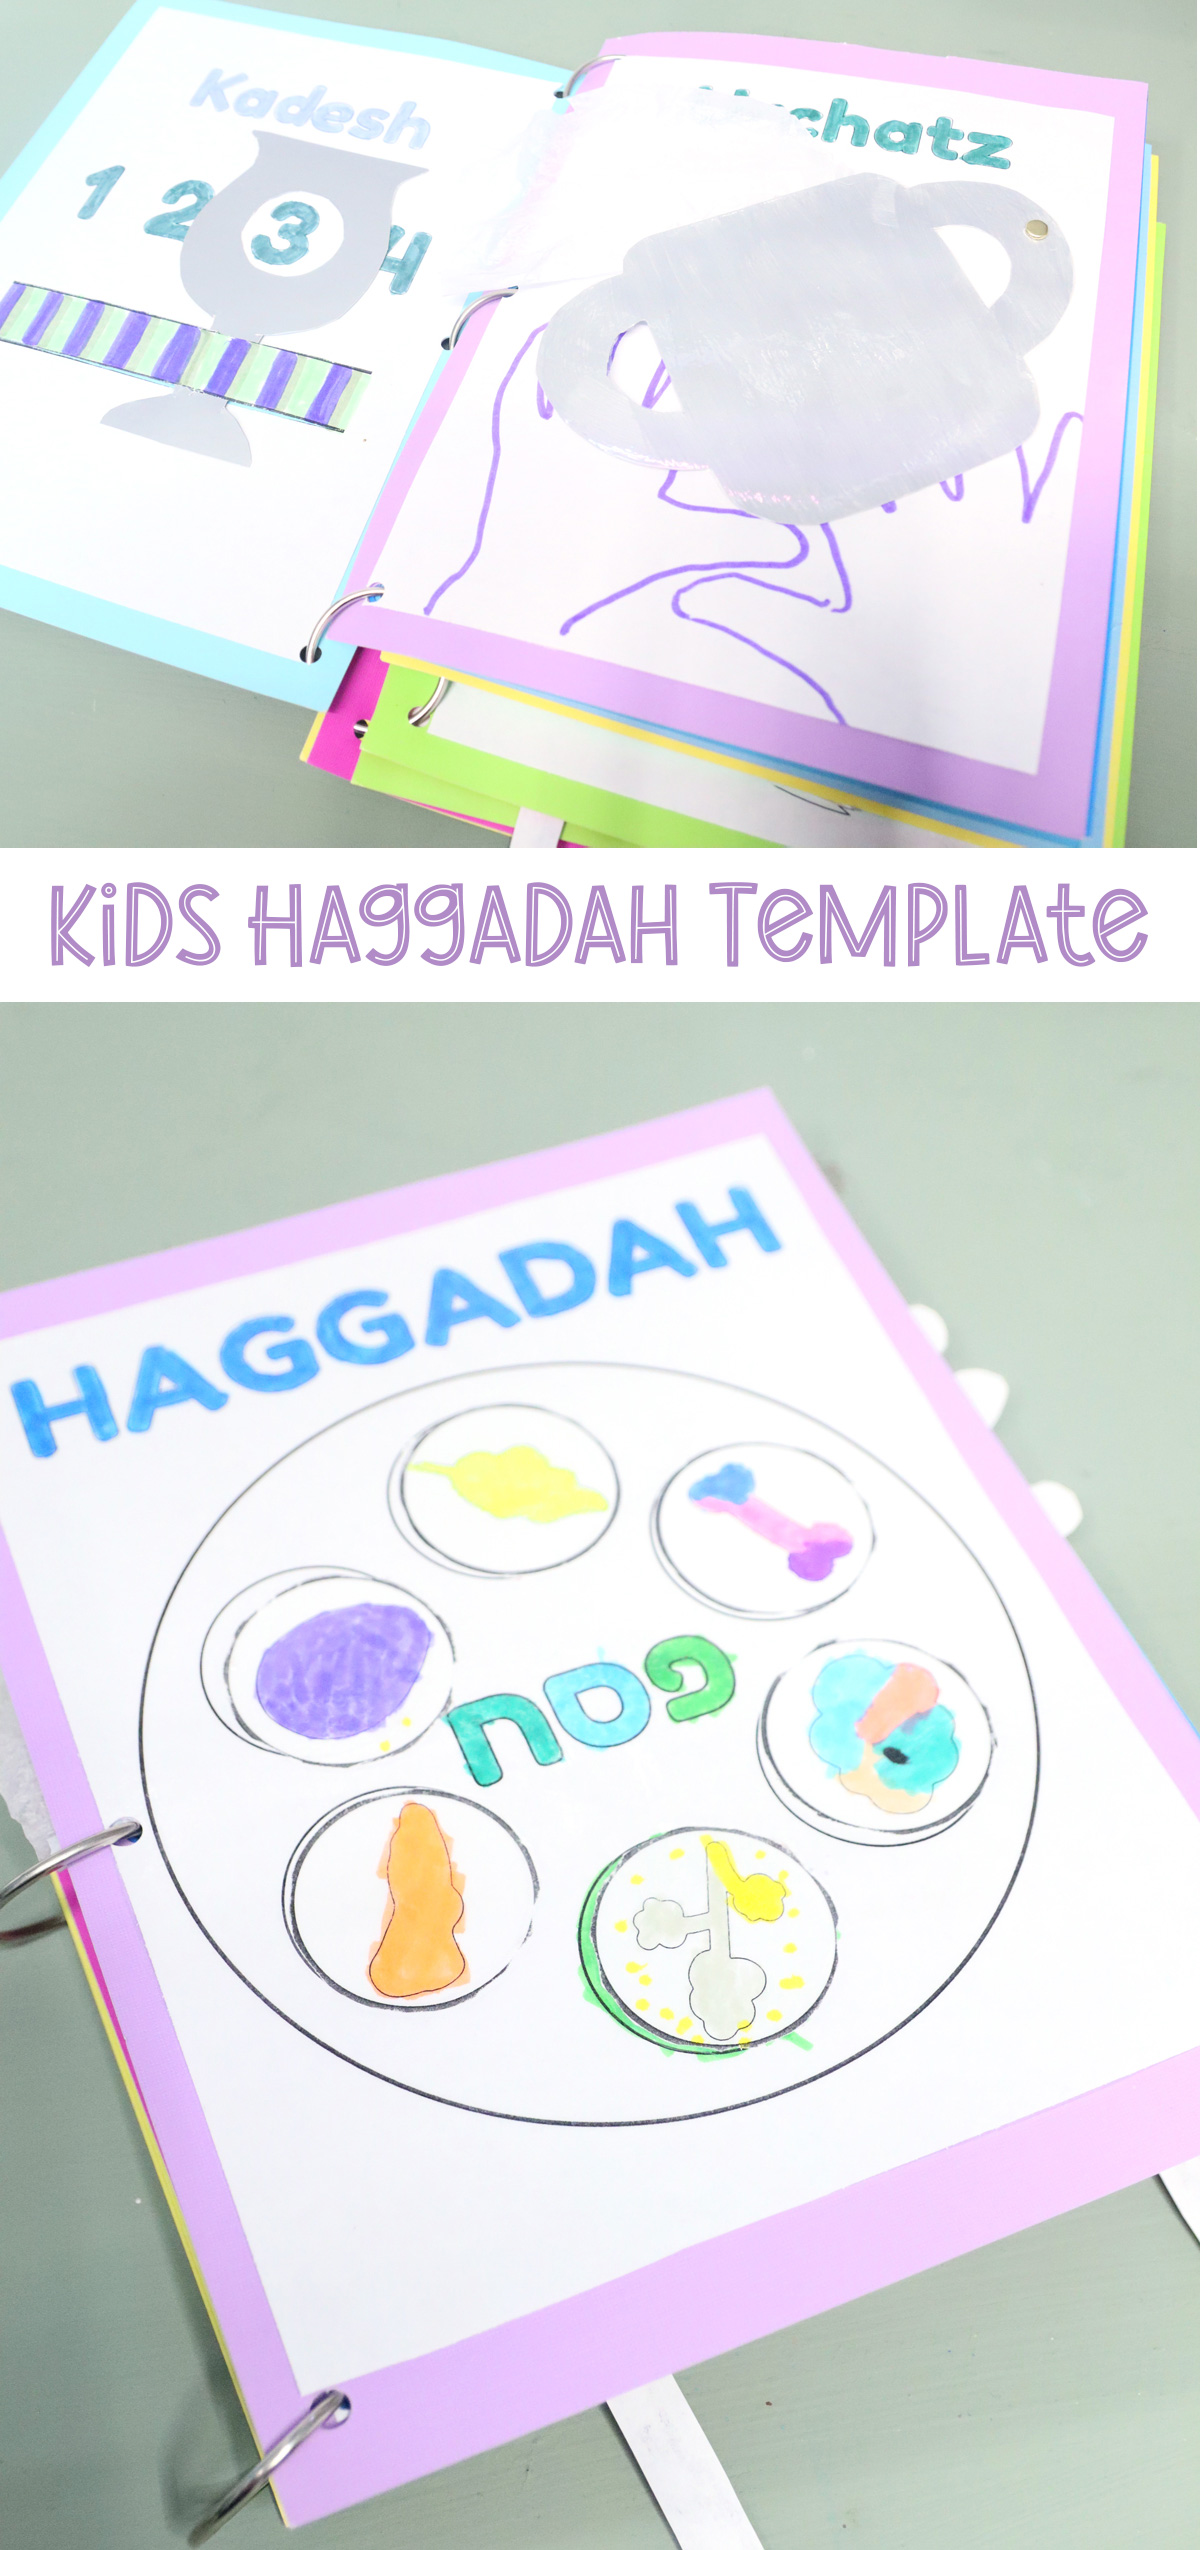
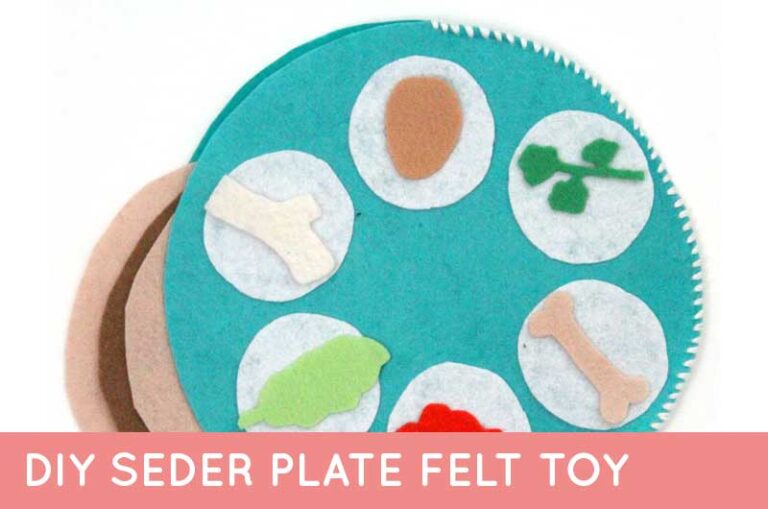
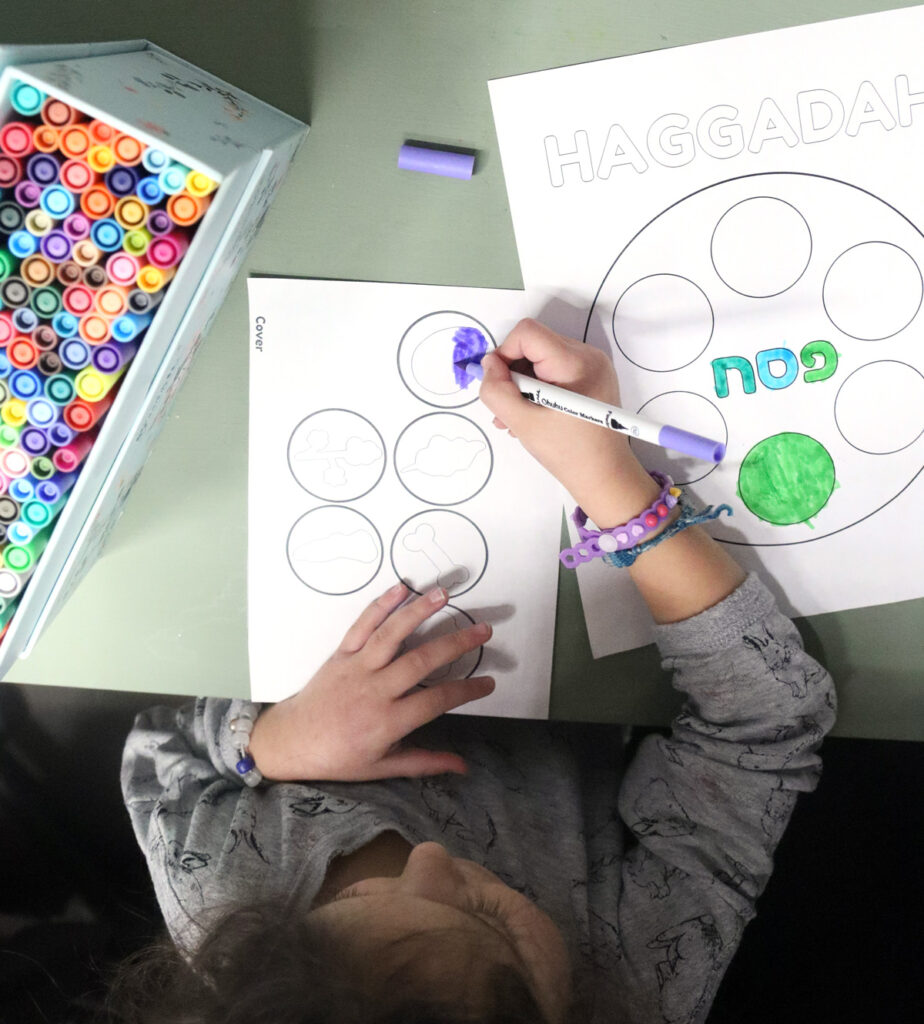
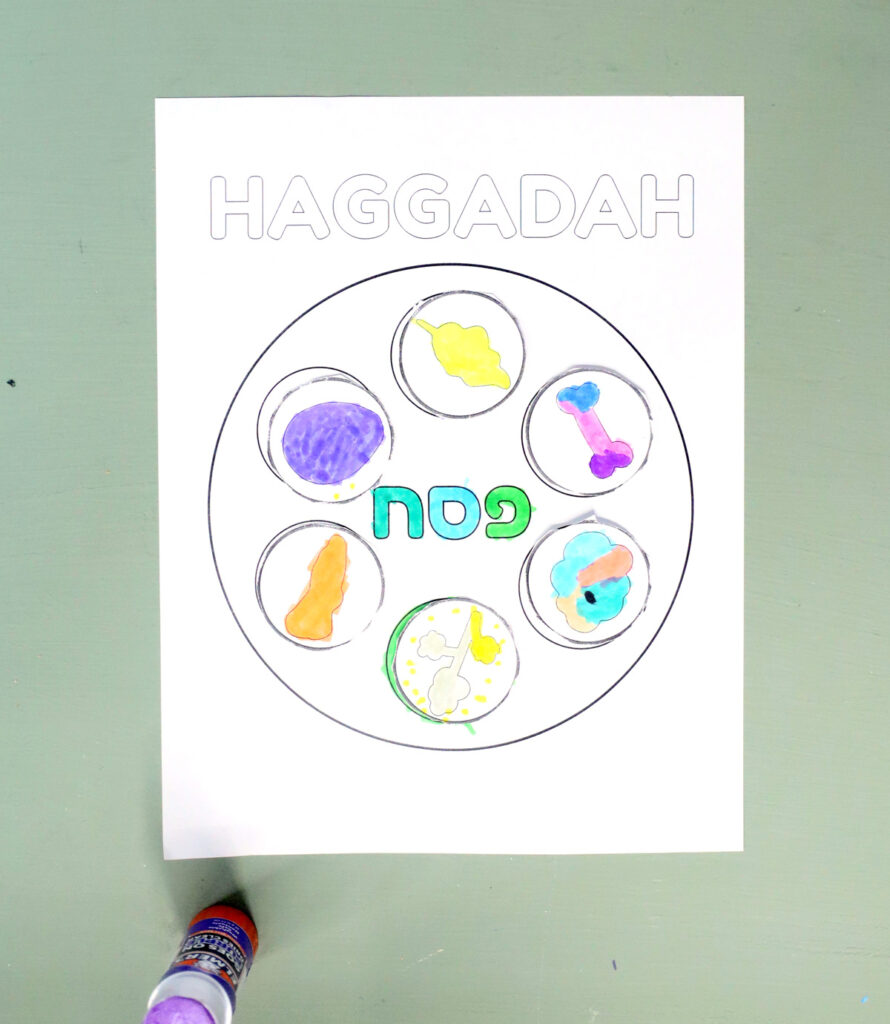
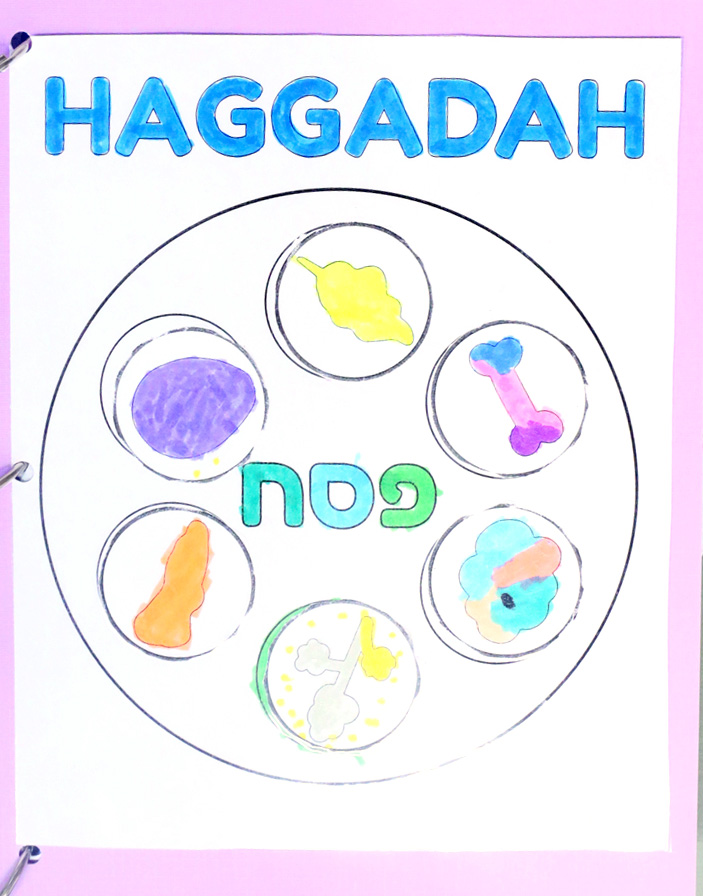
Cover
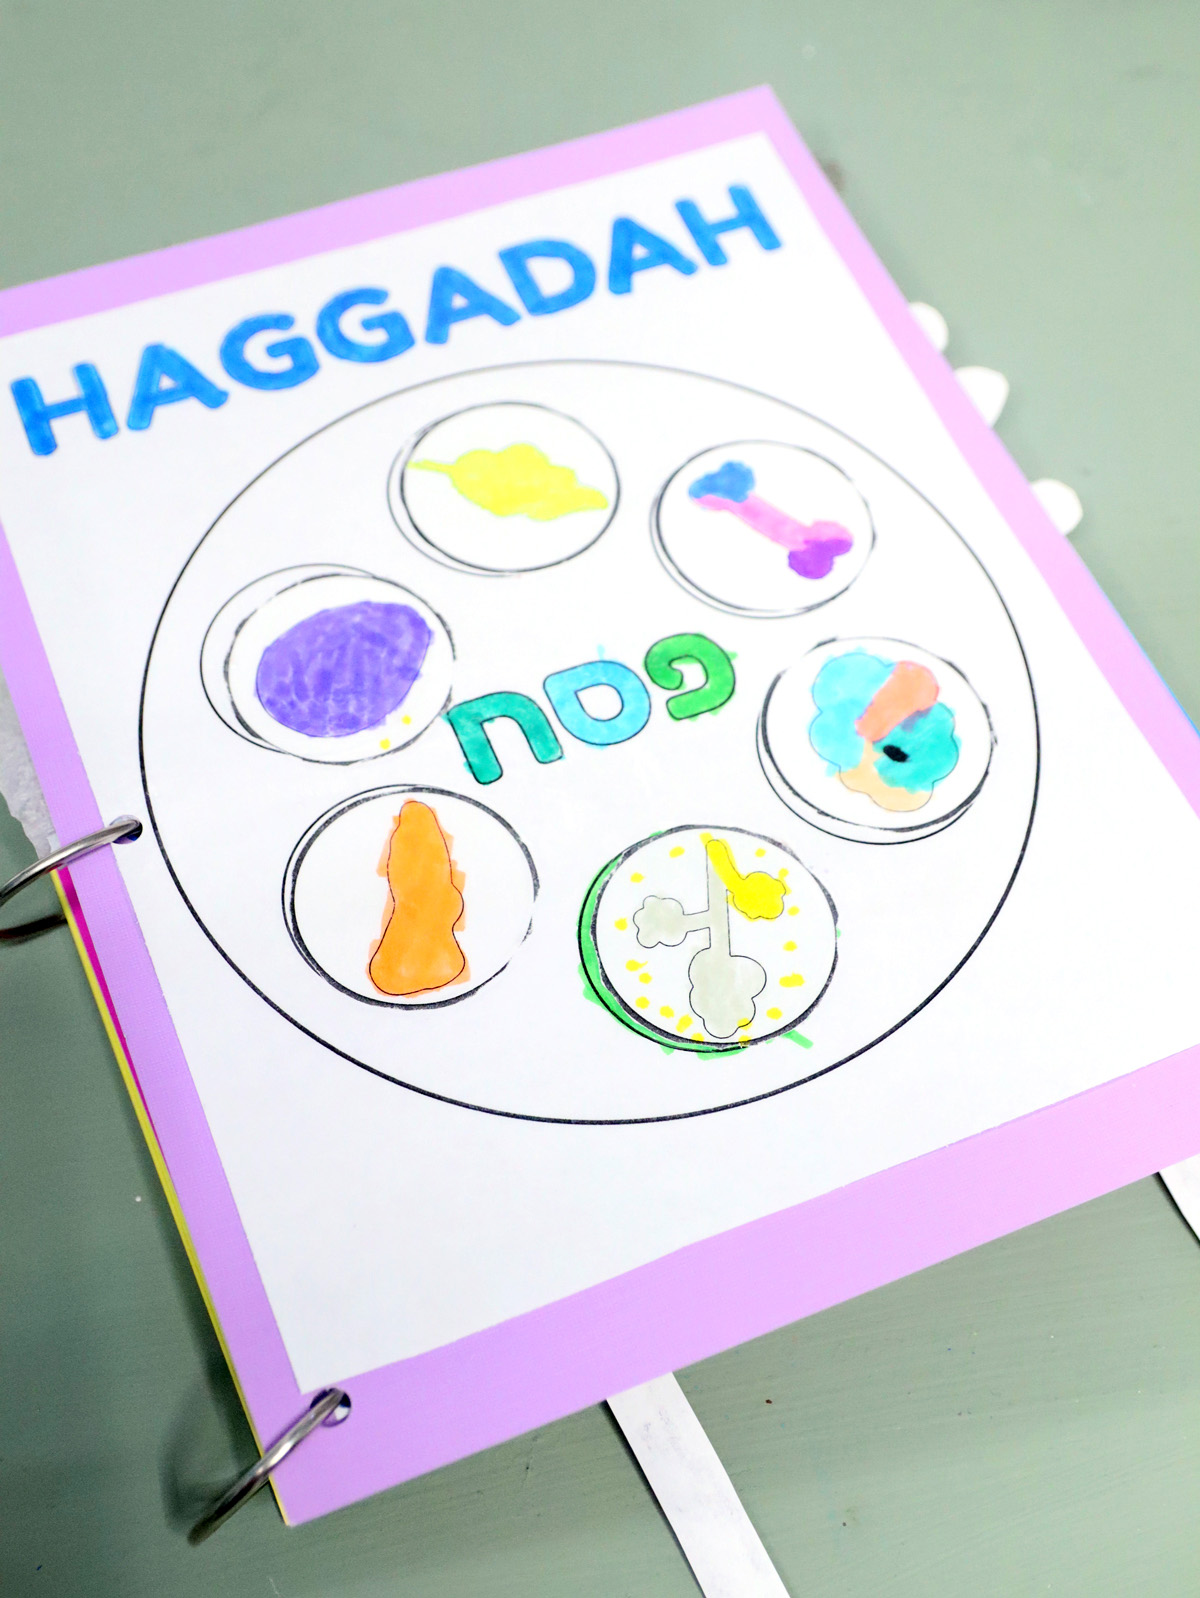
My 4 year old colored and assembled the cover – and she did not wait for instruction! I gave it to her to color, and before I knew it, she had cut out the circles and glued them in place – or at least wherever she wanted to!
My original intention was to laminate them individually and attach them with Velcro coins so that kids can learn the positioning of it (or pretend to set it themselves, even if they don’t memorize the correct spot.)
This is the only page that I made as more of a coloring page-style because it was the first one I designed. Afterward, I realized that I’d rather keep this one to crafting (as I have so many coloring crafts designed already). So you can definitely have kids illustrate it themselves to encourage more input from them, or do a craft for each circle instead of the cut and paste project. Some ideas:
- Charoset: Tissue paper scrunched up, dot painting (with a q-tip or pencil eraser), hole punches glued on in the correct shades of red, brown, or even orange.
- Maror/Bitter herbs: cut textured paper to shape, glue on some off white construction paper shreds/strips
- Chazeret/lettuce: Cut it from green crepe paper or grocery circular clippings of lettuce
- Karpas/vegetable: same! You can have them clip the different foods that can work as “karpas” from a magazine and glue whichever they want on. Or use crepe paper for parsley.
- Beitzah/egg: Cut from glossy off white poster board, grocery circular clippings
- Zro’ah/Shank Bone: Cut from construction paper or once gain circular clippings
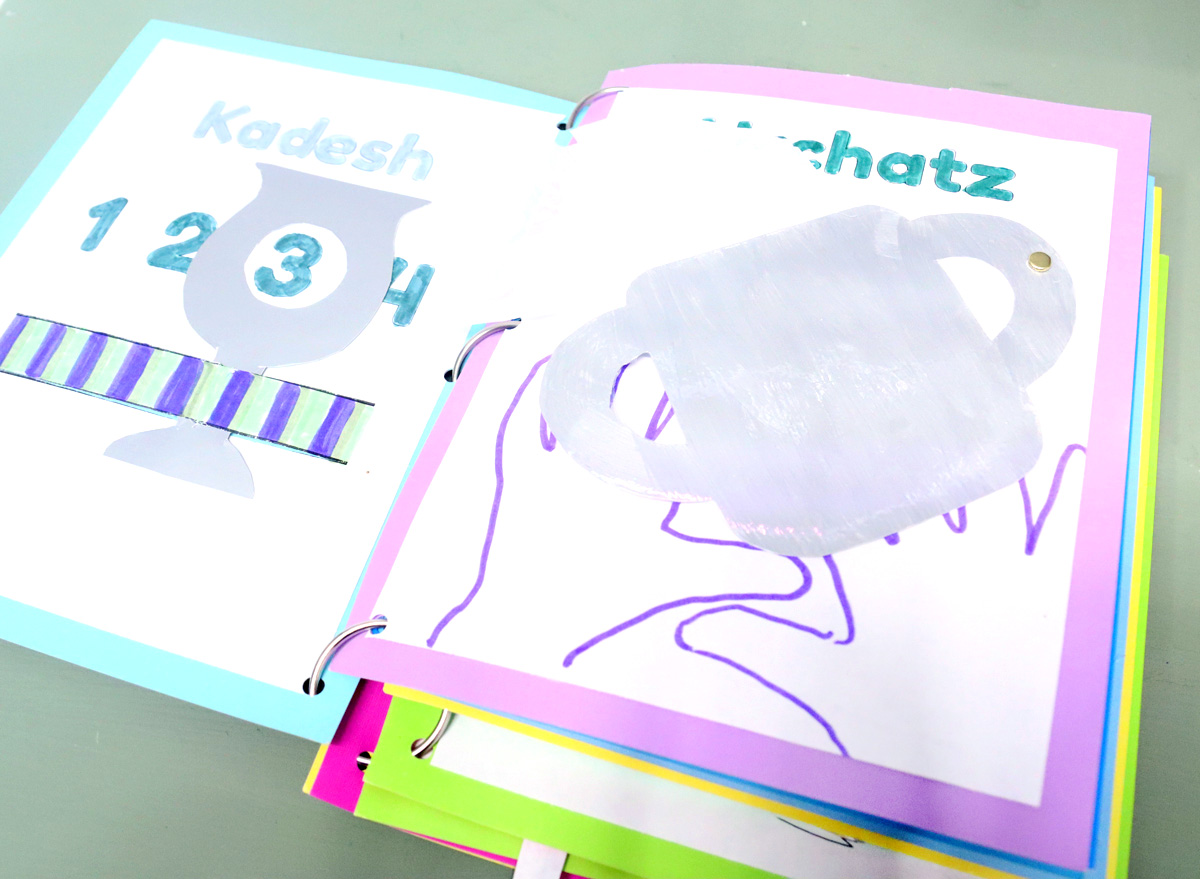
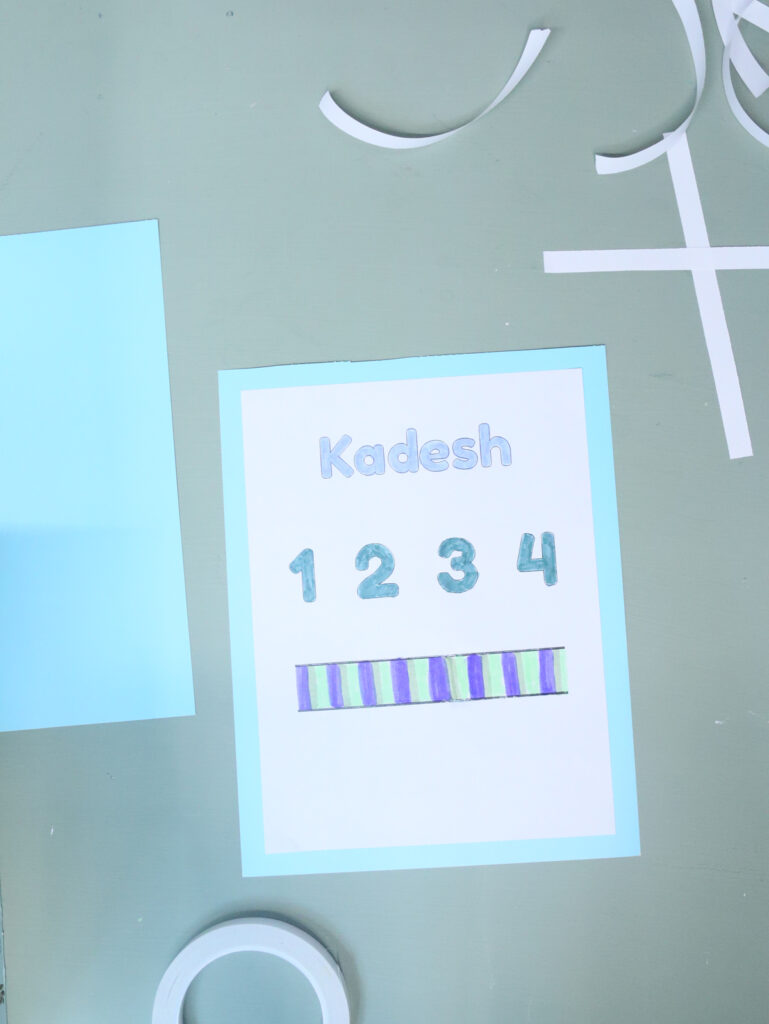
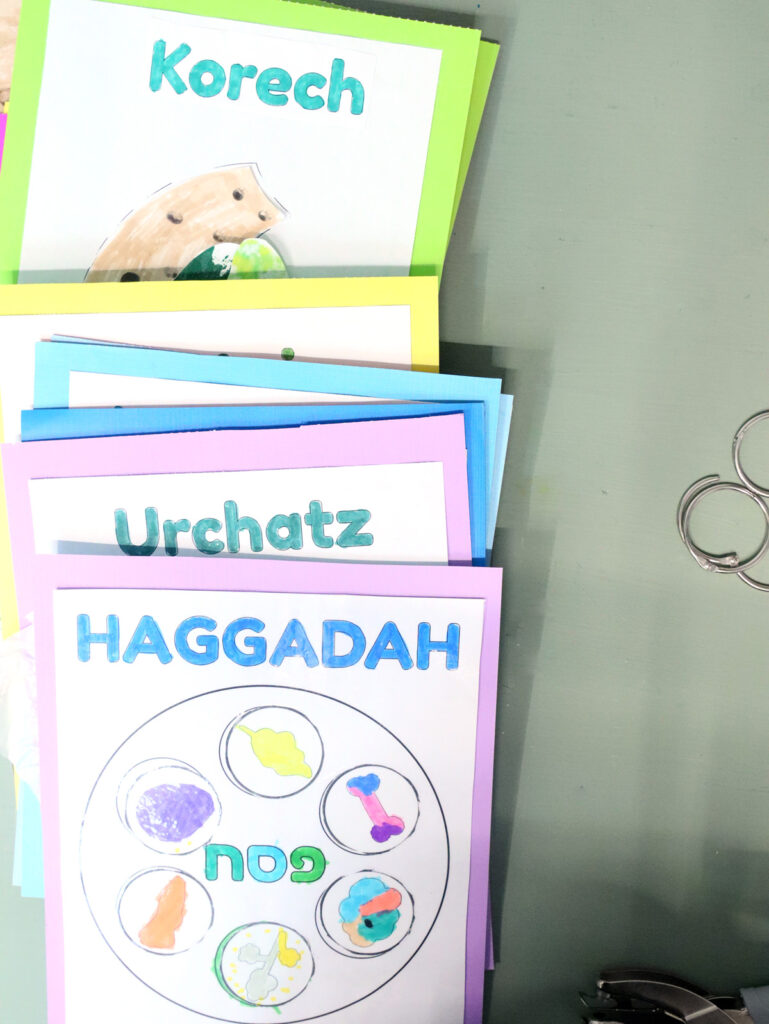
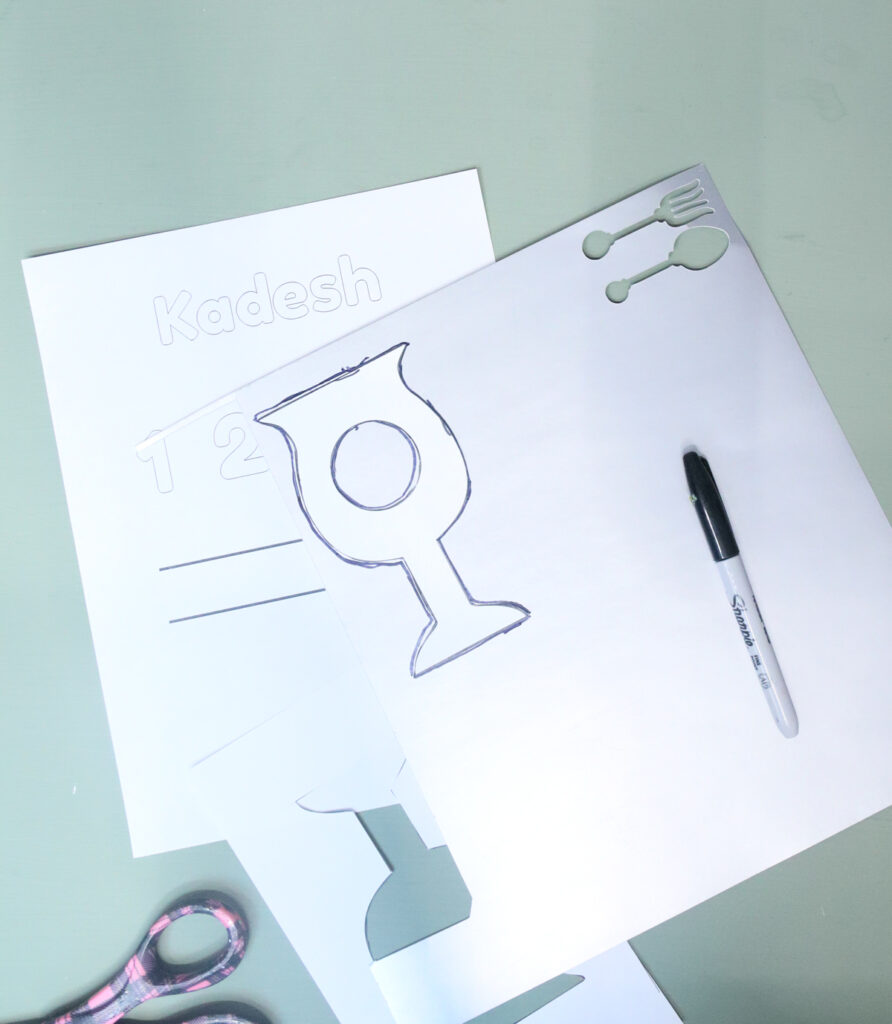
Kadesh-Urchatz
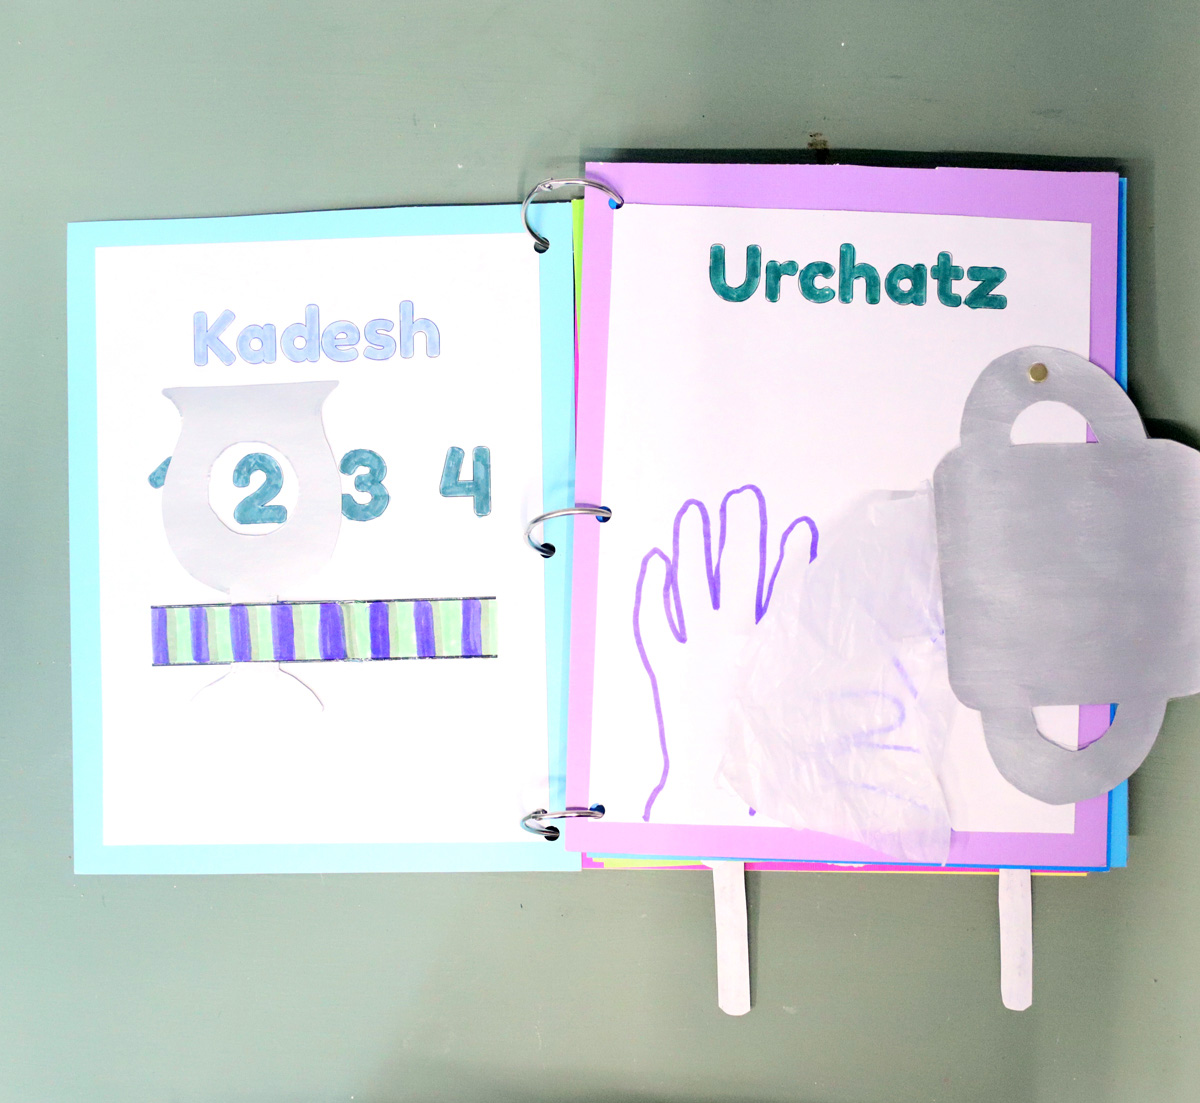
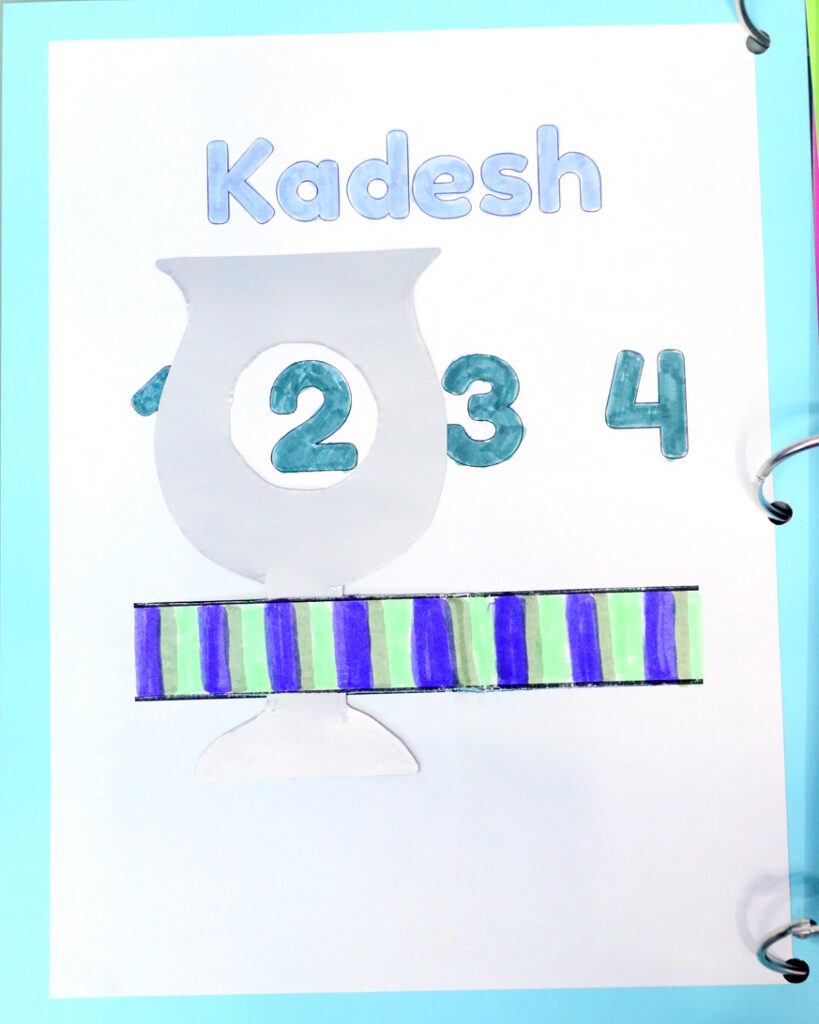
For Kadesh you have a Kiddush cup slider. Kids can then slide the kiddush cup to the cup they’re up to. A few of the pages have multiple purposes throughout the seder and this is one of them. I used metallic poster board for this, so it’s nice and rigid.
You can paint it silver instead or even have kids decorate the silver poster board to add intricate details to the Kiddush cup. You might want to fix the cup with Velcro coins at increments. I didn’t.
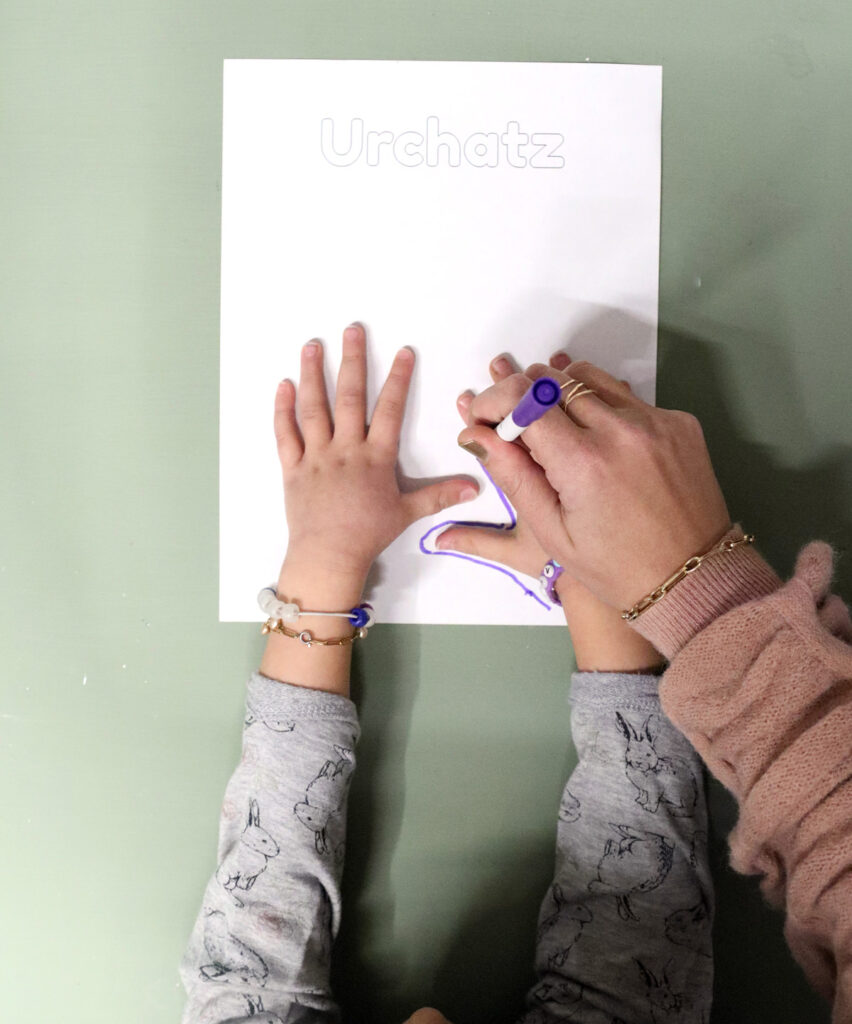
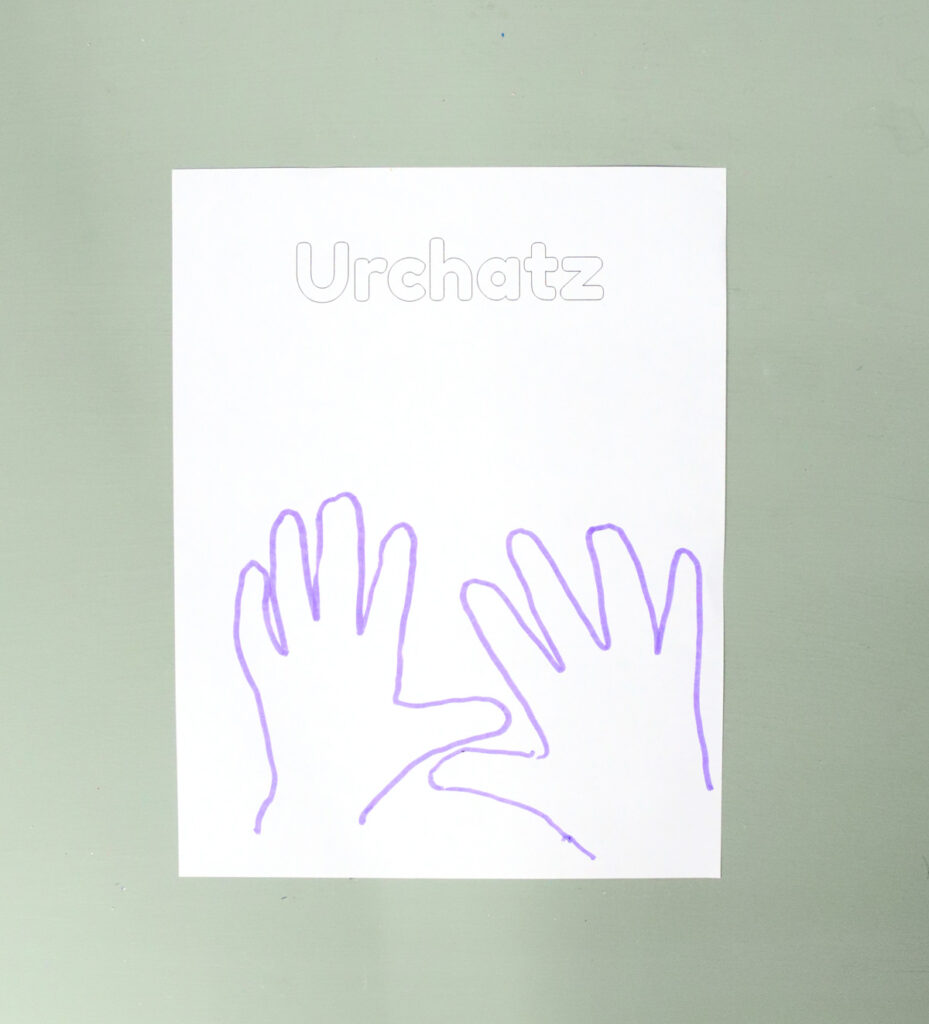
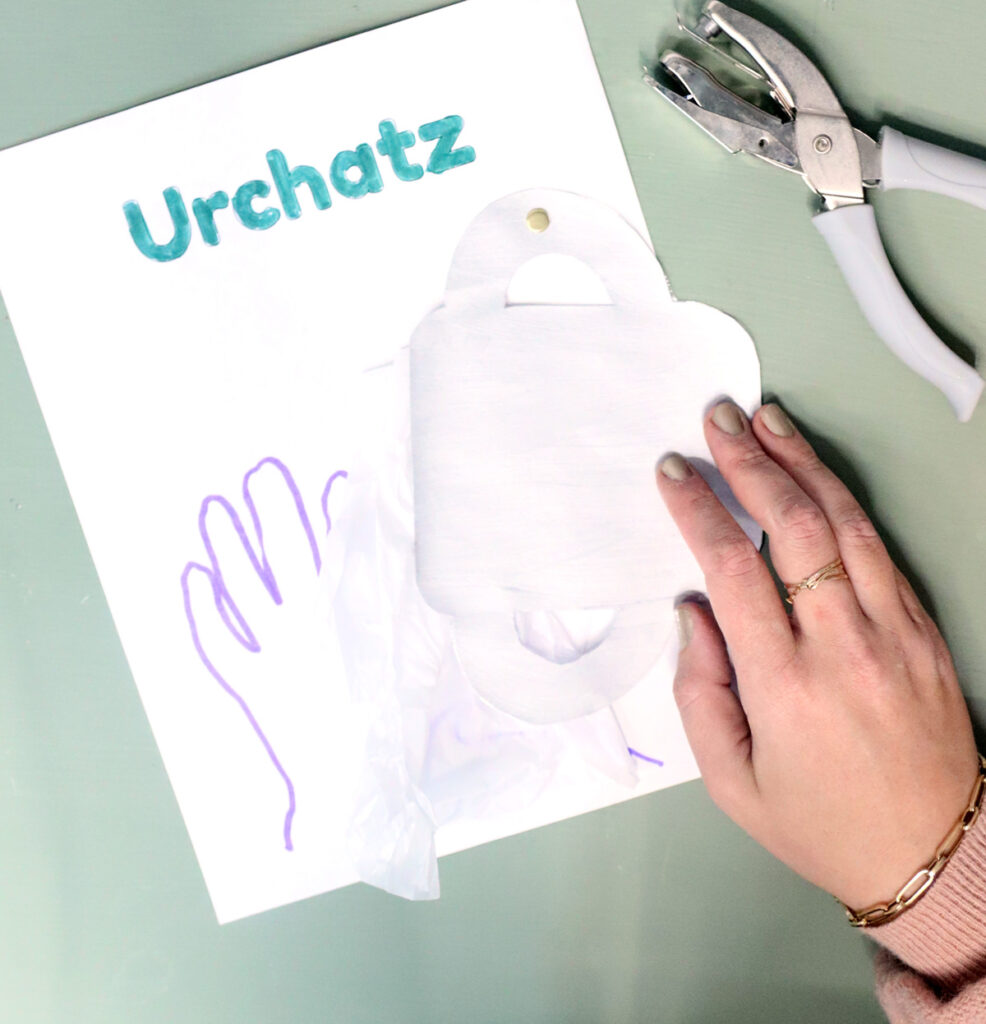
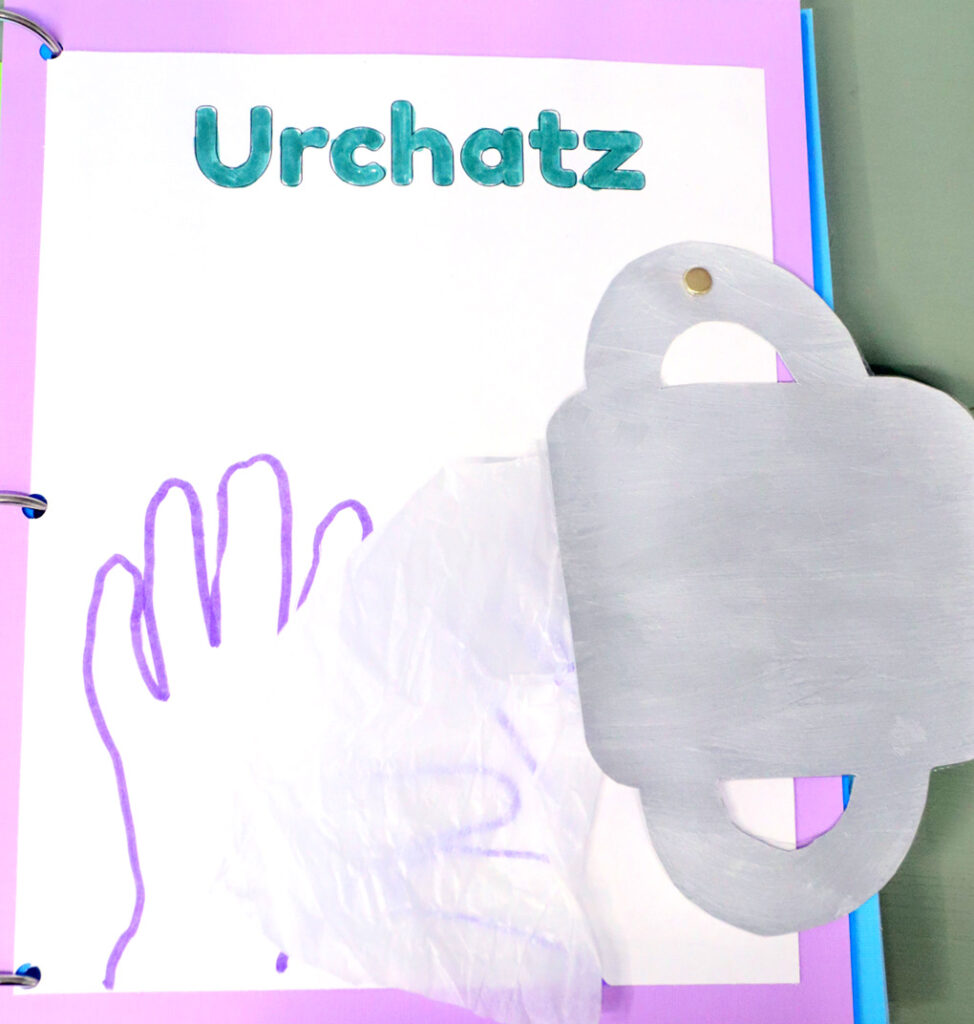
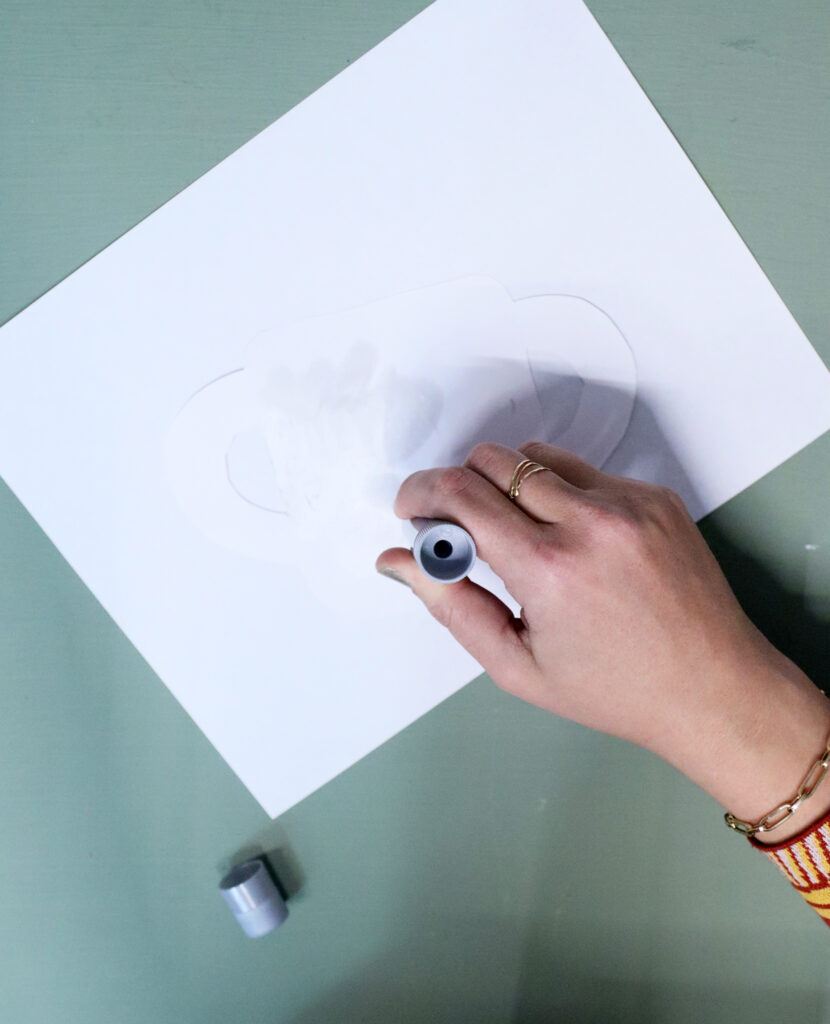
Urchatz is the same as Rachtzah which comes later. So you’ll want to switch them up a bit, making this the perfect spot for me to offer multiple ideas 🙂 Here, I painted the washing cup with silver craft paint, traced my 4 year old’s hands directly on the page, and added some (white tissue paper) water spilling from the cup. The cup itself is attached with a brad pin so kids can pour from it – but it’s fixed in place.
I’ll share more ideas for this by Rachtzah.
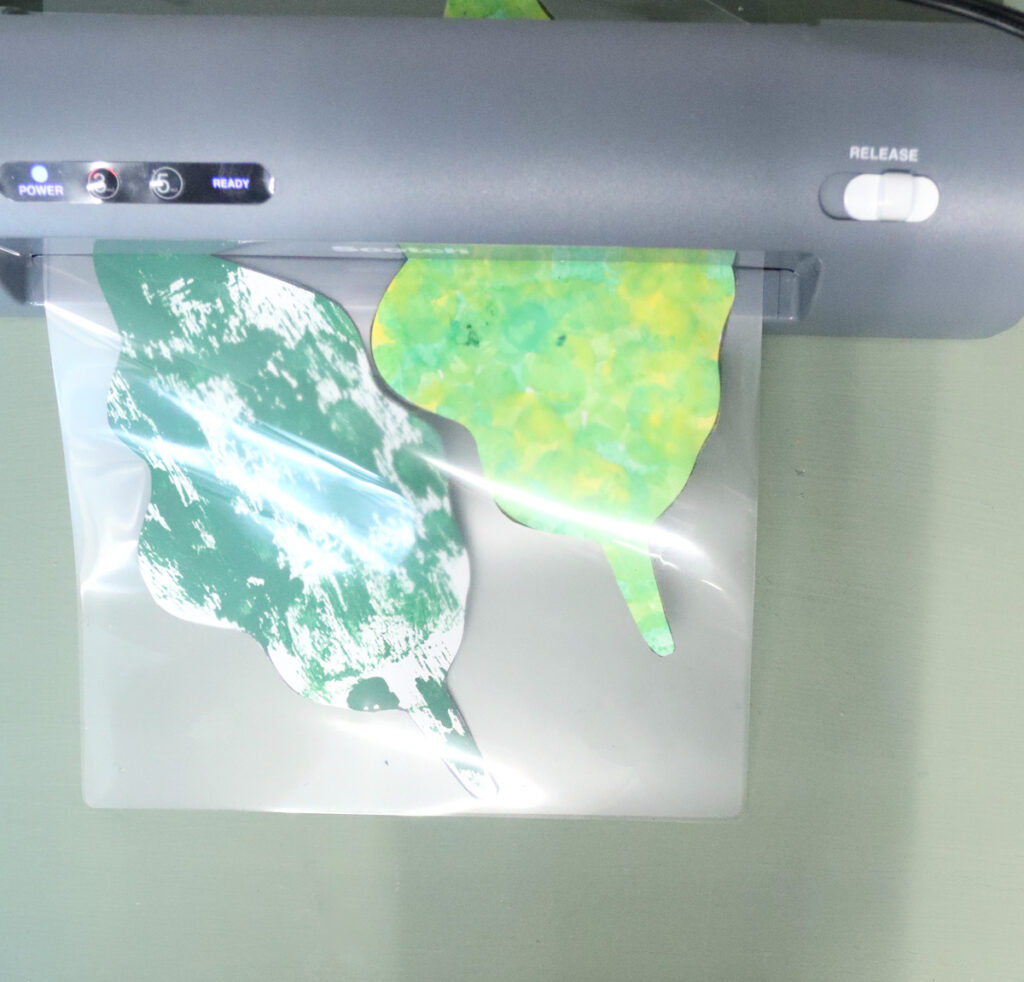
Karpas – Yachatz
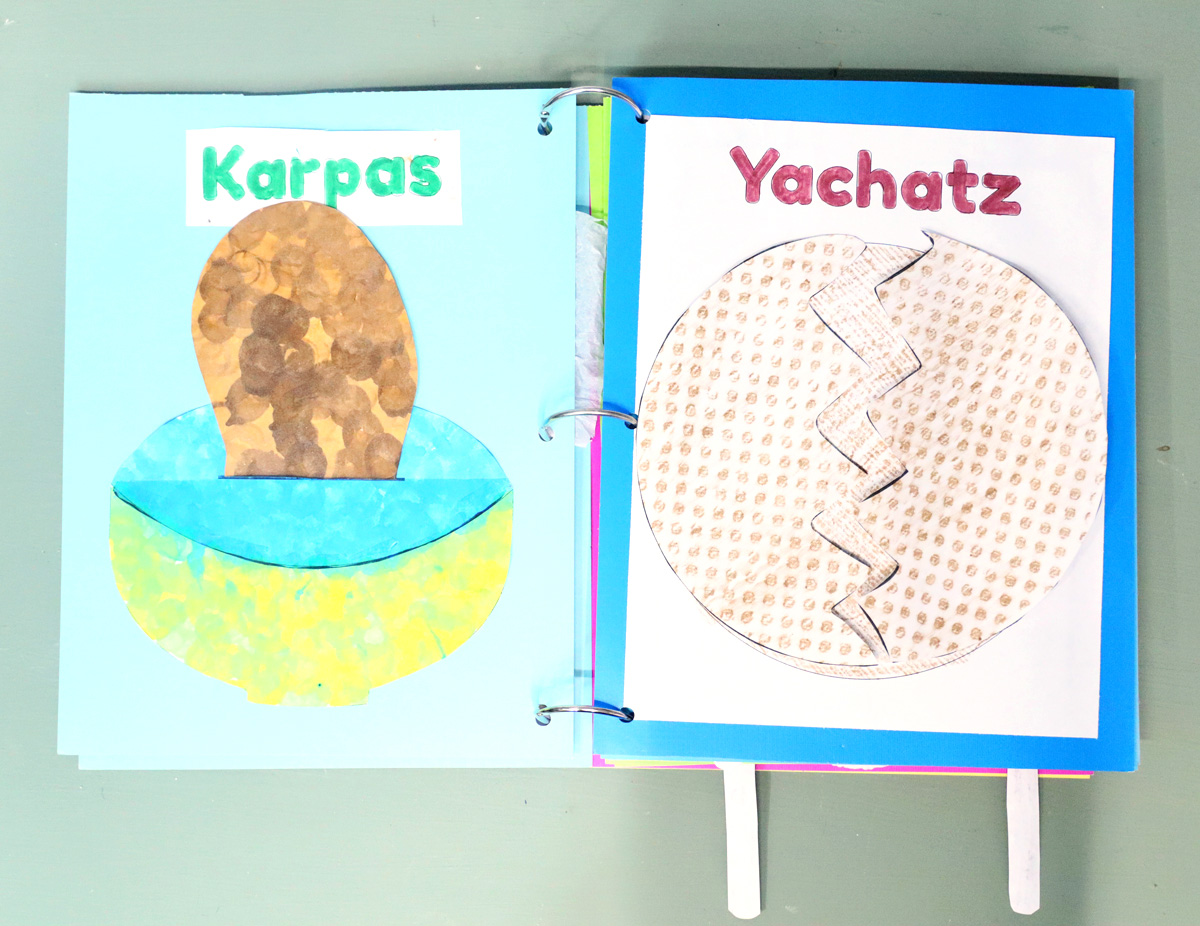
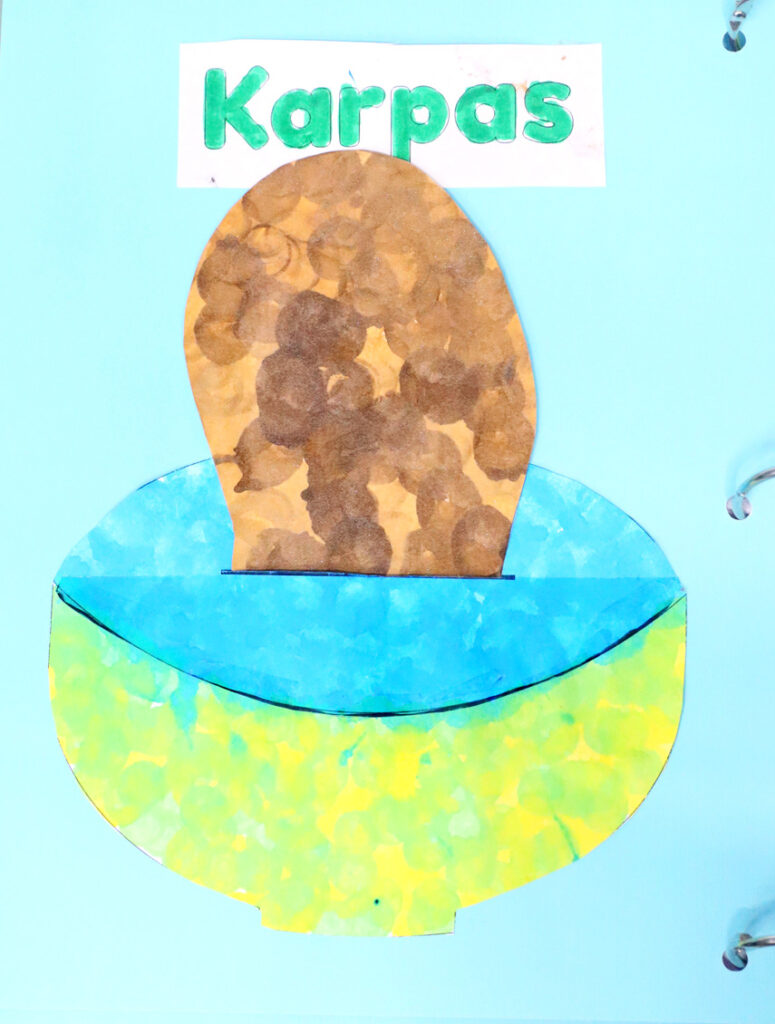
Karpas was chopped apart on my final page because I ruined the base. See? This Haggadah craft template is flexible! I pulled out the Do a Dots for this, using it for the bowl, potato, and salt water. Optional touches like a clear plastic divider can be used together with the elements I put in. Kids can “dip” the potato in the “salt water.”
You can also actually glue bits of salt in the water area if you’re brave. You can cut the potato from construction paper – it has the right rough texture. You can even use a plastic fork with a piece of paper “potato” (white chunk) glued on the end taped into place if you want it more realistic.
The potato is fixed in place with a Velcro coin so that it won’t fall out.
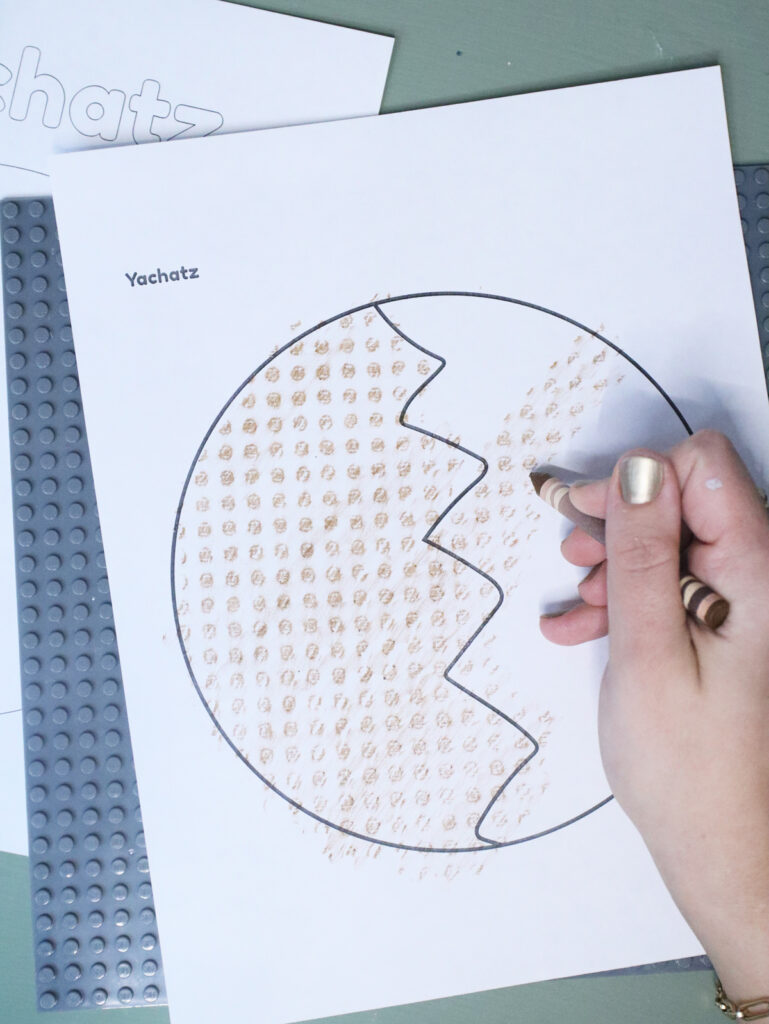
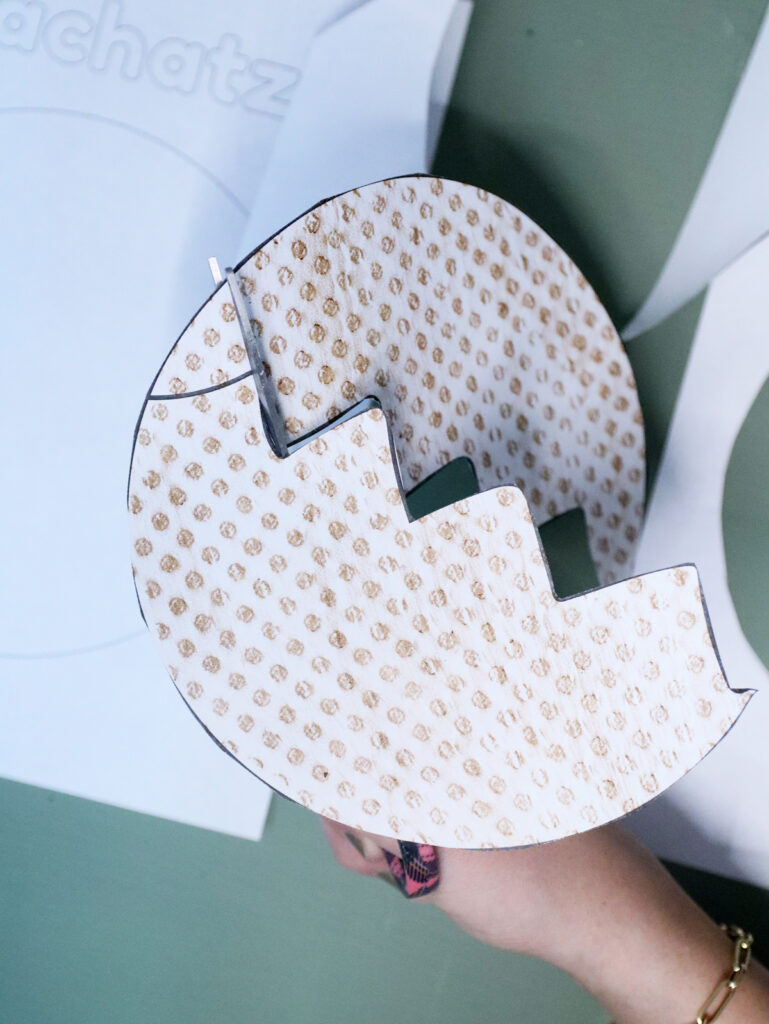
Yachatz is our first “matzah” page and there are so many ways to do this! I used a LEGO baseplate to create the texture rubbing on this one – place the paper on the base plate and color with a brown crayon.
This page works as a “puzzle” with two halves of a matzah that can be matched to fit in the base. Half the matzah can later be hidden by tzafun. Kids can, of course, also imitate the breaking of the matzah and pretend to “break” their own.
Throughout, I will share more ideas for Matzah print and they are all interchangeable.
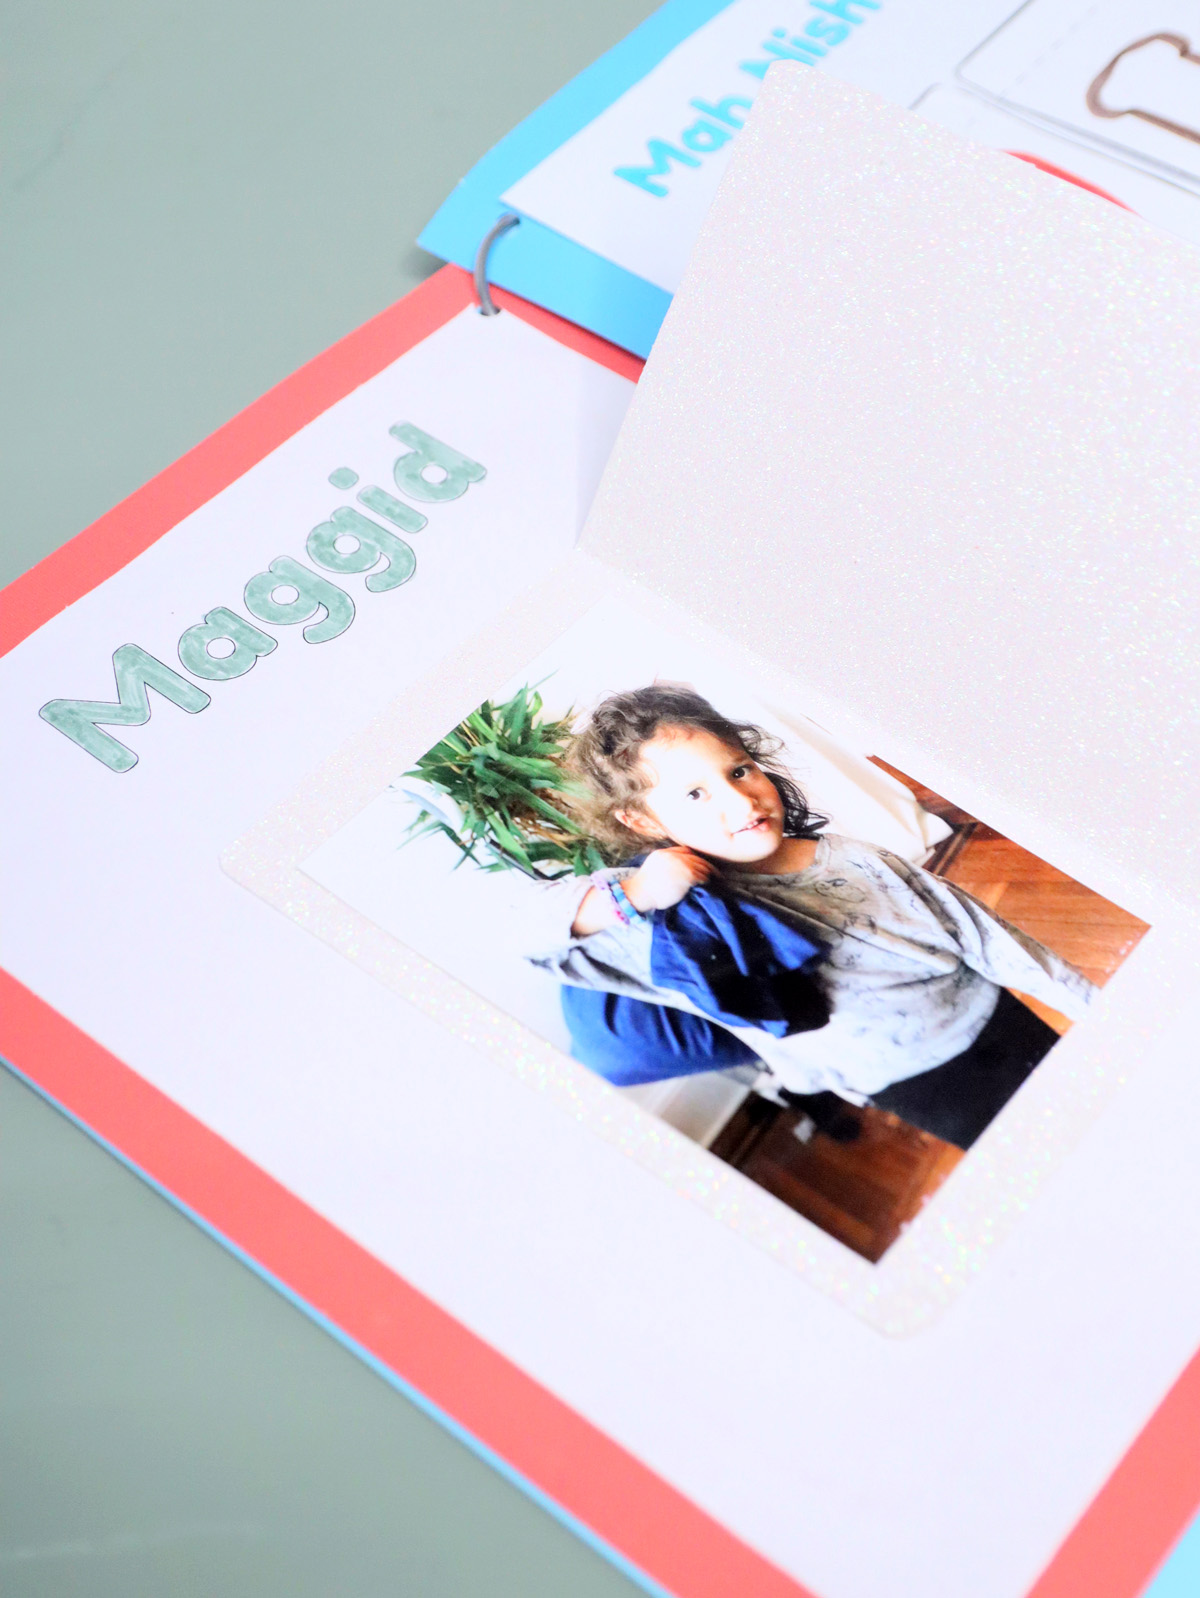
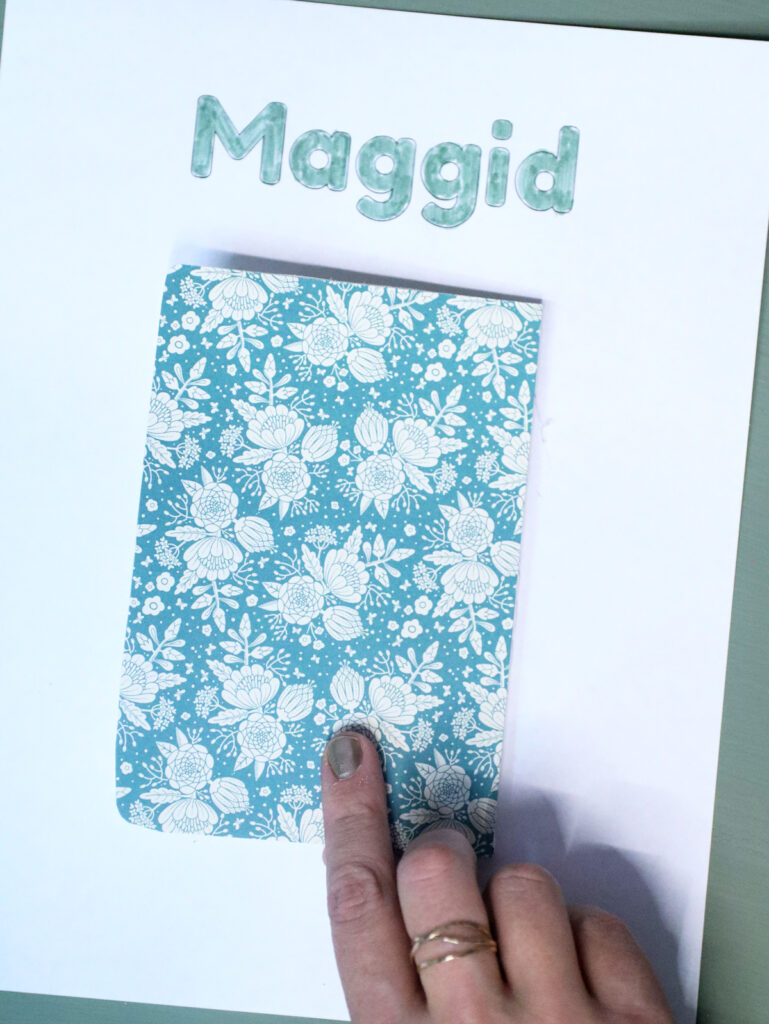
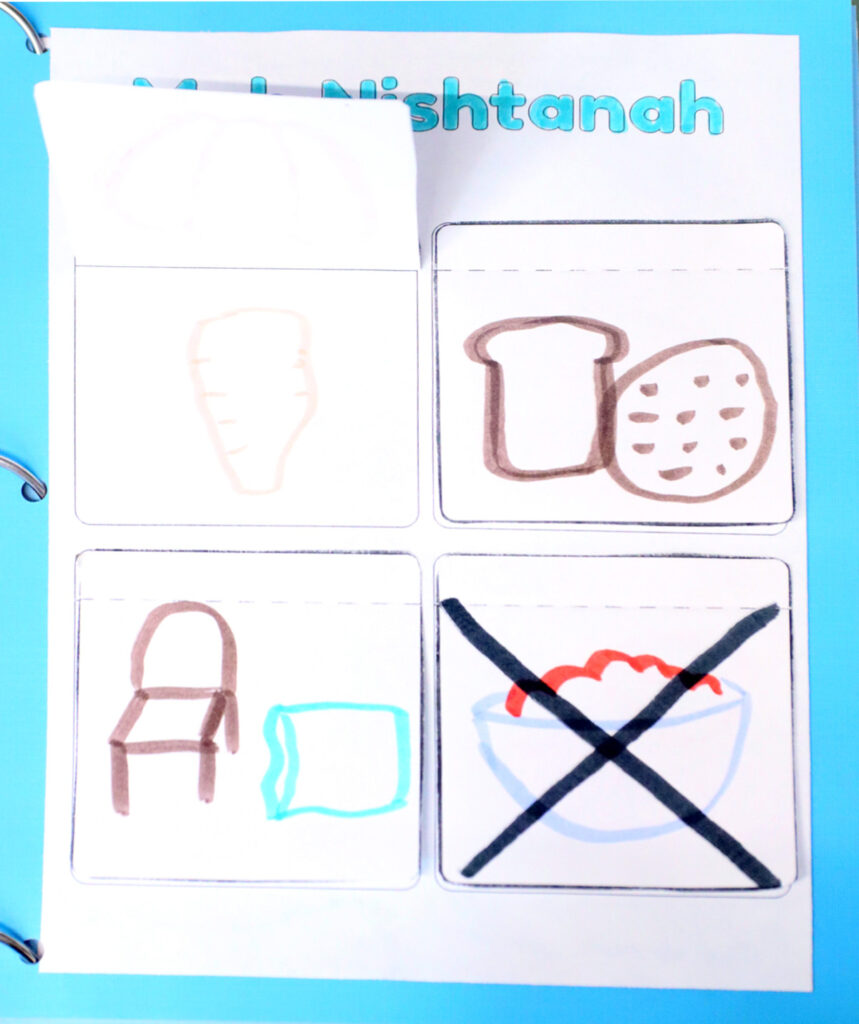
Maggid – Mah Nishtanah
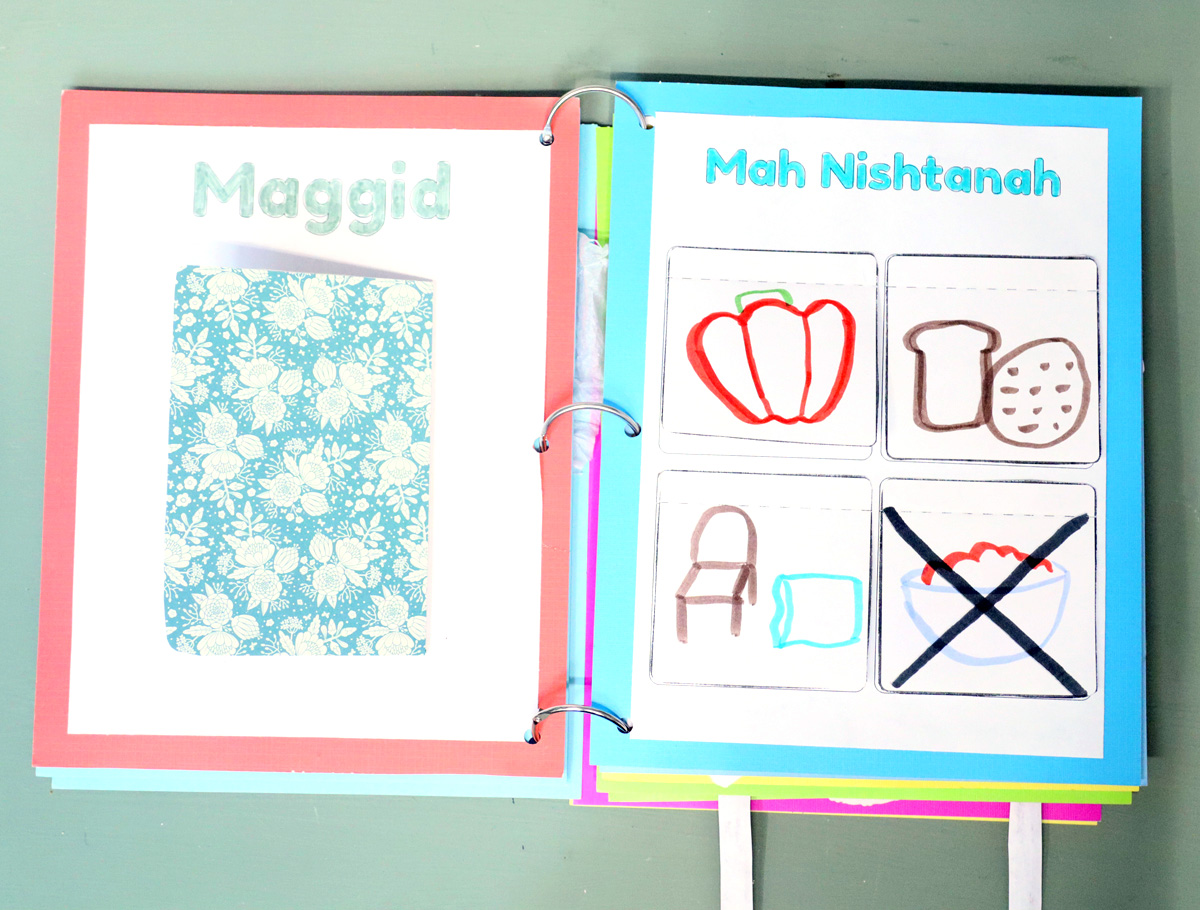
Maggid is long, with may different parts. I wanted even young kids to be able to follow along with some parts of it. However, I obviously can’t include everything so I chose three parts to include.
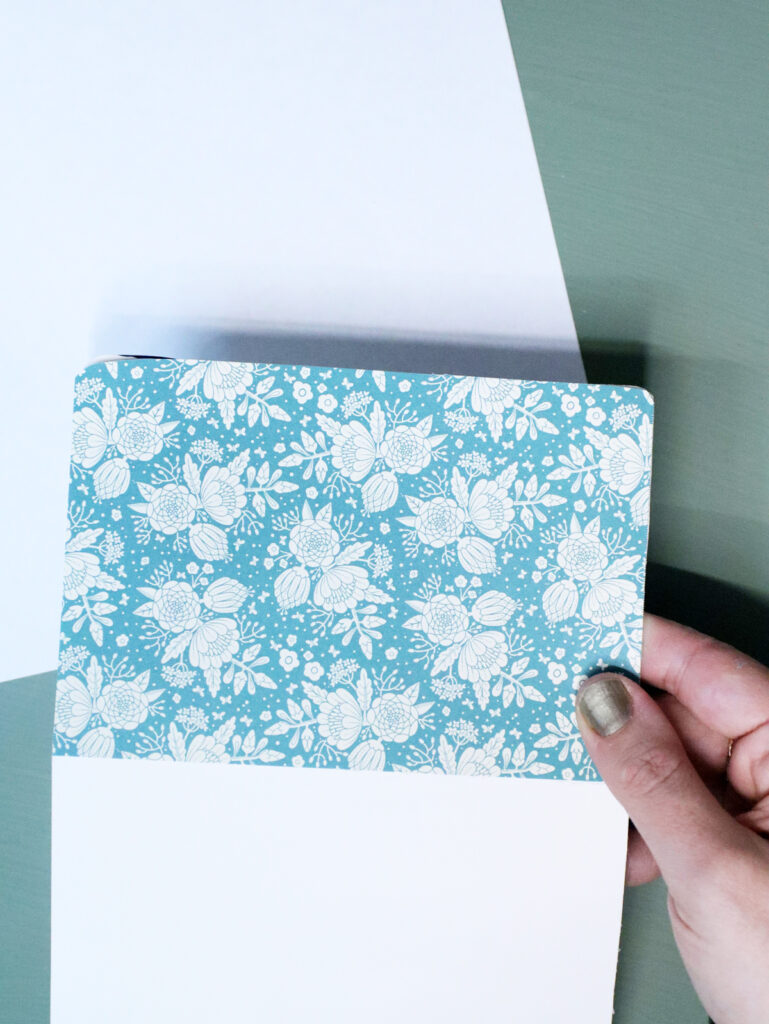
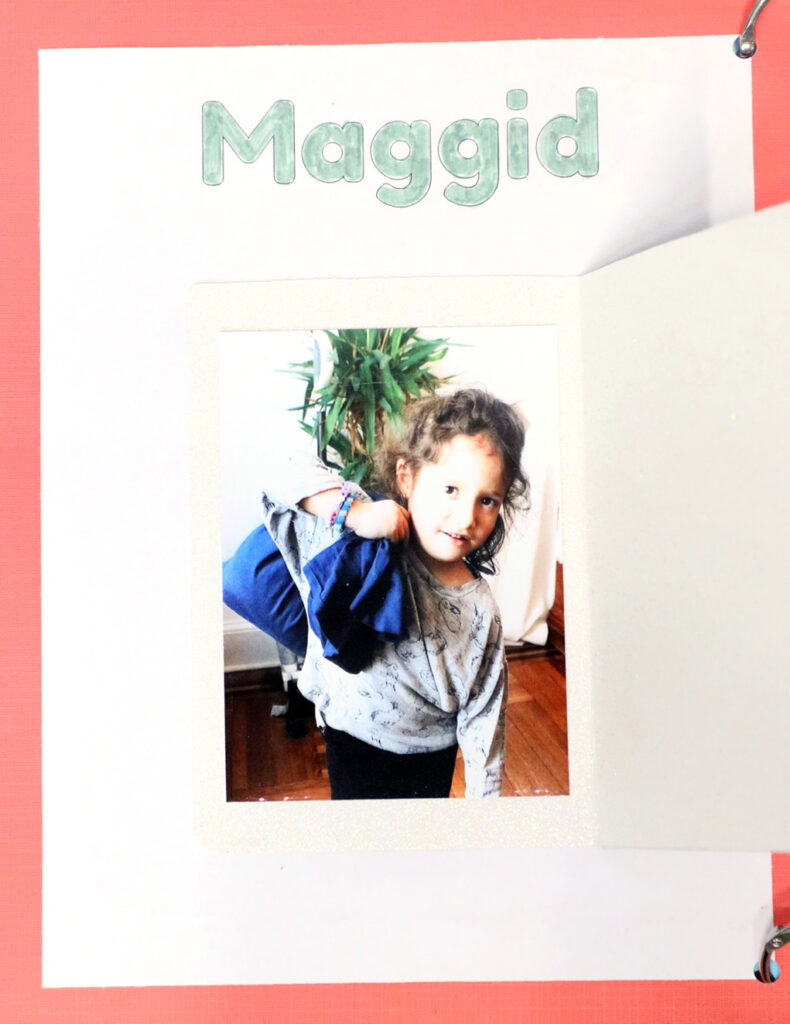
For the main Maggid page, you have a “Haggadah” (just a folded card) that kids can open and close. I used glitter cardstock for the inside, and patterned scrapbook paper for the outside.
Inside, I placed a photo of my daughter. I recommend staging this as you see fit to commemorate the exodus. My daughter is holding a pillow case as if it’s a sack. You can also have kids just draw a picture of the Haggadah inside. You can glue it on so that it opens left to right or right to left (I did it right to left).
You can add a ribbon “bookmark” inside the Haggadah too.
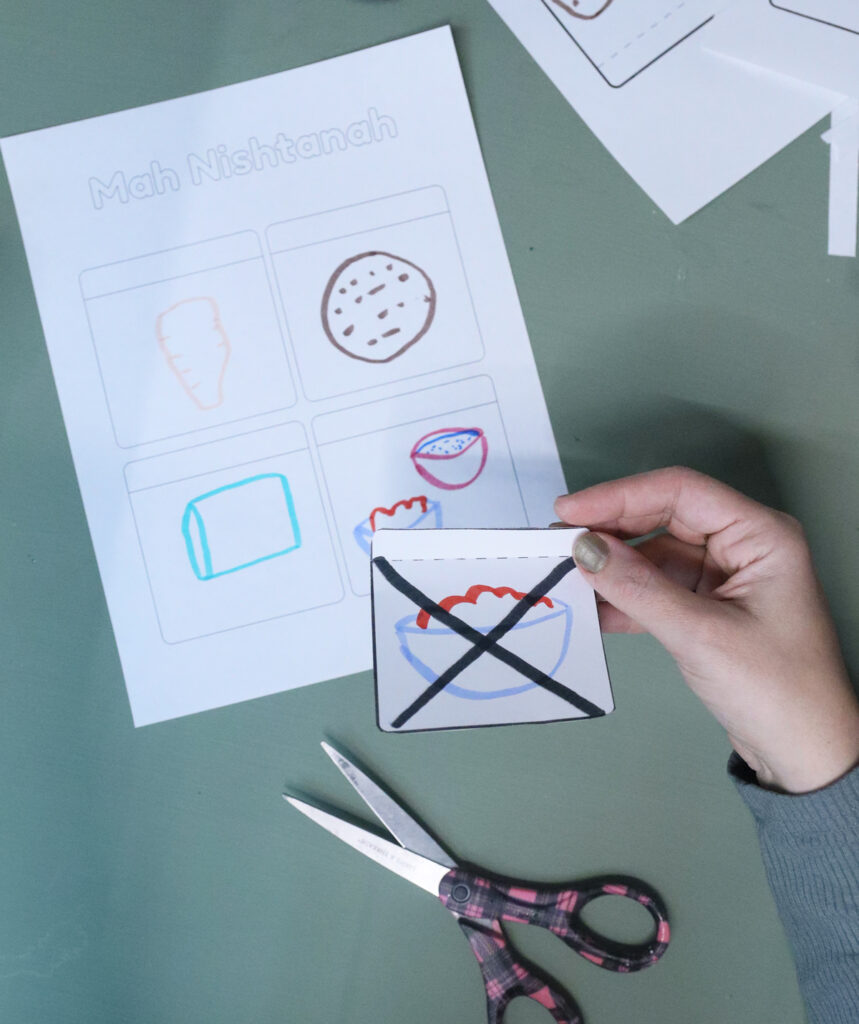
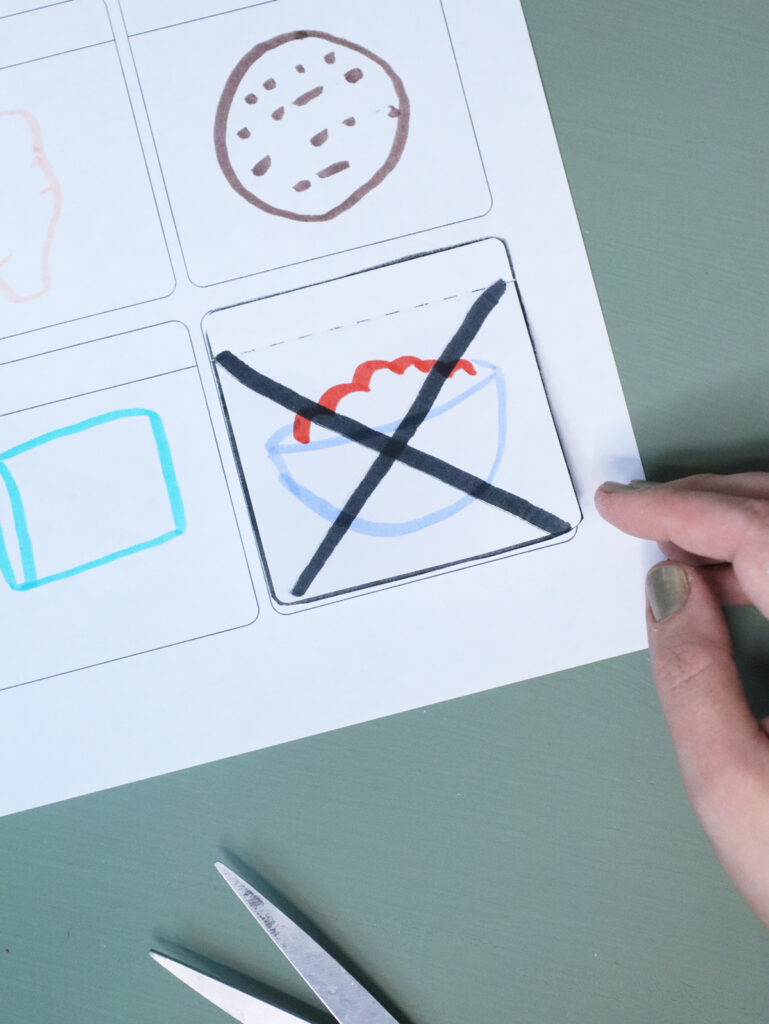
Mah Nishtanah is a “lift the flap”. Yes, it’s blank. I wasn’t sure how to do it and realized that different classrooms need to do it on different levels. If you’re a teacher of readers, actually teaching the Mah Nishtanah, you’ll want to put the text there.
This is the first of the crafts where I was debating illustrating it and even did some of it, and then reminded myself that this is not a coloring craft! Kids need to be creative. For this page, I personally did very simple drawings in the slots. You can reference my drawings to show young kids.
The top flap should have “on all other nights” and the bottom should have the “but tonight” graphic.
If you don’t want to do drawing or text, you can do mini crafts (as I described for the cover, and as I’ll show you for ten plagues.)
You can also instead do something like these flashcards instead and ditch the page entirely (make a “pocket” for them or tape them on like a book).
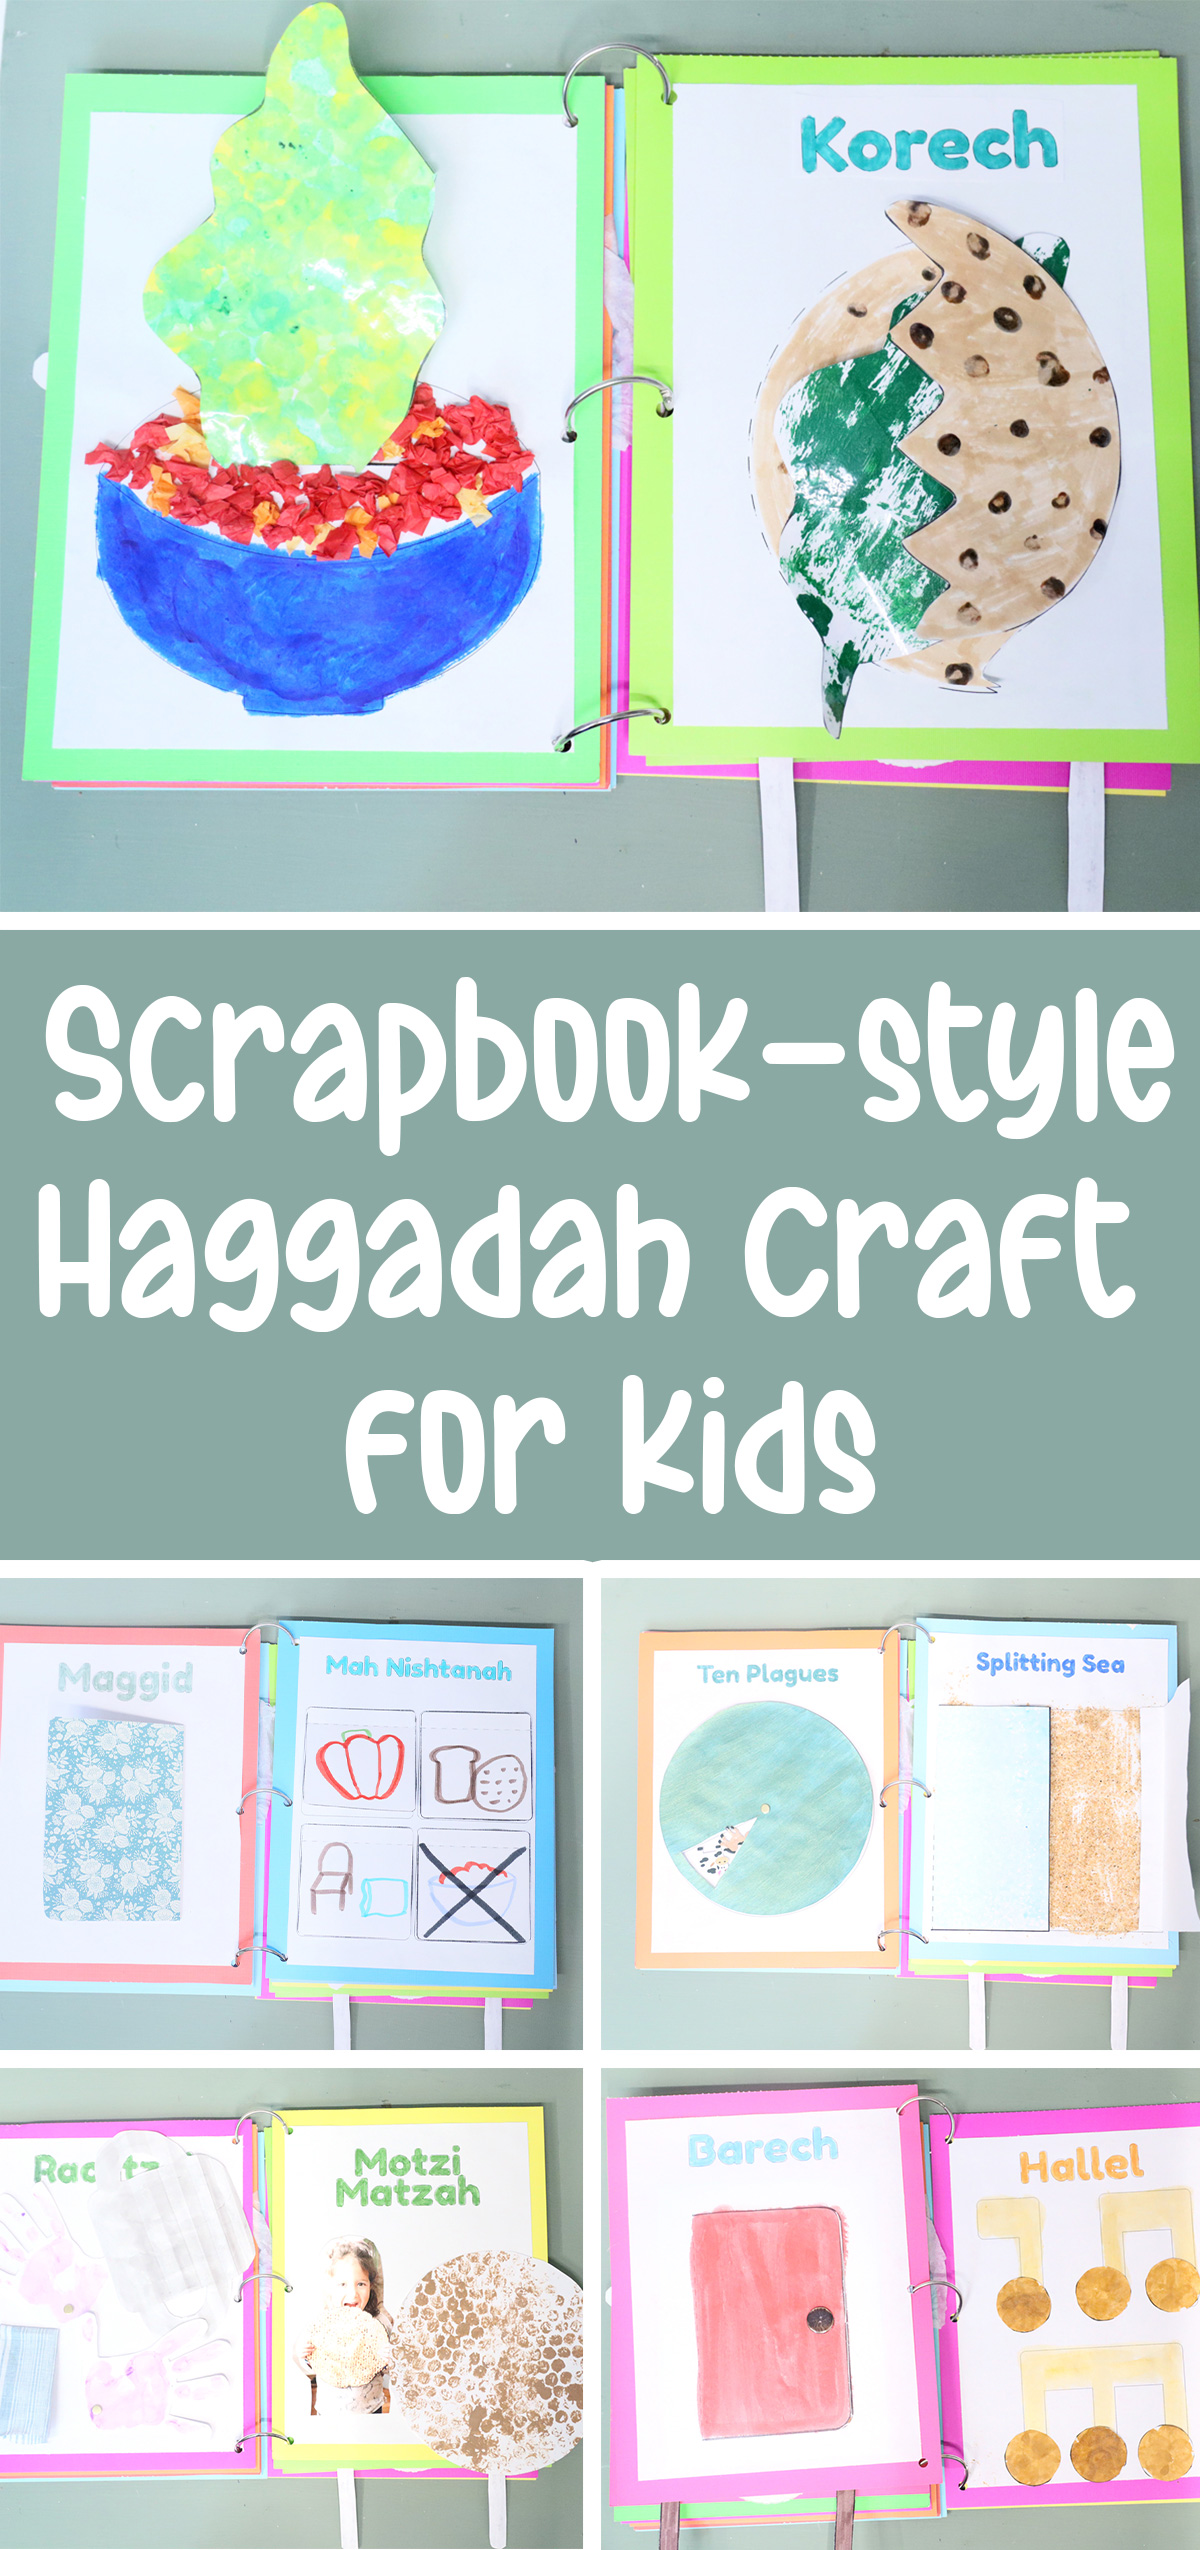
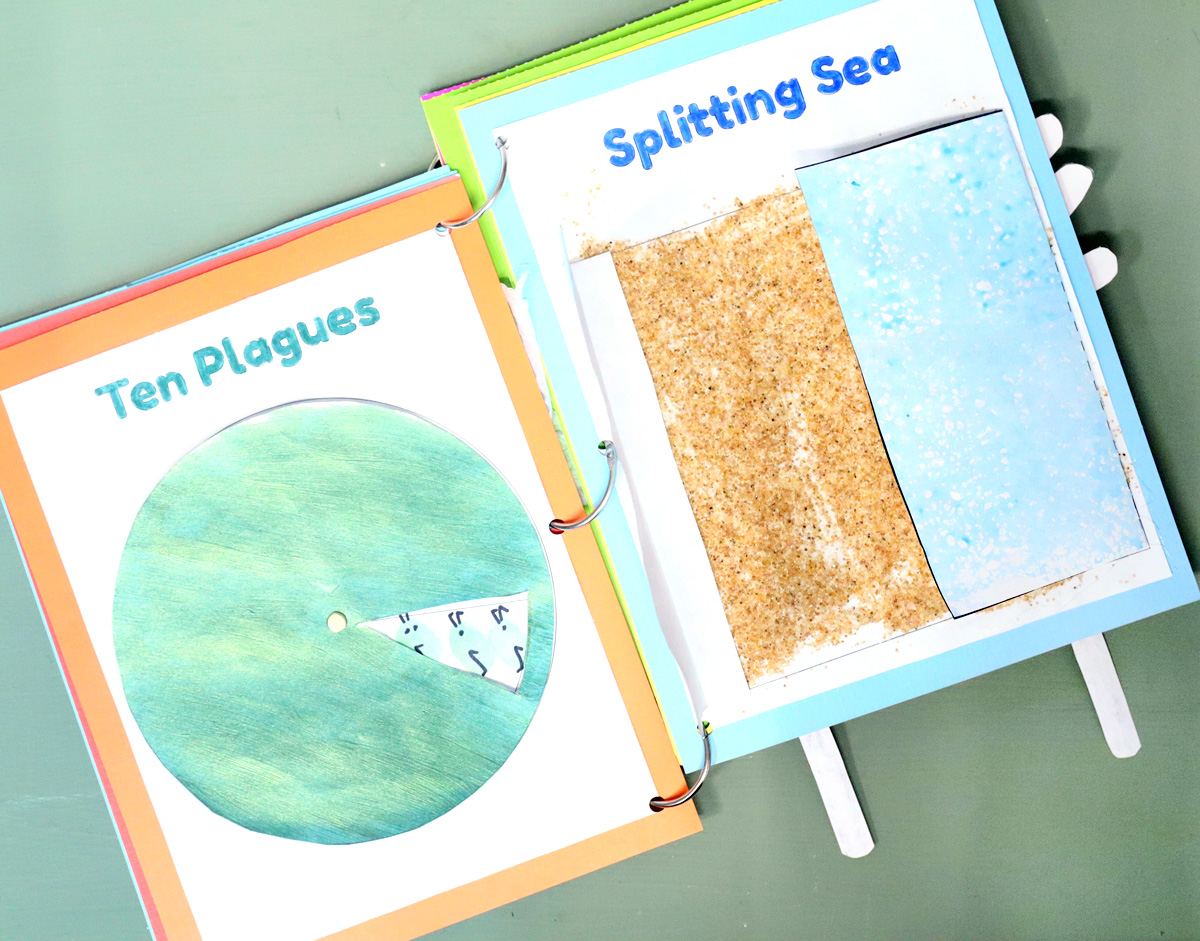
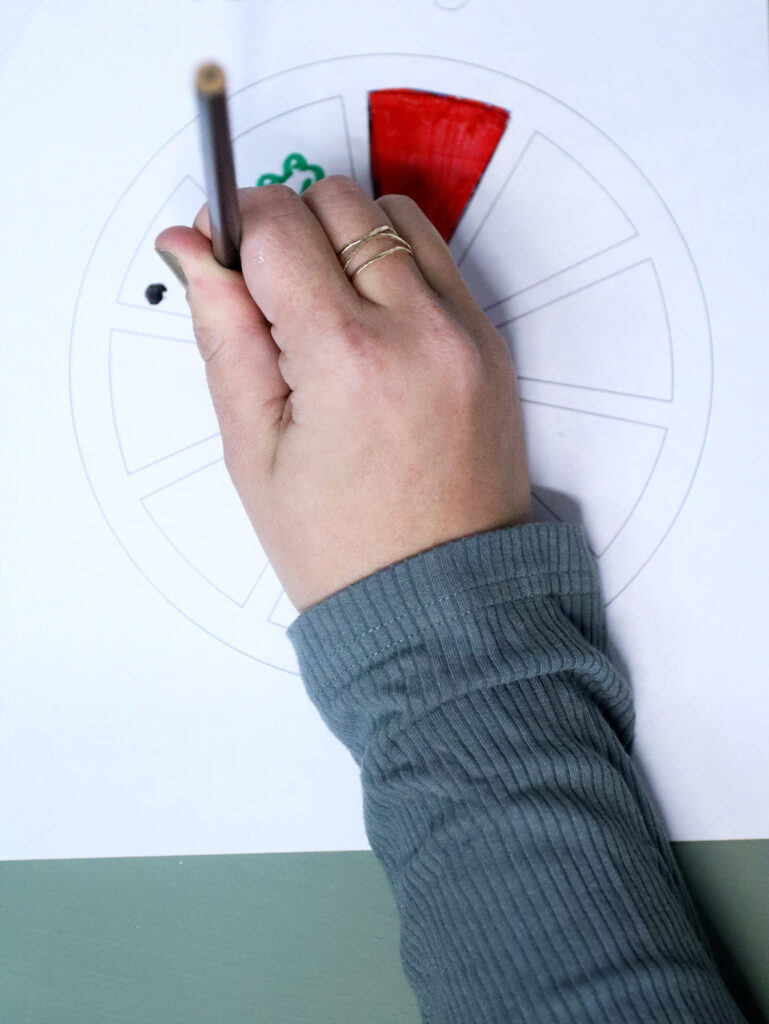
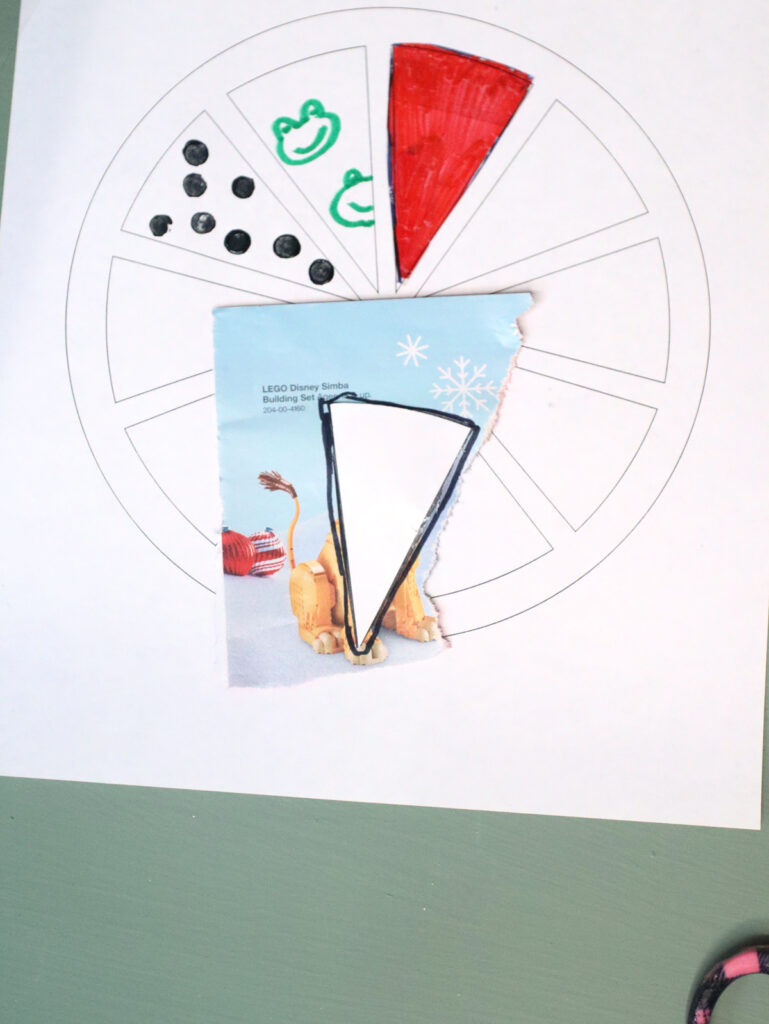
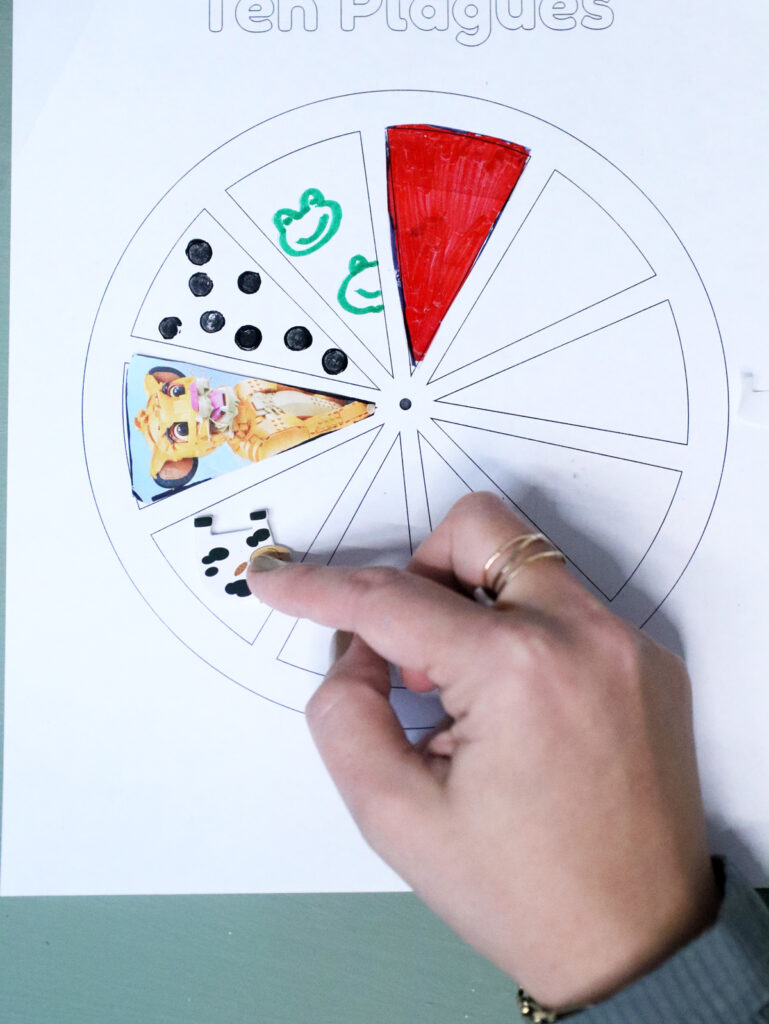
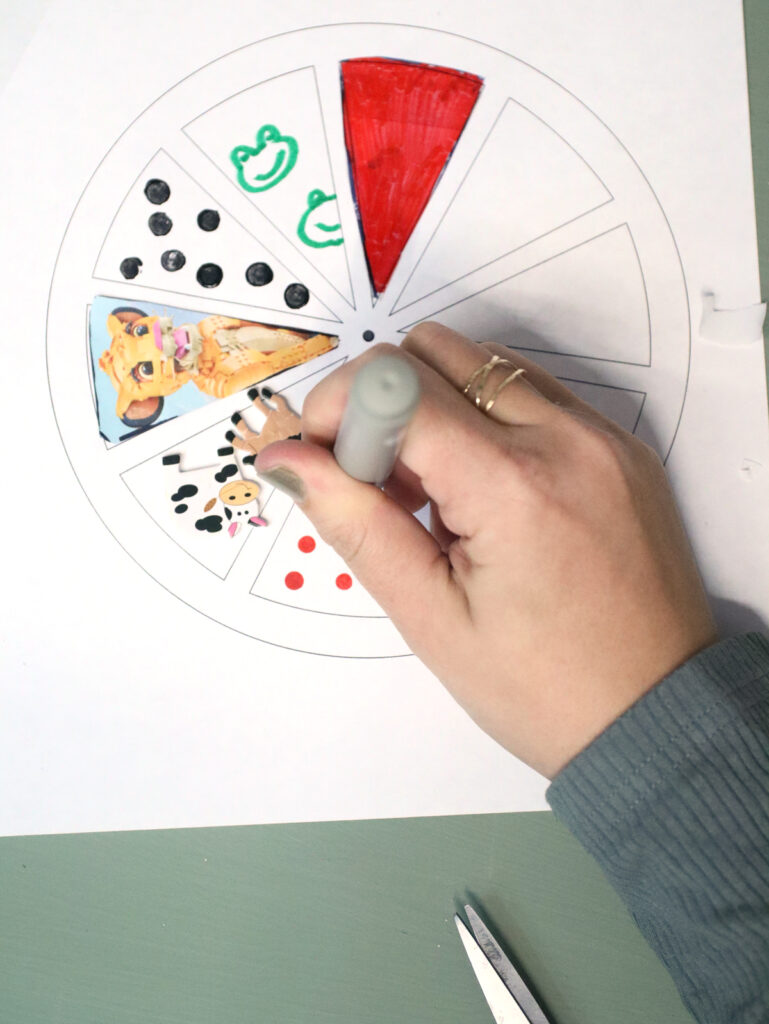
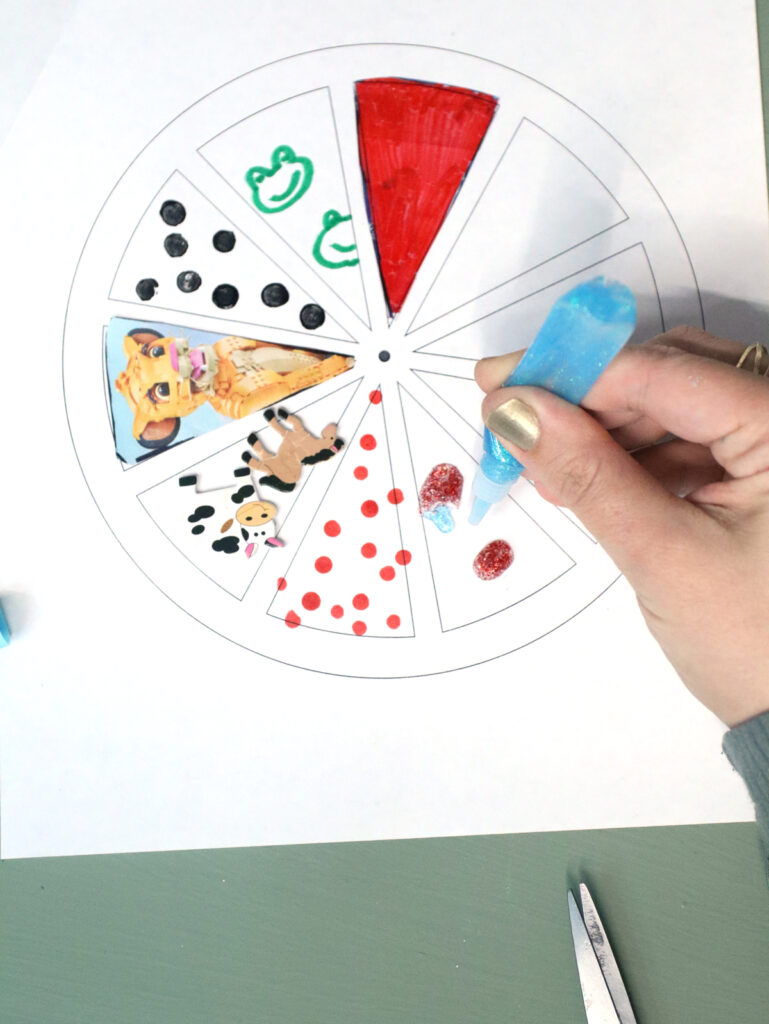
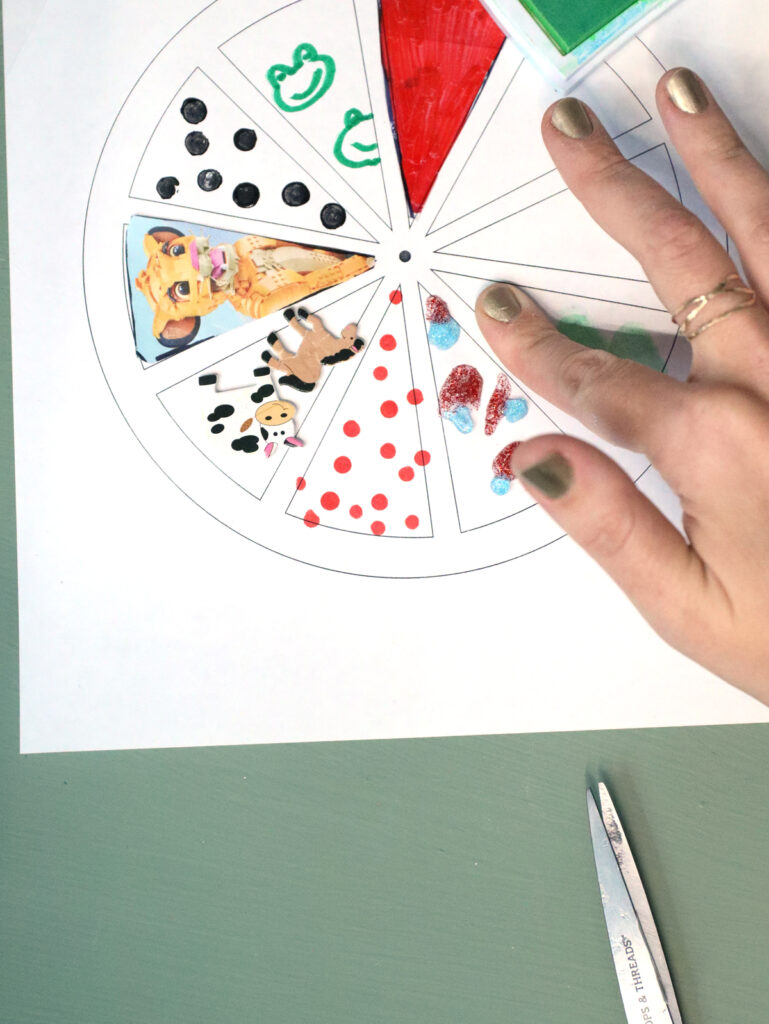
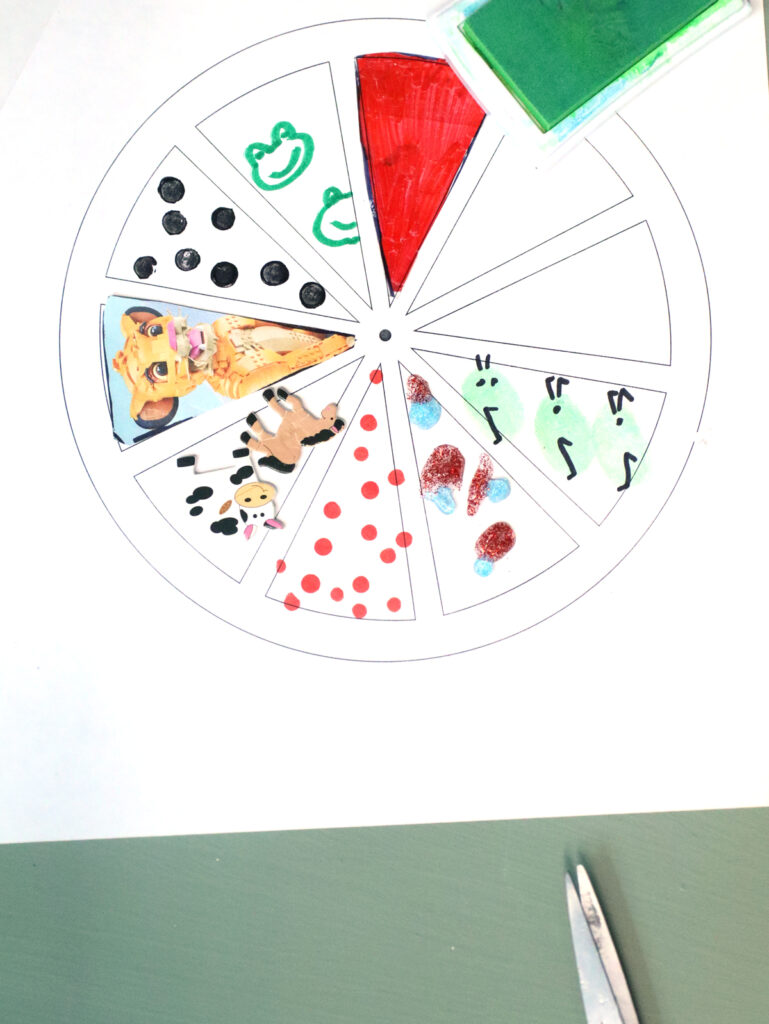
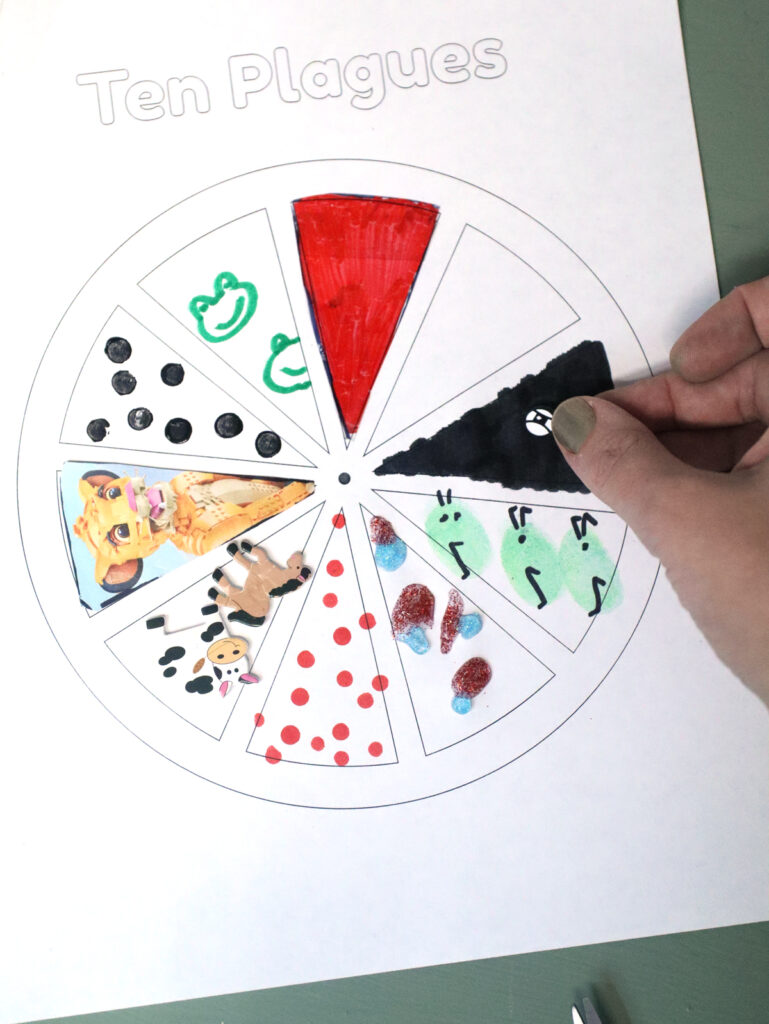
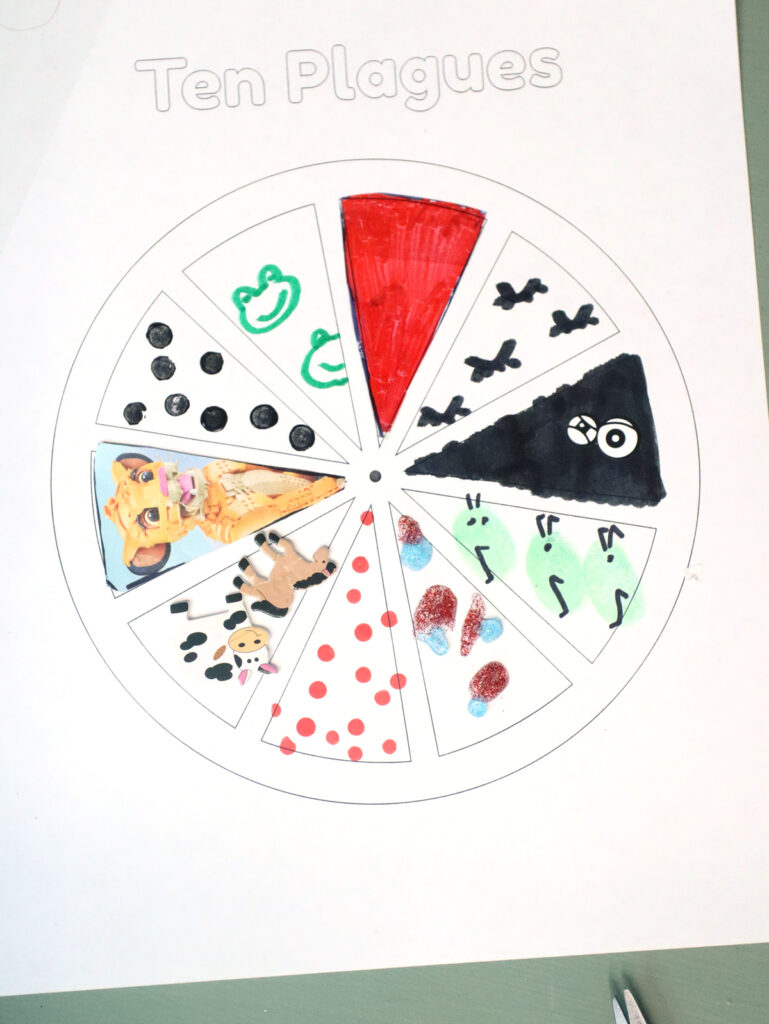
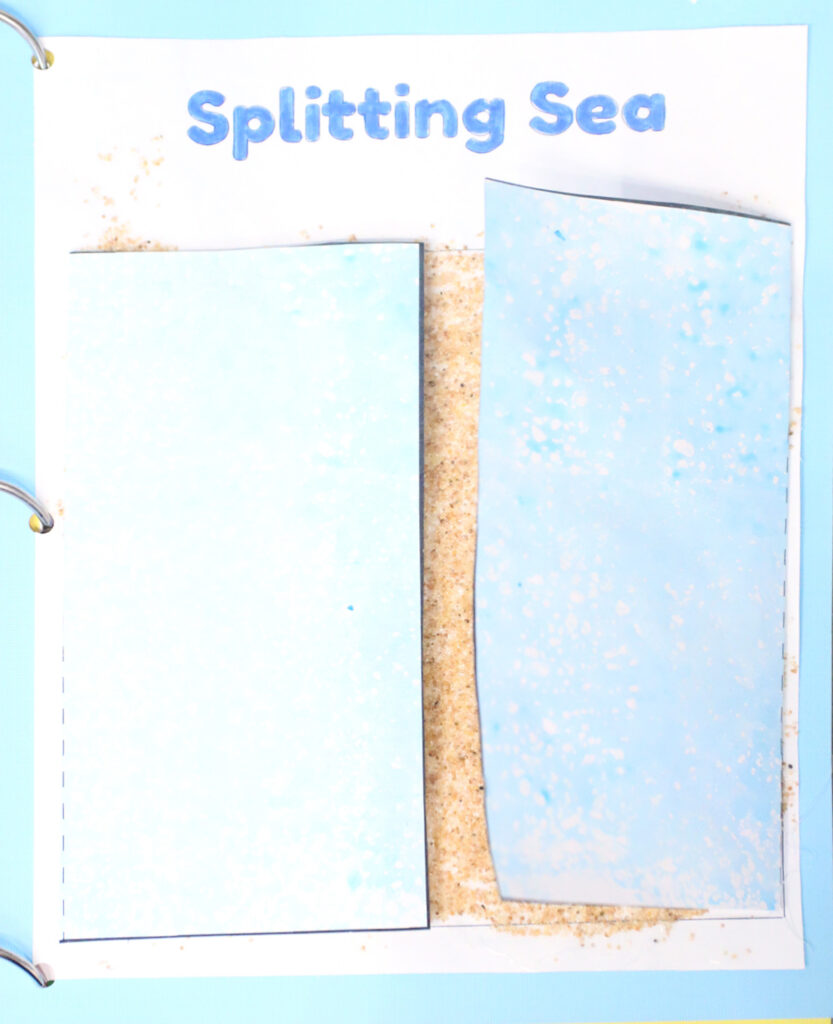
Ten Plagues – Splitting Sea
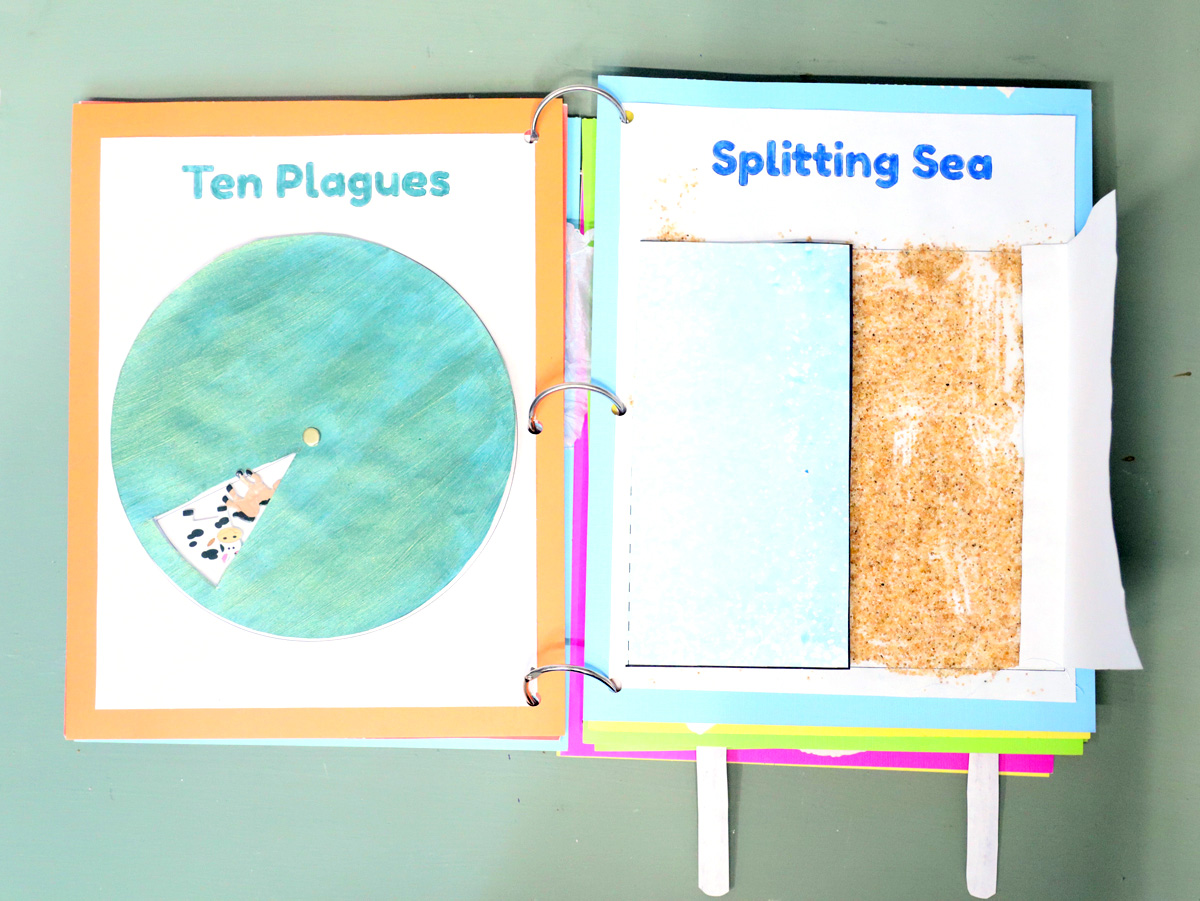
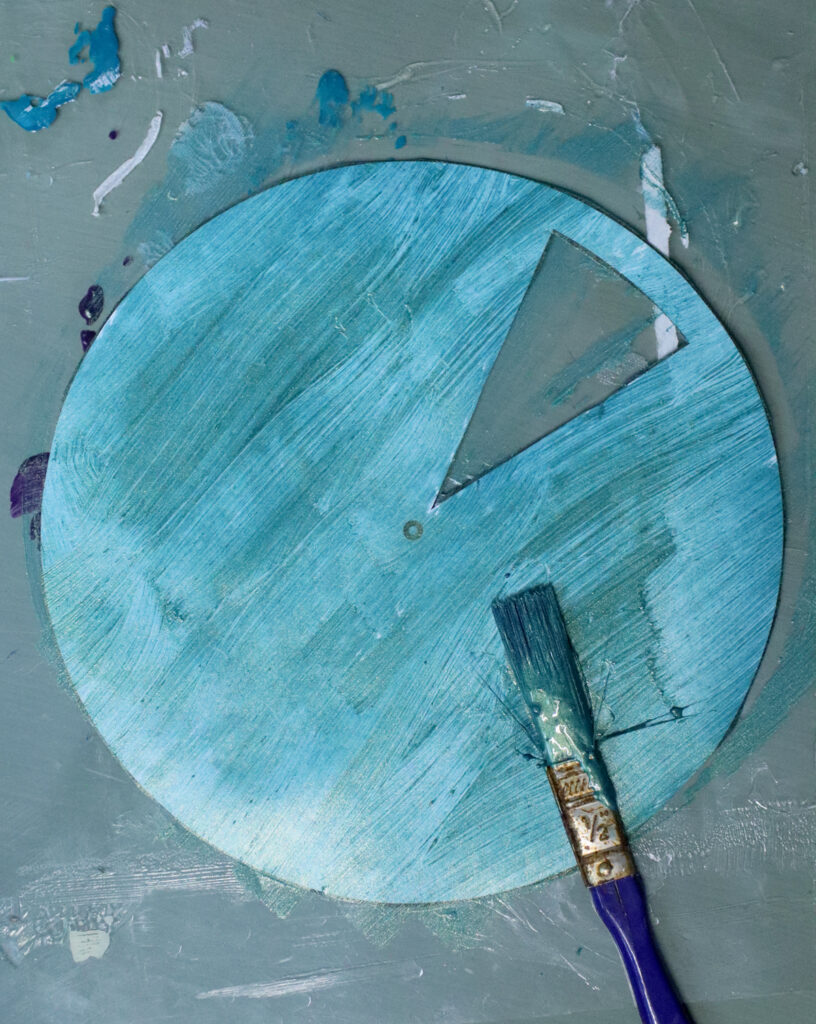
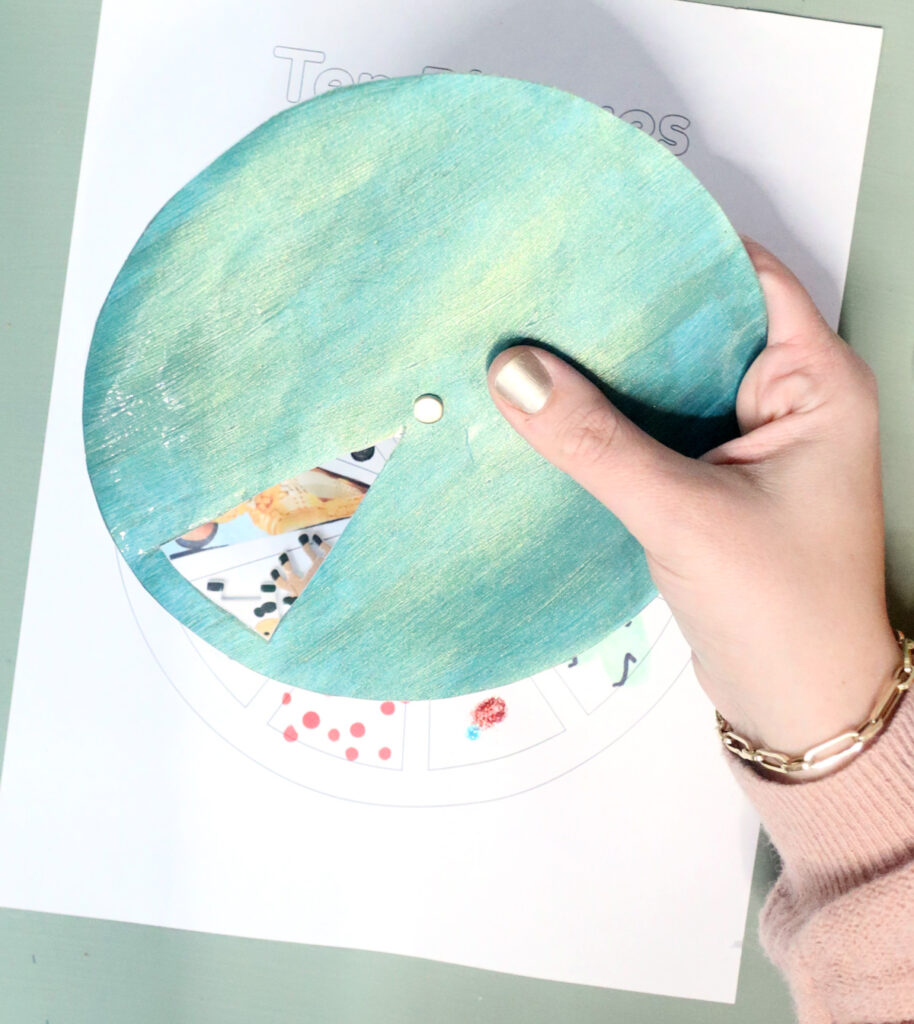
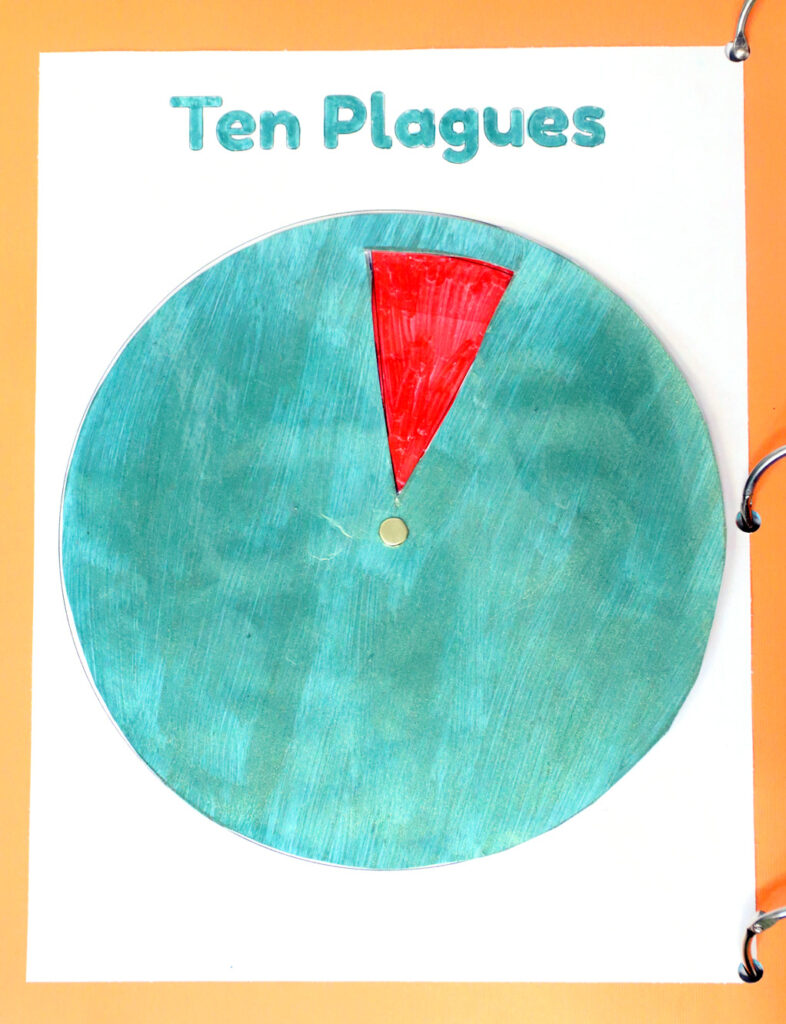
For ten plagues, I made a dial with one section revealed. It’s a lovely, interactive way to do this and I show you the concept of “microcrafting” the sections here. The ability to do this really commits it to kids’ memories and is one of the main reasons I chose to leave the sections on things like this blank.
Keep in mind the shape is a bit hard because of the craft style. What I did:
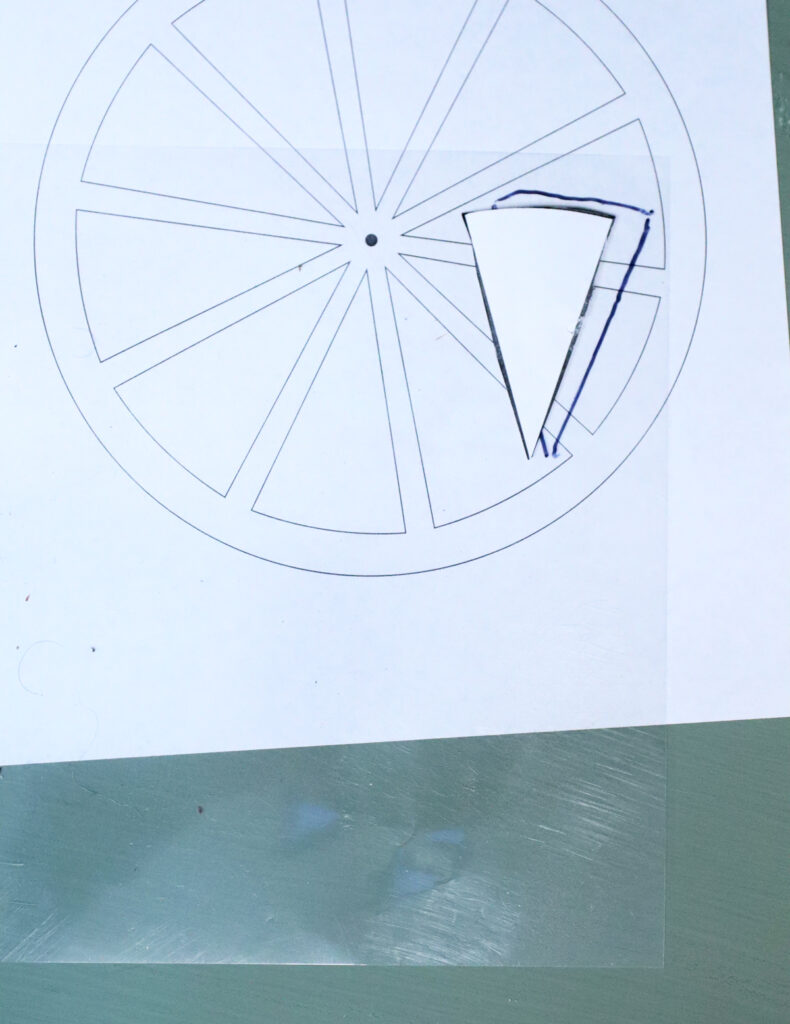
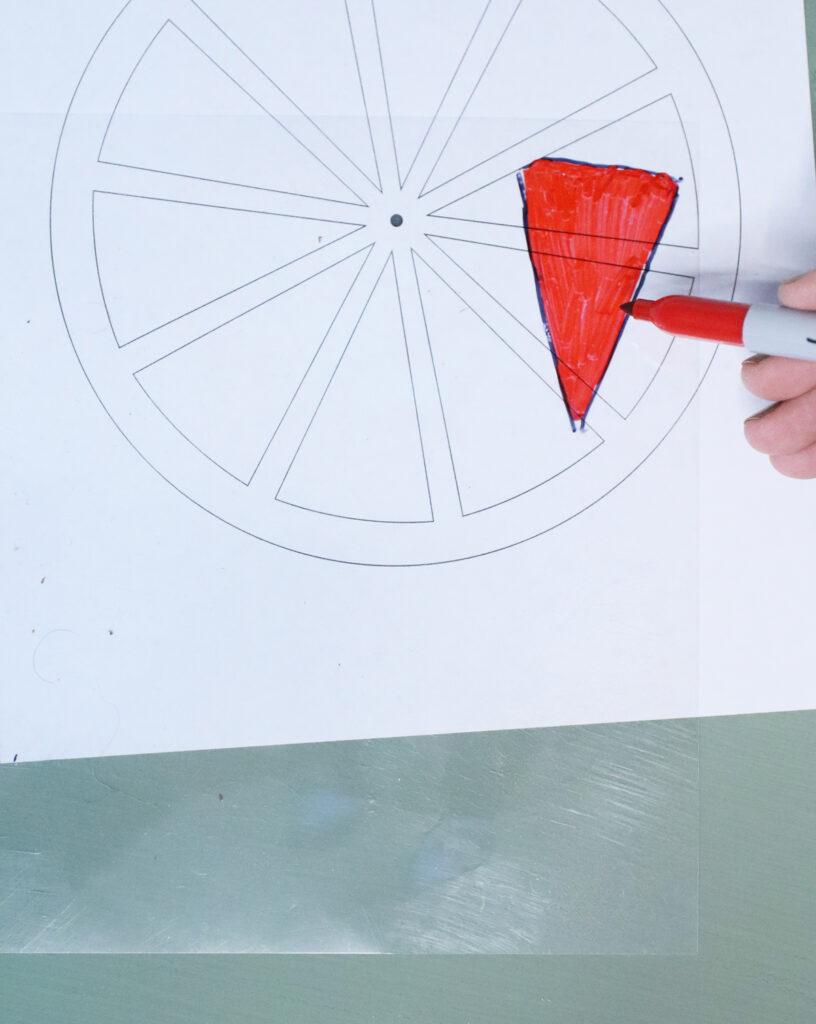
- Dam/blood – colored a clear paper with red sharpie, cut it to the shape of the section (when you cut the hole out of the top dial, save that bit to use as a template).
- Tzefarde’a/frogs – I drew these to show how you can really draw all the plagues
- Kinim/lice – Black dots with an eraser dipped in craft paint.
- Arov/Wild Animals – I cut a lion (LEGO haha) image out of a magazine (toy catalogue…) You can do magazine clippings for lots of these. Again, I used the hole of the dial as a template.
- Dever/Pestilence – farm animal stickers, stuck on upside down.
- Shchin/boils – Smaller dot art marker dotted to make red dots
- Barad/hail – I used blue and red glitter glue to make “fire and ice” splotches.
- Arbeh/locust – Fingerprints on a green stamp pad, and then I added little very primitive/simple details to turn them into grasshoppers
- Choshech/darkness – Colored it black and added eye stickers
- Makkat Bechorot/Death of the firstborn – This is a tricky one, and so depends on age/stage. I drew closed eyes on it.
Make the dial itself pretty – with paint, do a dots, scrapbook paper, or whatever floats your boat.
If you want something simpler, make a framework (repurpose the envelope from tzafun, for example) for Makkot puppets such as these. Or use these 10 plagues stickers.
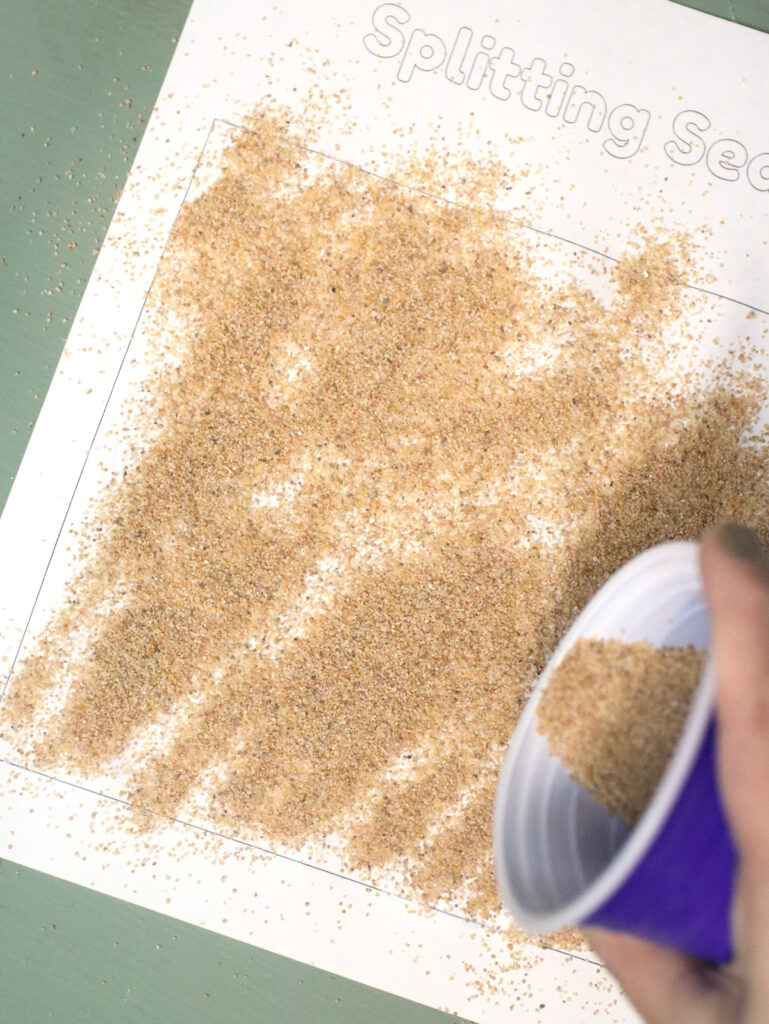
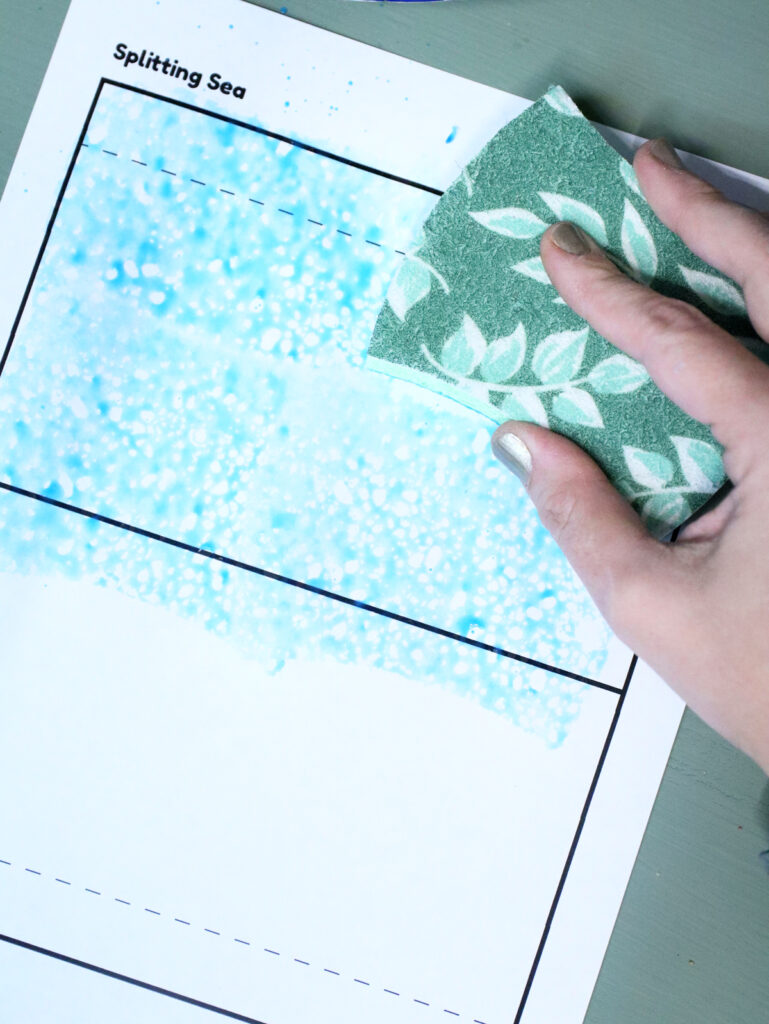
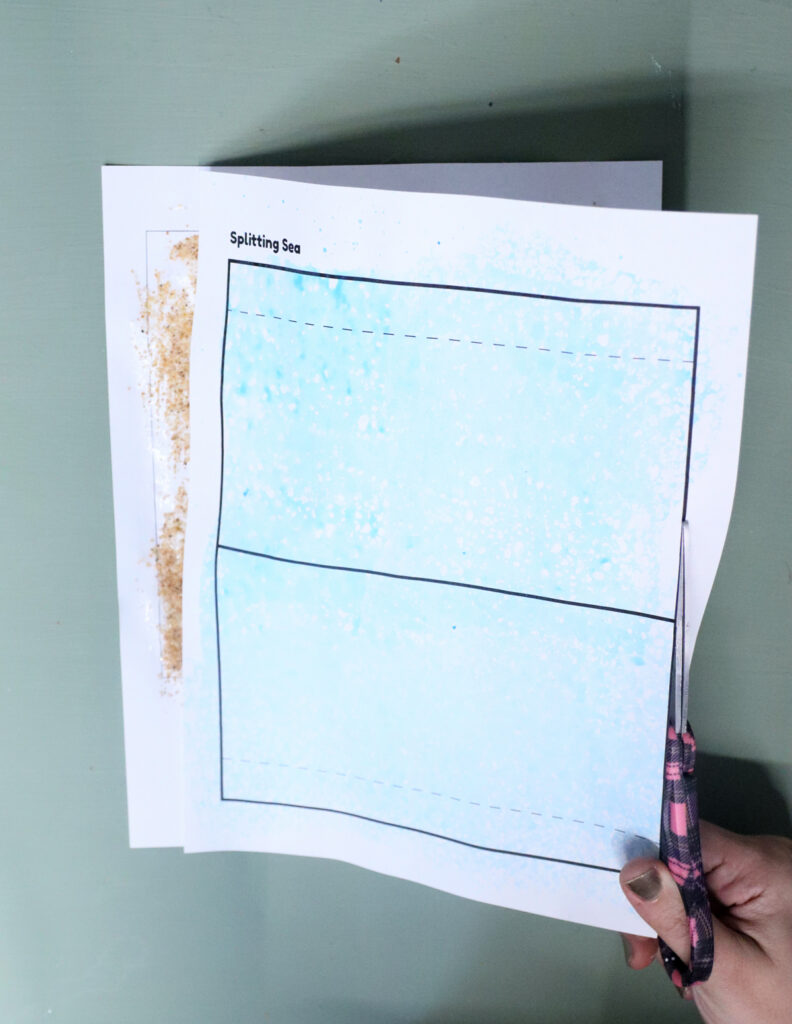
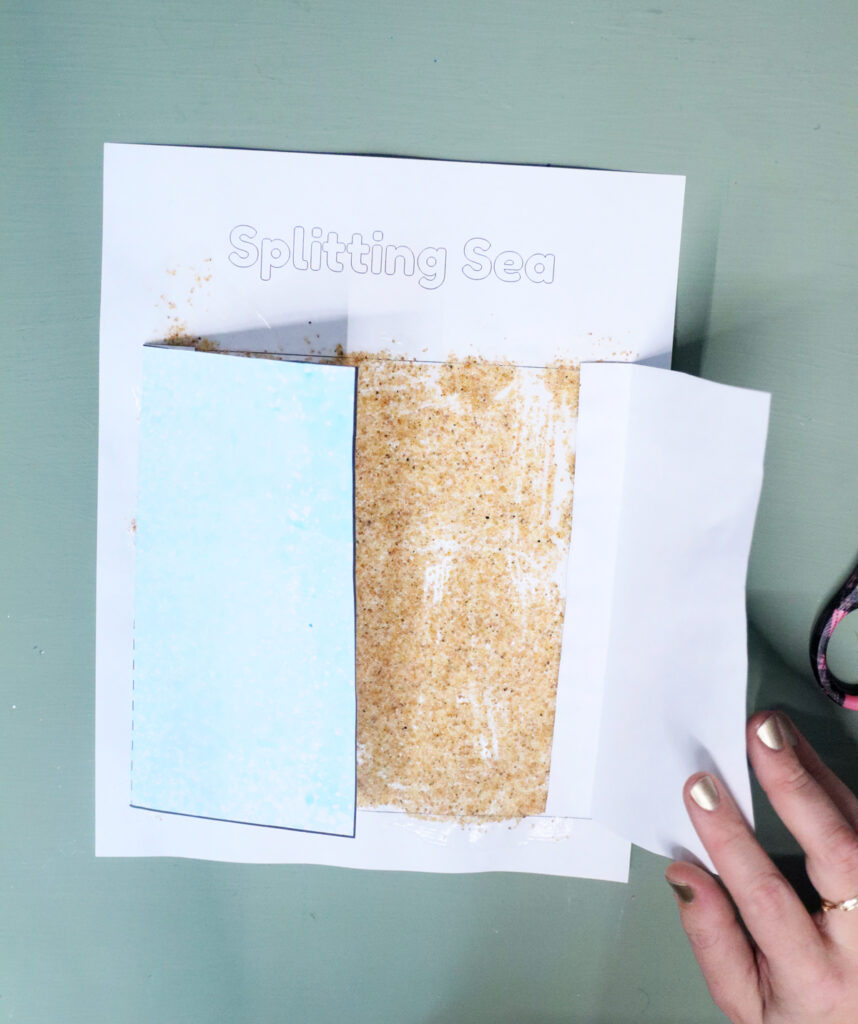
Splitting the sea was surprisingly challenging because I had fancy ideas I had to ditch. The lesson: keep this simple! It’s two flap “doors” that get decorated in a sea theme, and open to reveal dry land.
The base features clean crafting sand, attached with Mod Podge. And of course, I sealed it with Mod Podge too. For an easier take, cut squares of sandpaper and have kids glue that on instead. Or, have them stamp it with something with a grainy texture.
The outside is sponge painted – I literally took a kitchen sponge, dipped it in blue paint, and stamped it. You can do watercolors here – it’s a great use of it, and kids can easily get a watery look if they stick to blue.
You can also embellish with seashell shaped sequins or mini shells, fish stickers, or other sea-themed add-ons.
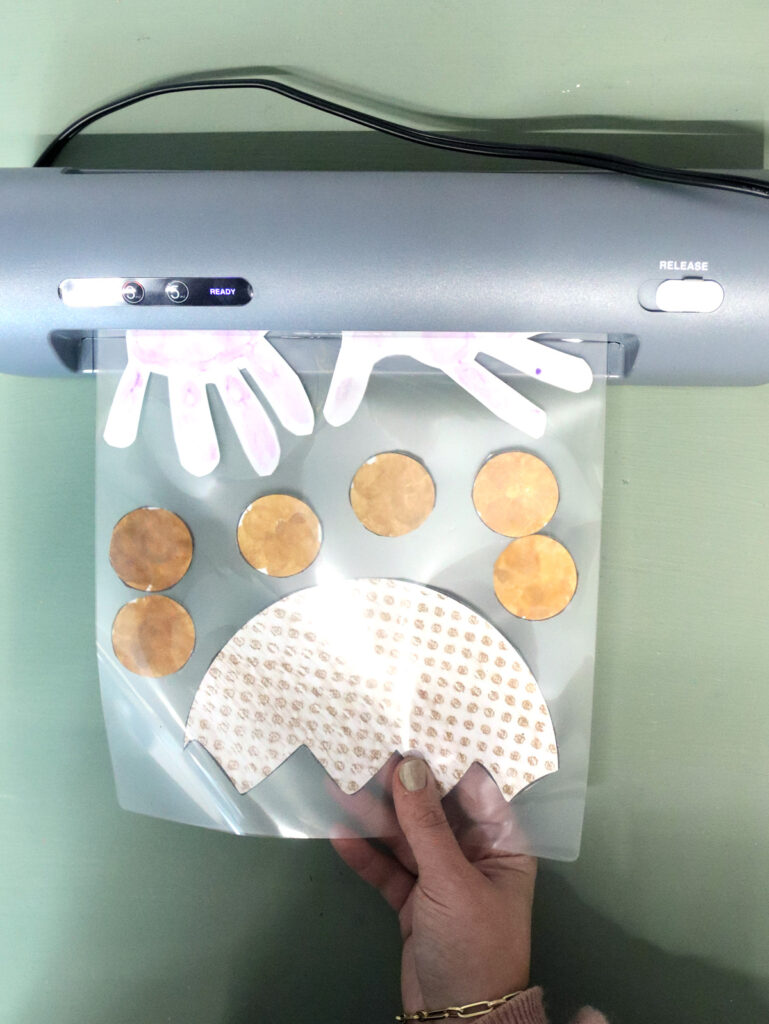
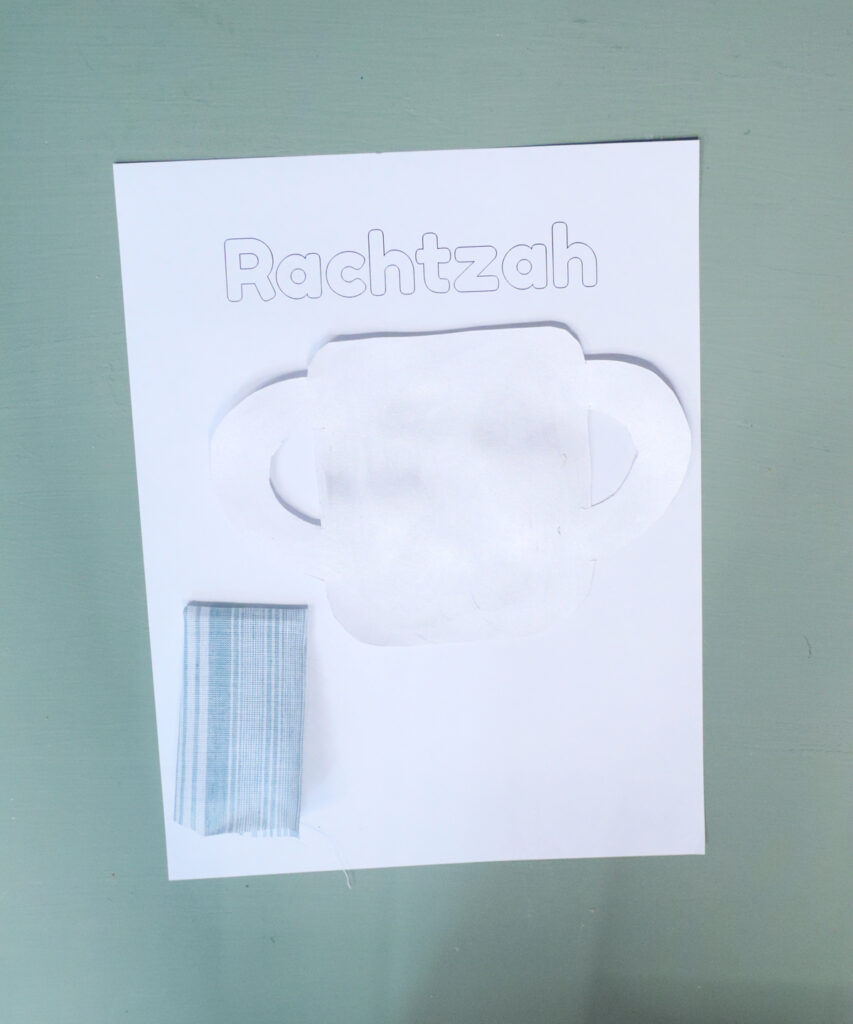
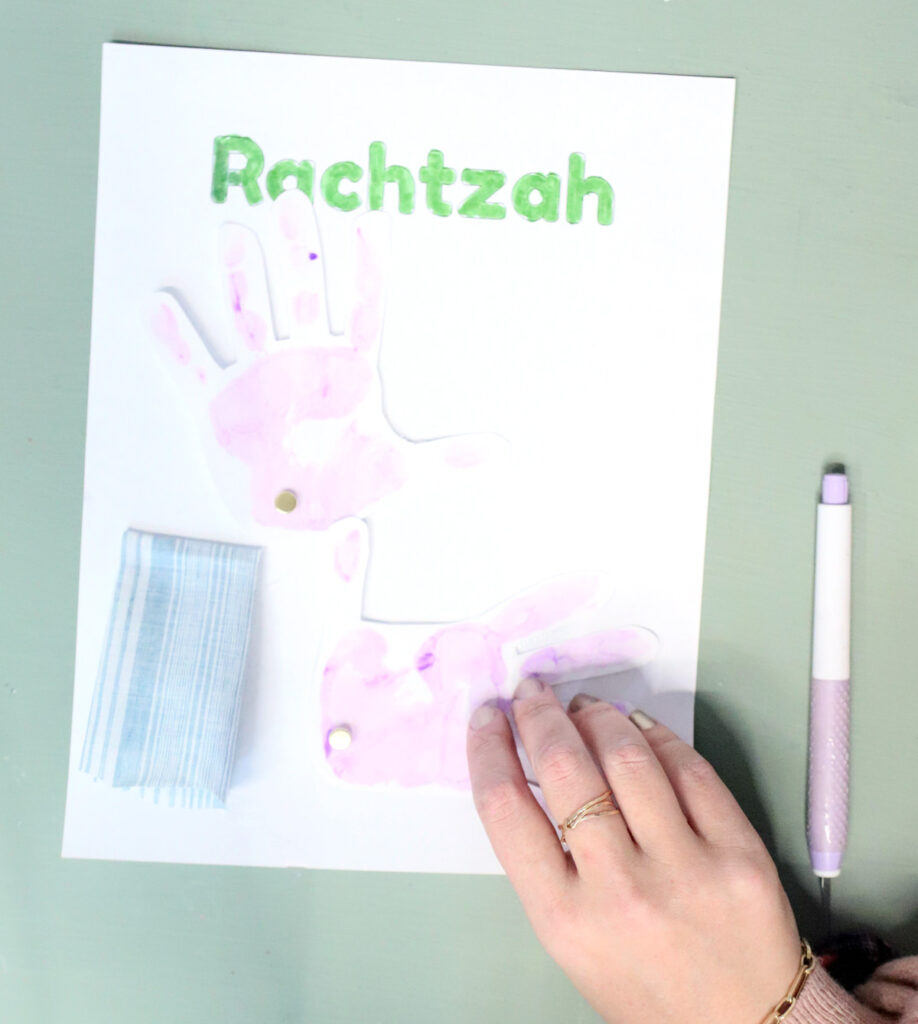
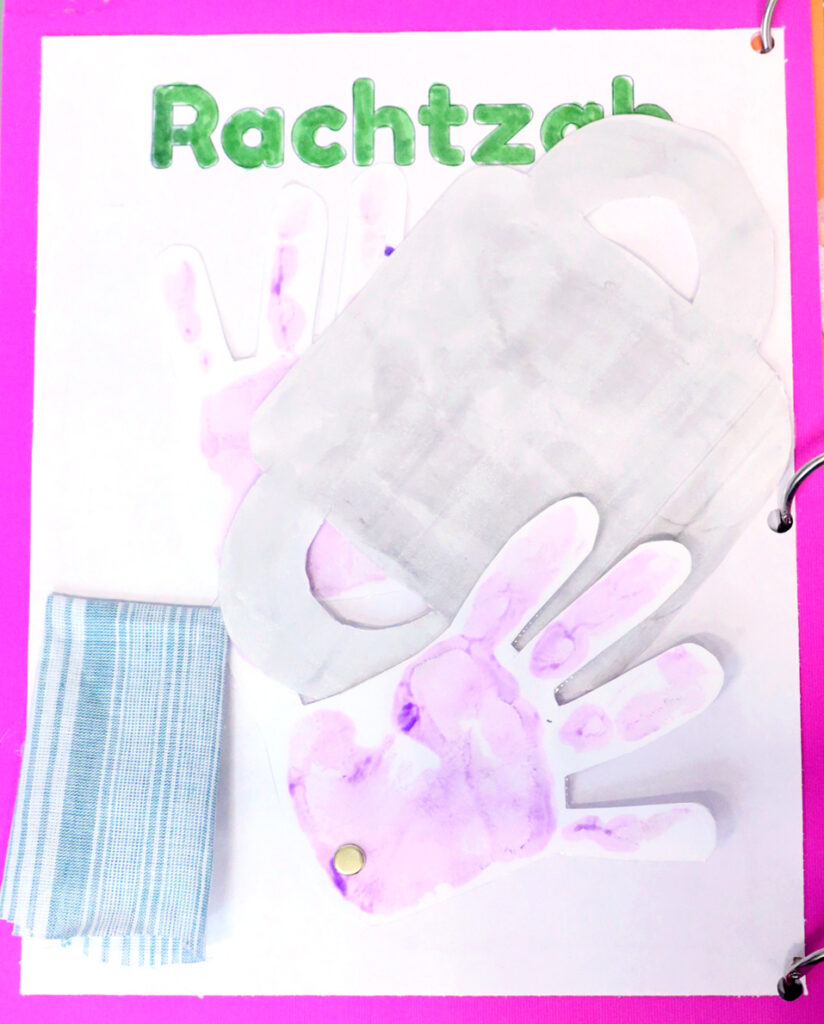
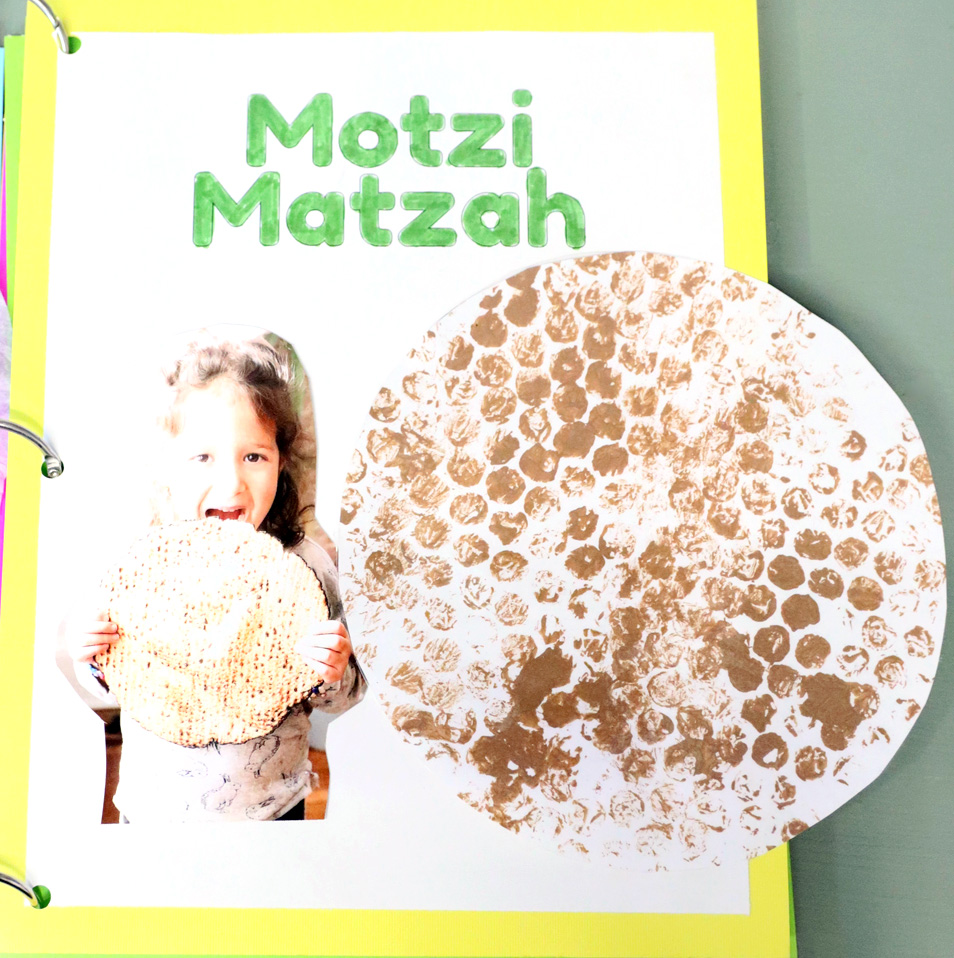
Rachtzah – Motzi Matzah
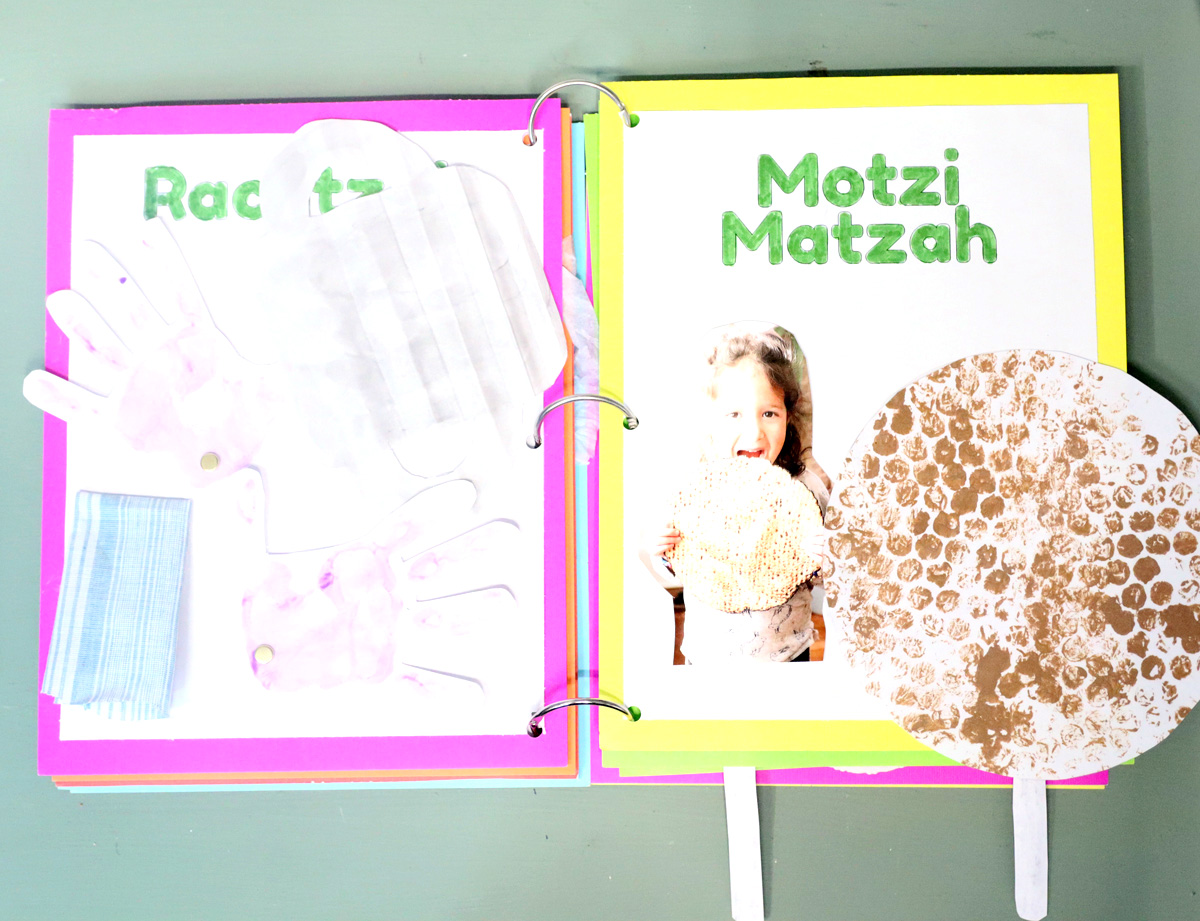
Rachtzah is the same template as Urchatz and was a good opportunity for me to show you how to use the template different ways. Here, we used tempera paint sticks to cut out the cup and attached it with a Velcro coins so it’s fully removable for play. (Note: it jammed in my laminator which is why it’s folded and I didn’t have time to correct it).
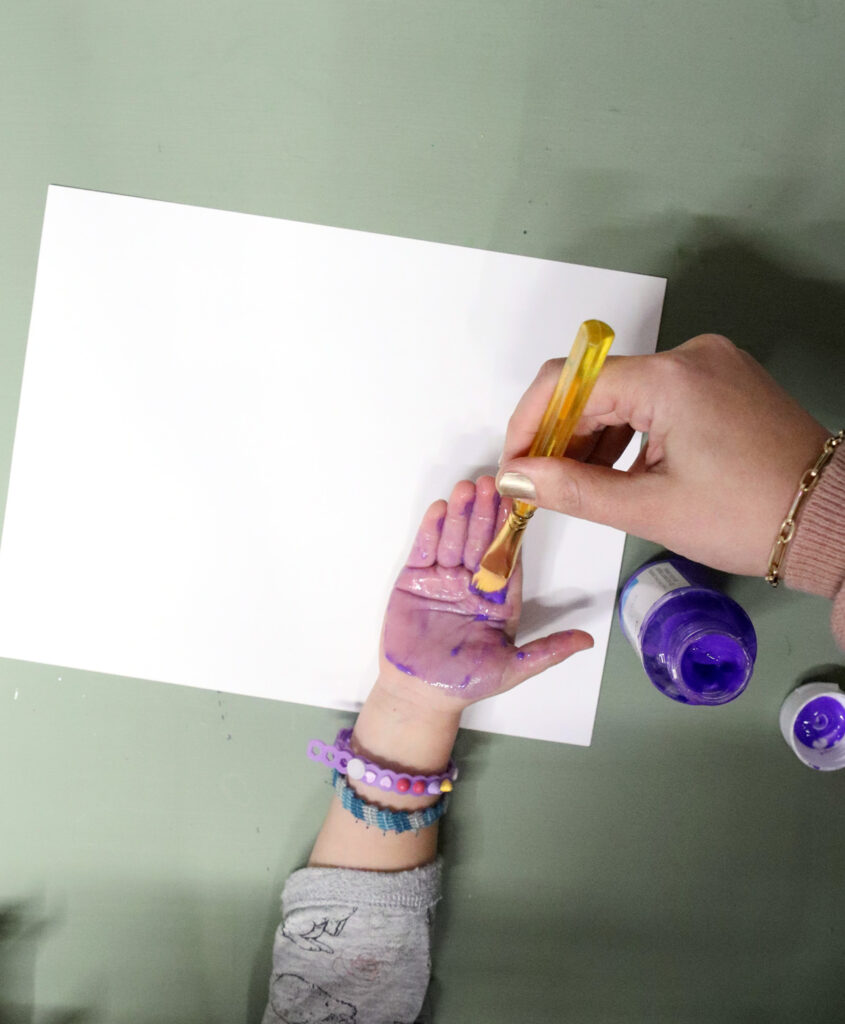
I glued on a folded swatch of dollar store fabric as a “towel” – it adds texture, but is likely something an adult will need to do for them. My 4 year old made two handprints on a separate page, and we cut them out loosely, laminated them, and attached them with brad pins so that it’s another moving part on the page.
For Motzi Matzah you have the Matzah template and can add what you want. I thought it’s a cute place to add another photo. Yes, it’s totally optional, and not in the template.
I was going to just have A say “ah” so that when playing with the finished Haggadah craft she can “feed” it to herself, but instead we took it with a piece of Matzah.
For this matzah, we did some bubble wrap printing for the texture.
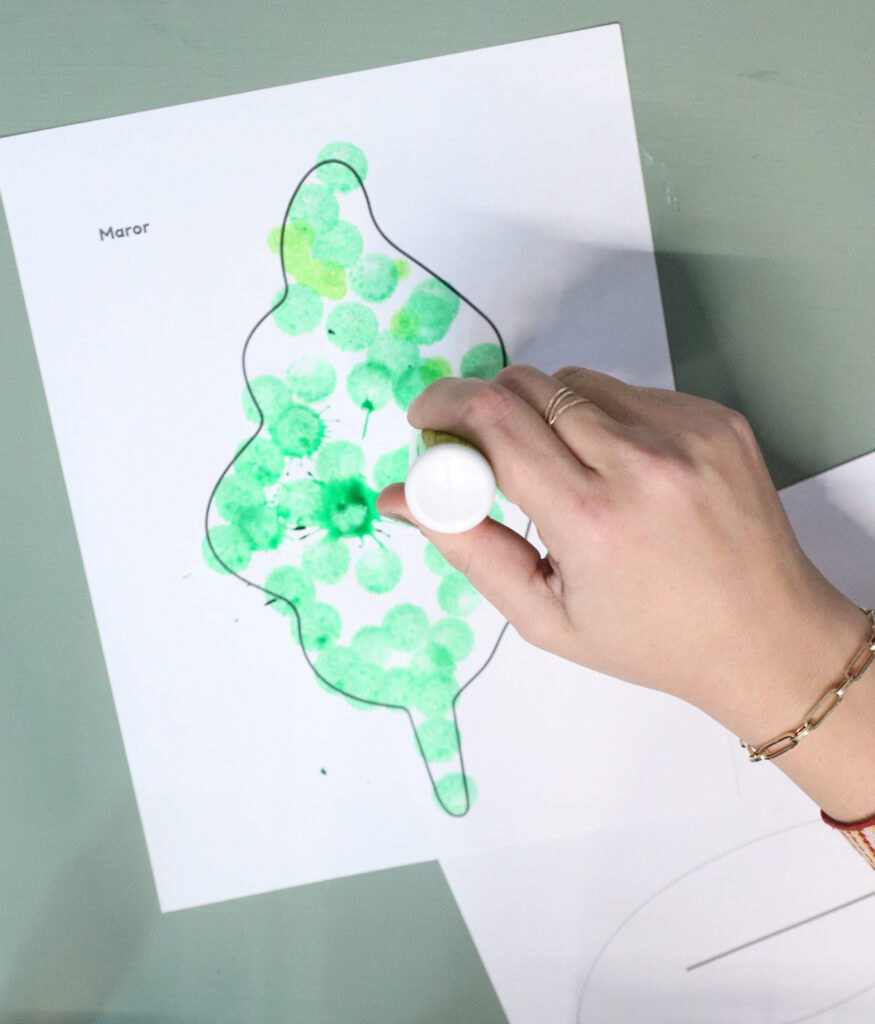
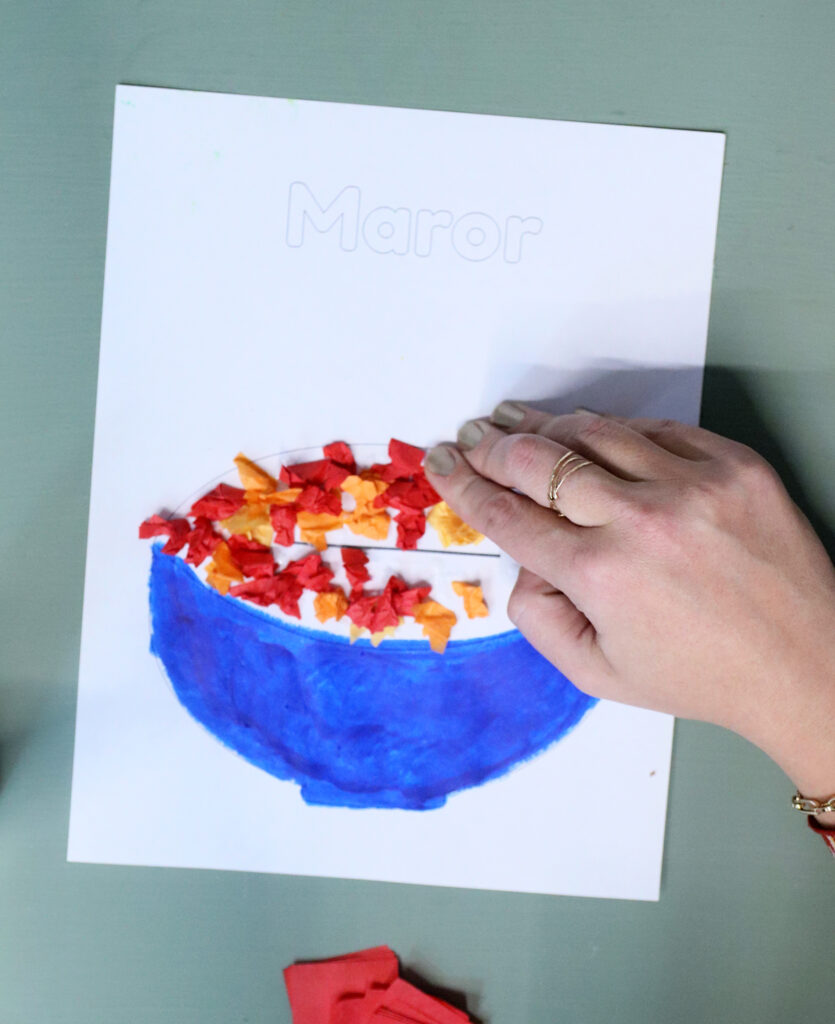
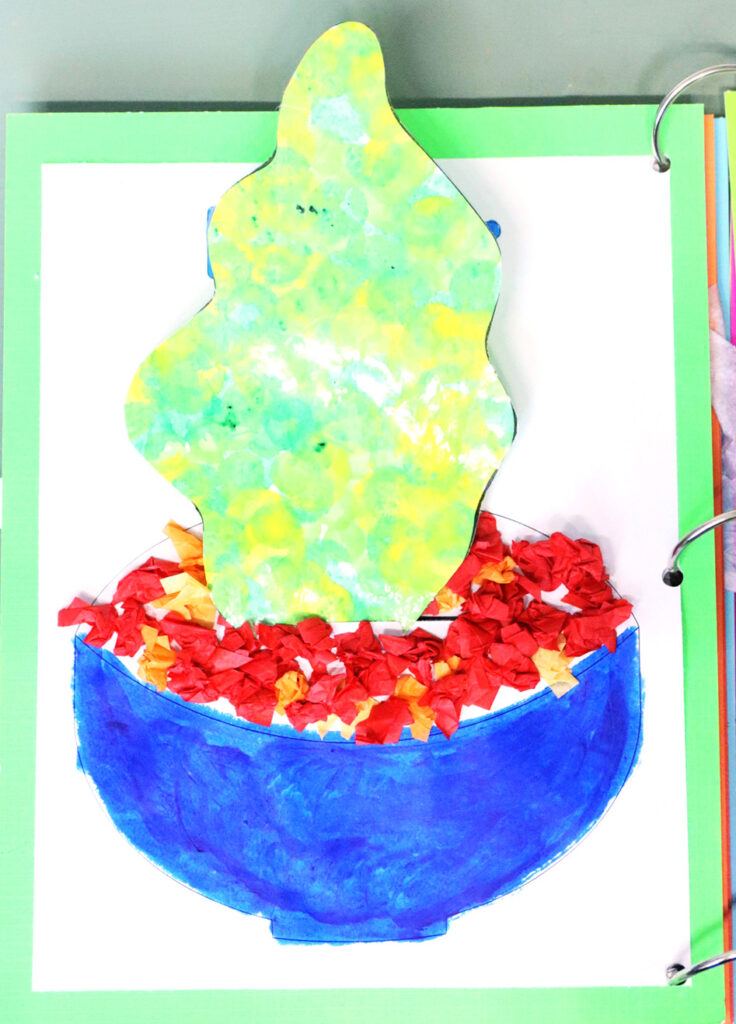
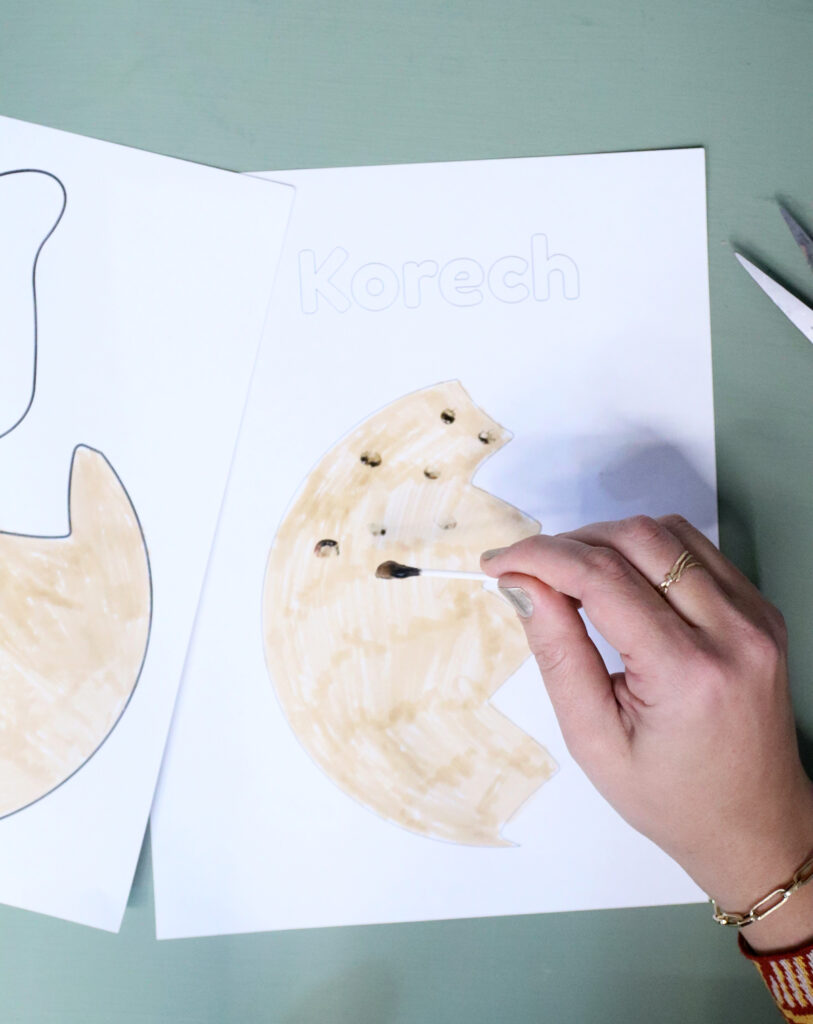
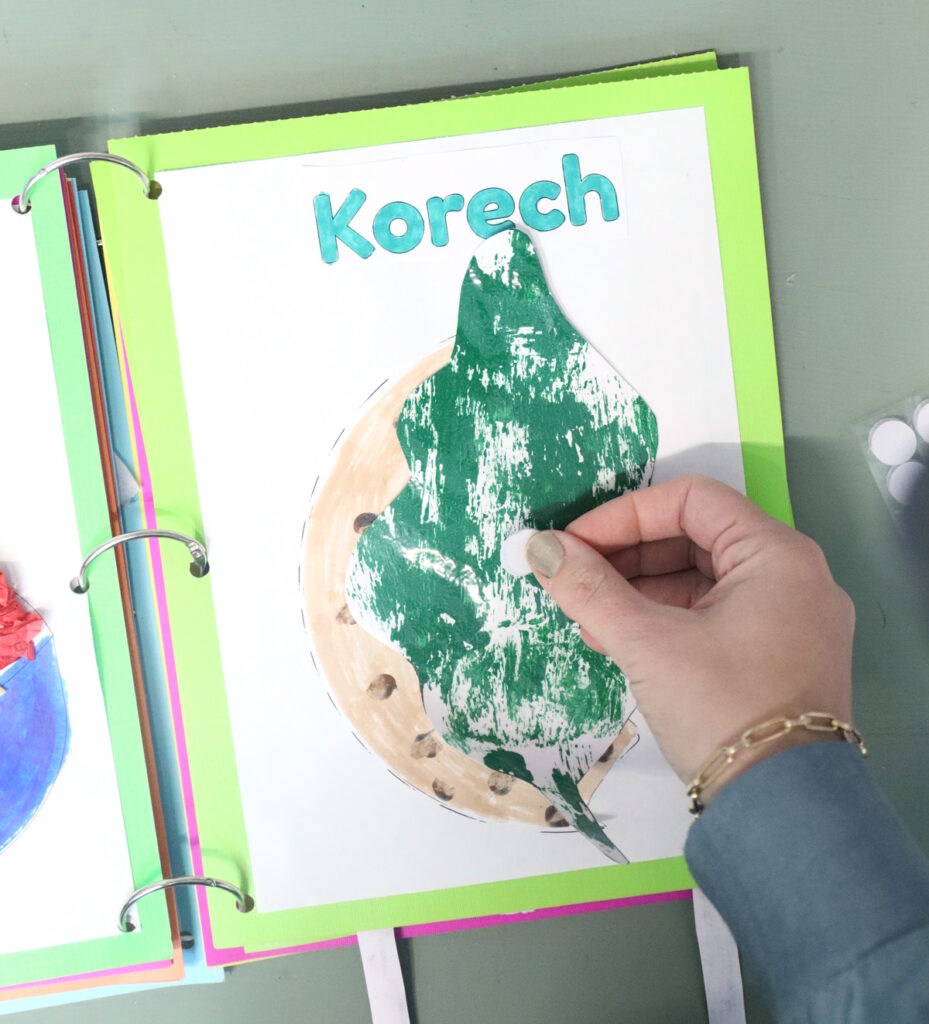
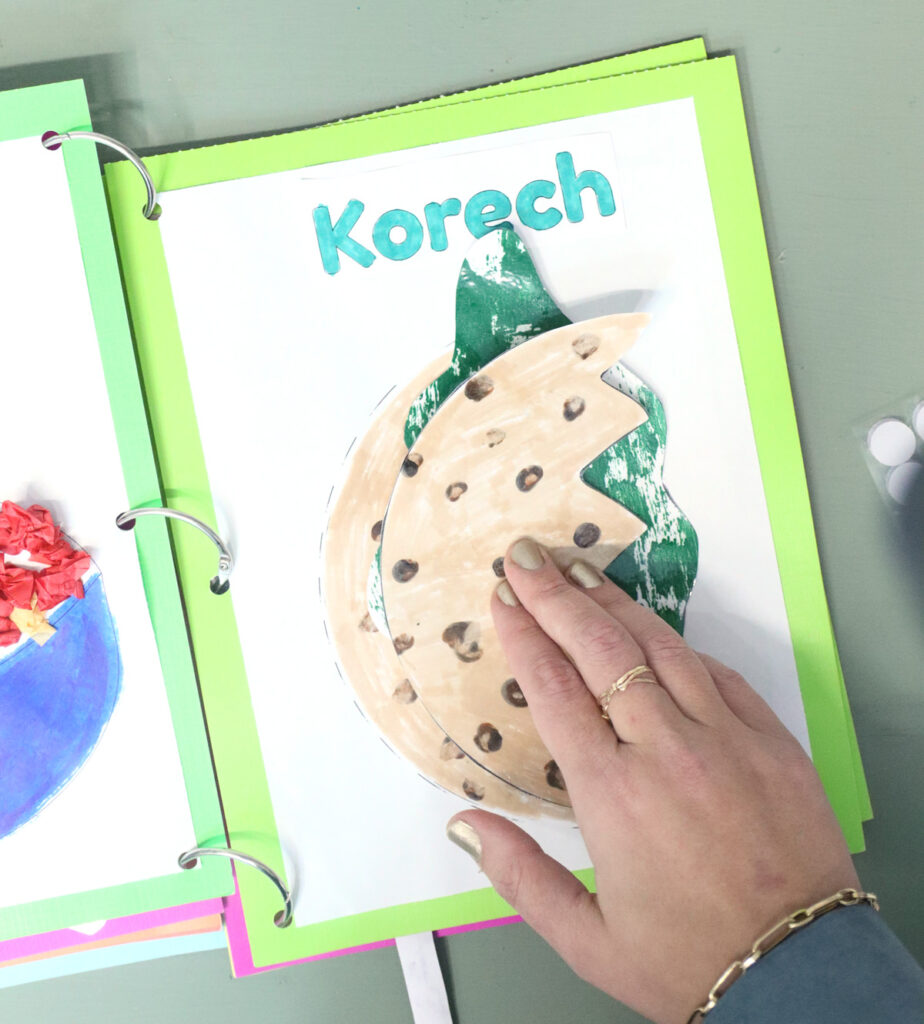
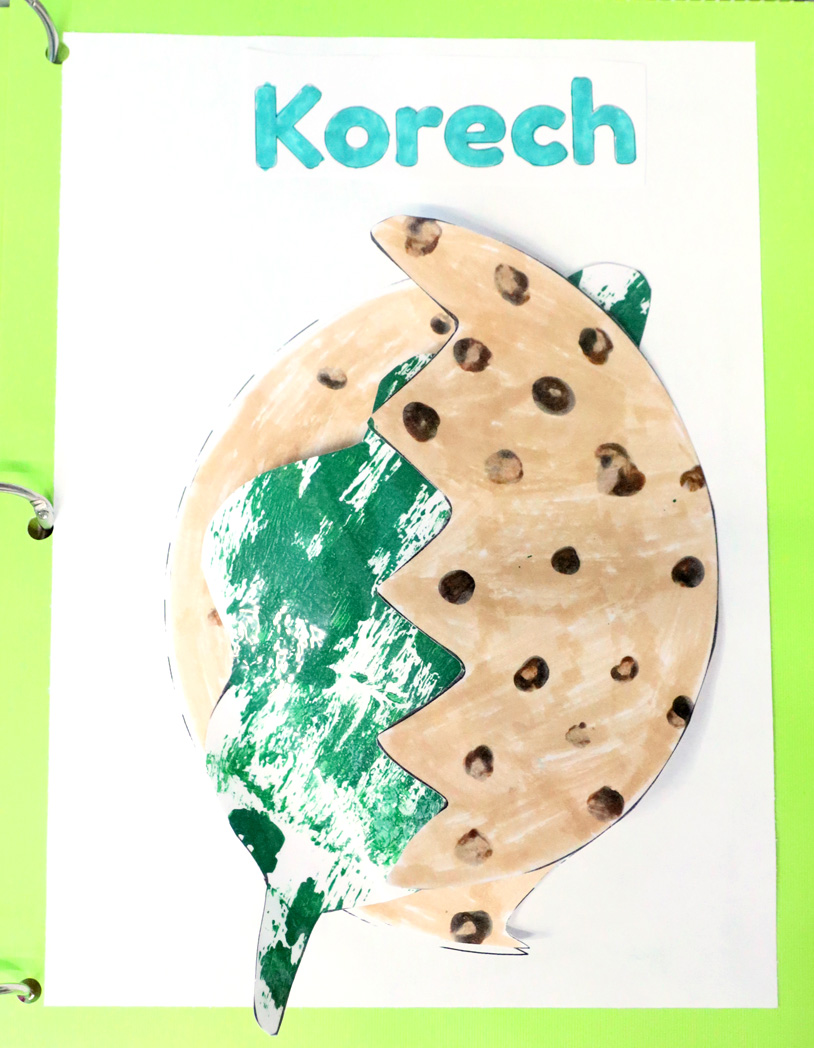
Maror – Korech
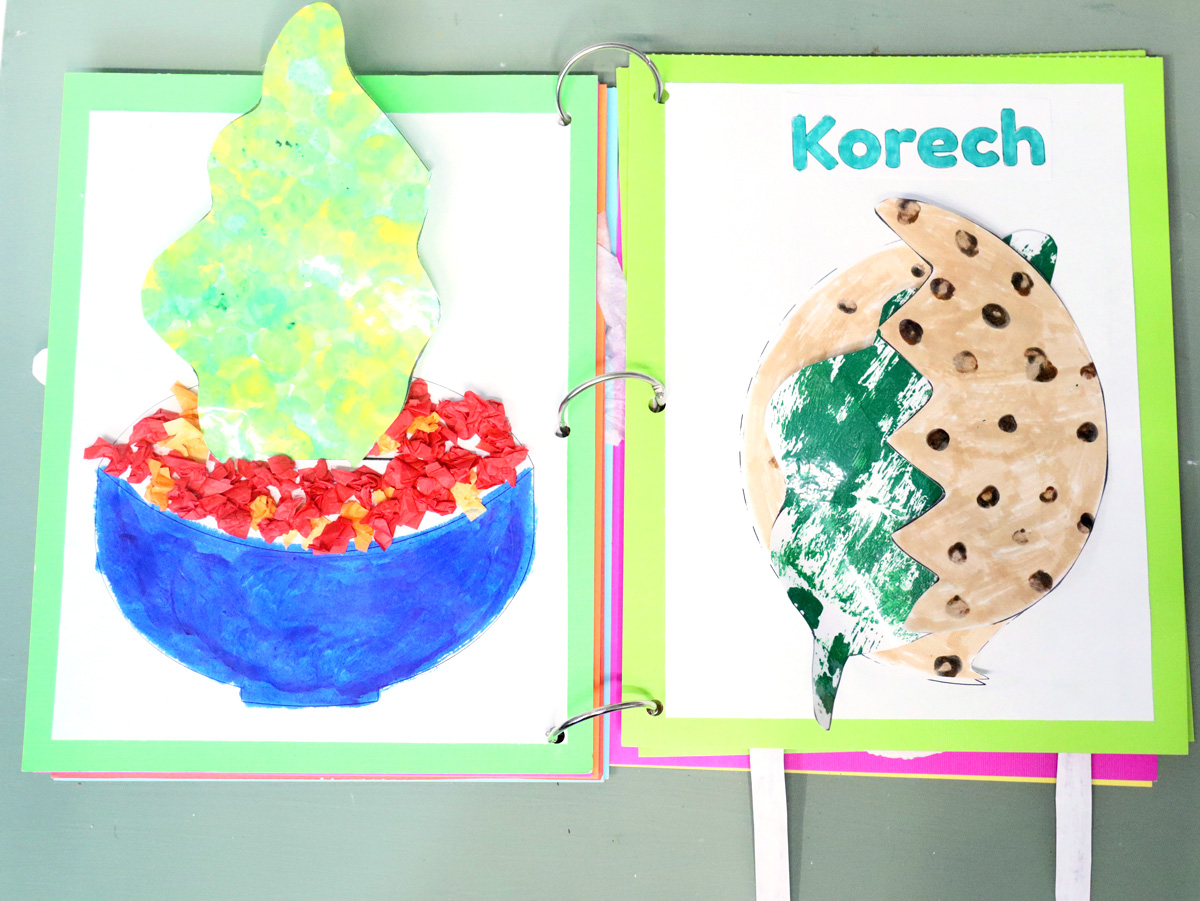
We pulled out the Do a Dots for the Maror page, but then used paint sticks for the bowl. The Charoset is tissue paper scrunched up and glued on. Kids love doing this and yes, it gets messy, but it’s a win!
The Marror is connected with a Velcro coin but you can of course use a brad instead. There’s a slit in the bowl as well for you to dip it into.
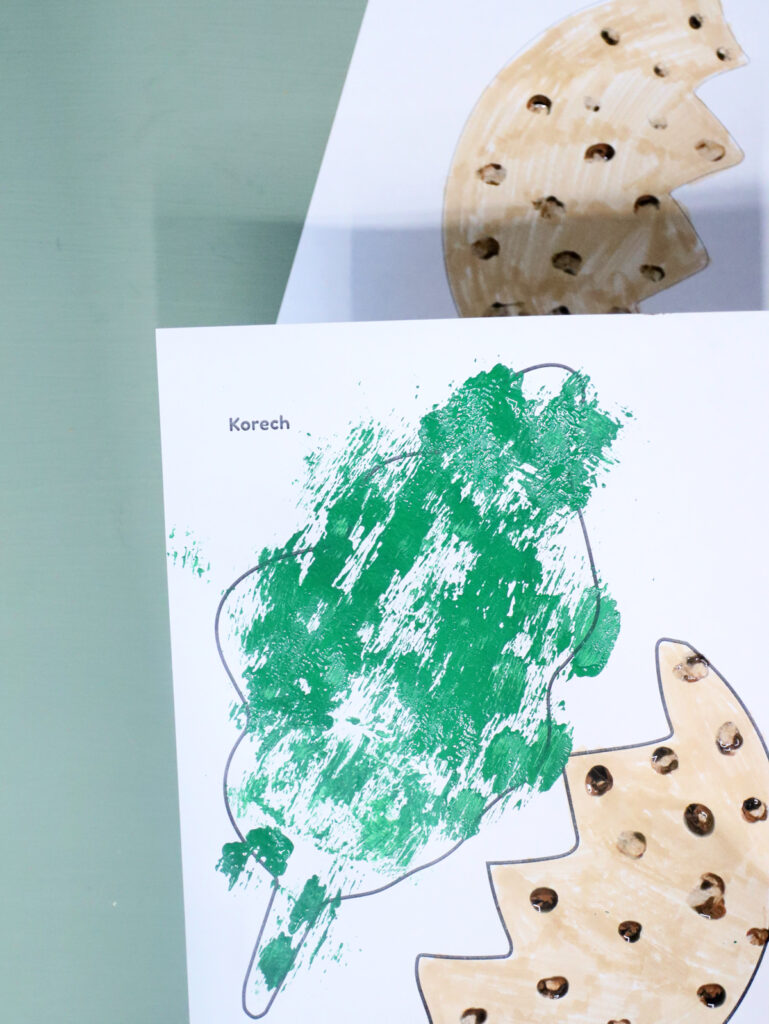
On the Korech page we were really repeating items we had before and got creative! We made Matzah print by coloring the base and then using a q-tip to paint dots on it. For Maror, we used crepe paper as stampers. I should have just cut it from crepe paper as it got soaked and wasn’t so easy to do.
You may prefer, if doing this with kids, to test things like paper rubbings, or fix the tissue paper to something like cardboard to turn it into a stamp.
Matzahs are stacked with Marror – with the base matzah fixed on the plate. They connect into a sandwich using Velcro coin, of course. I had intended to add some tissue paper “charoset” here too but forgot…
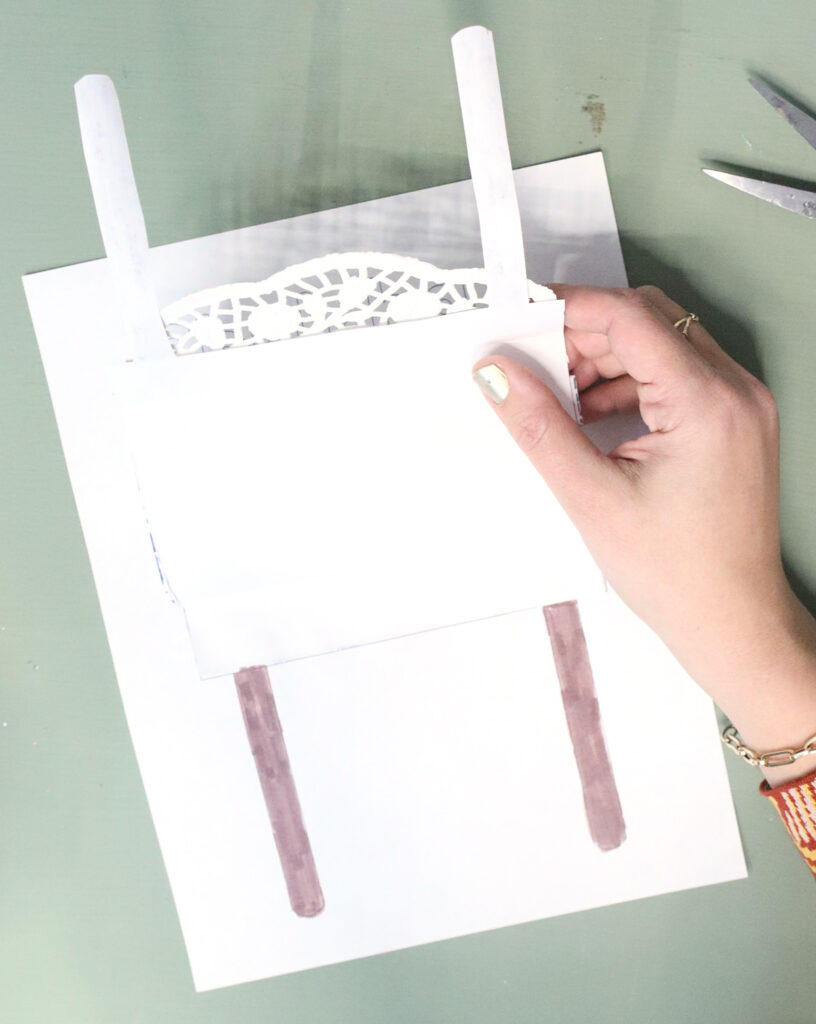
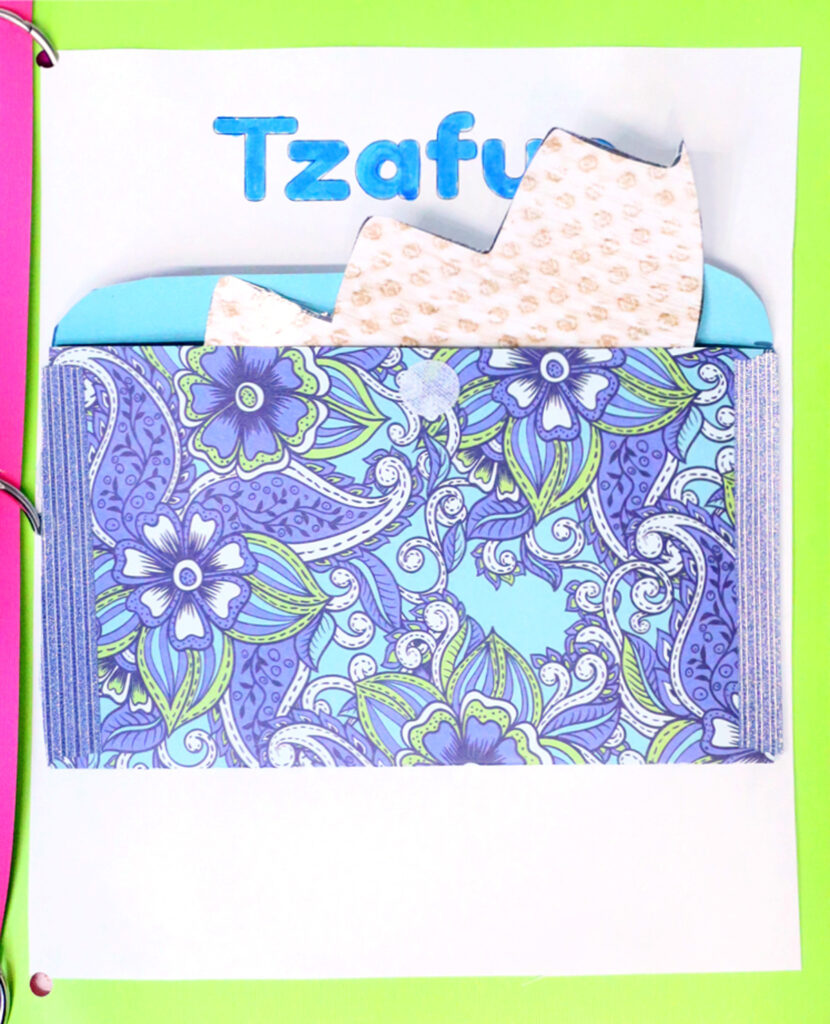
Shulchan Orech – Tzafun
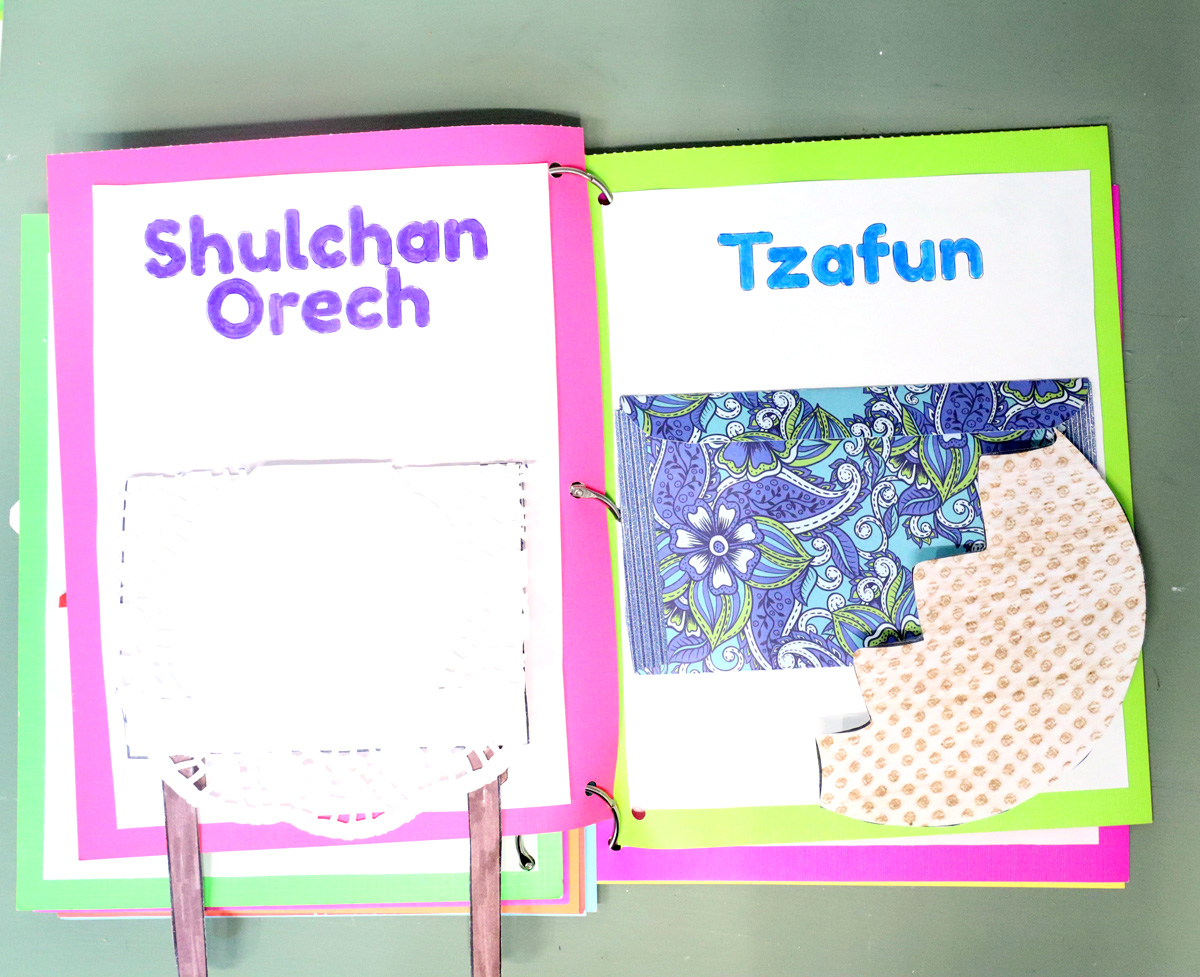
Shulchan Orech features a cute little pop-up table (yes, it’s simple enough for young kids to cut! Easy shapes! Easy assembly – that’s the point!) I threw in a doily tablecloth.
One additional detail you can put in here that I didn’t is… you guessed it grocery circular clippings! Have kids clip various food items and bring them in. Then, have them sort which ones can be eaten on Pesach and which can’t. And they can glue the Passover-friendly items on the table.
Or, make little plates from circles of paper.
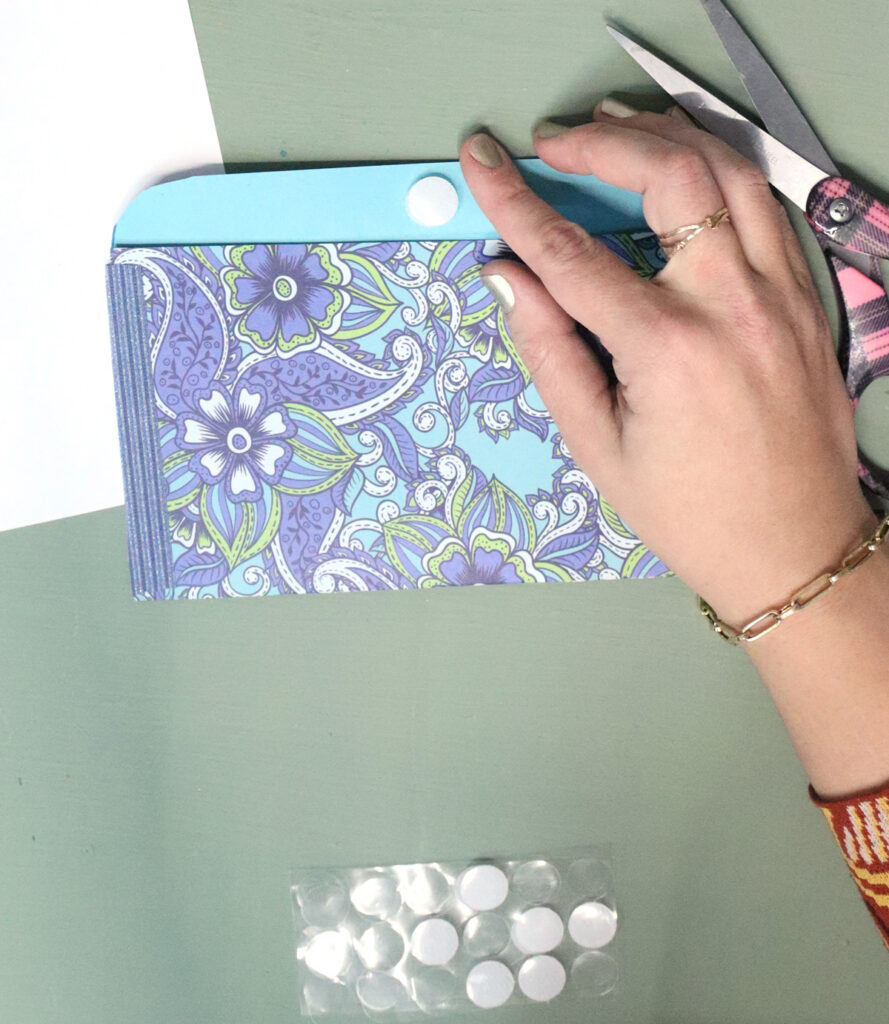
Tzafun is a little Afikoman pouch – really just an envelope that I made from scrpabook paper, but you can craft from felt too! We reused the Matzah half from Yachatz for educational/continuity purposes but you can just reuse that template if you want to make a separate piece of matzah to “live” on this page.
I glued the envelope on. However, you can also attach it with a Velcro coin so that kids can pretend to hide it, for better or for worse.
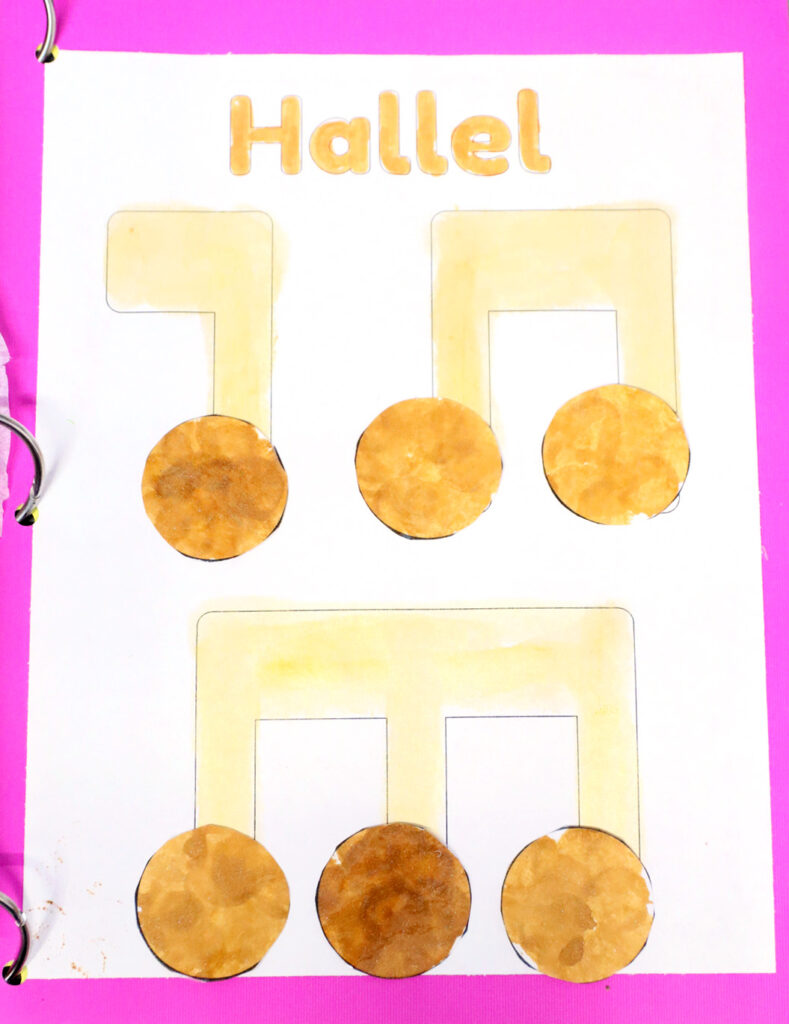
Barech – Hallel
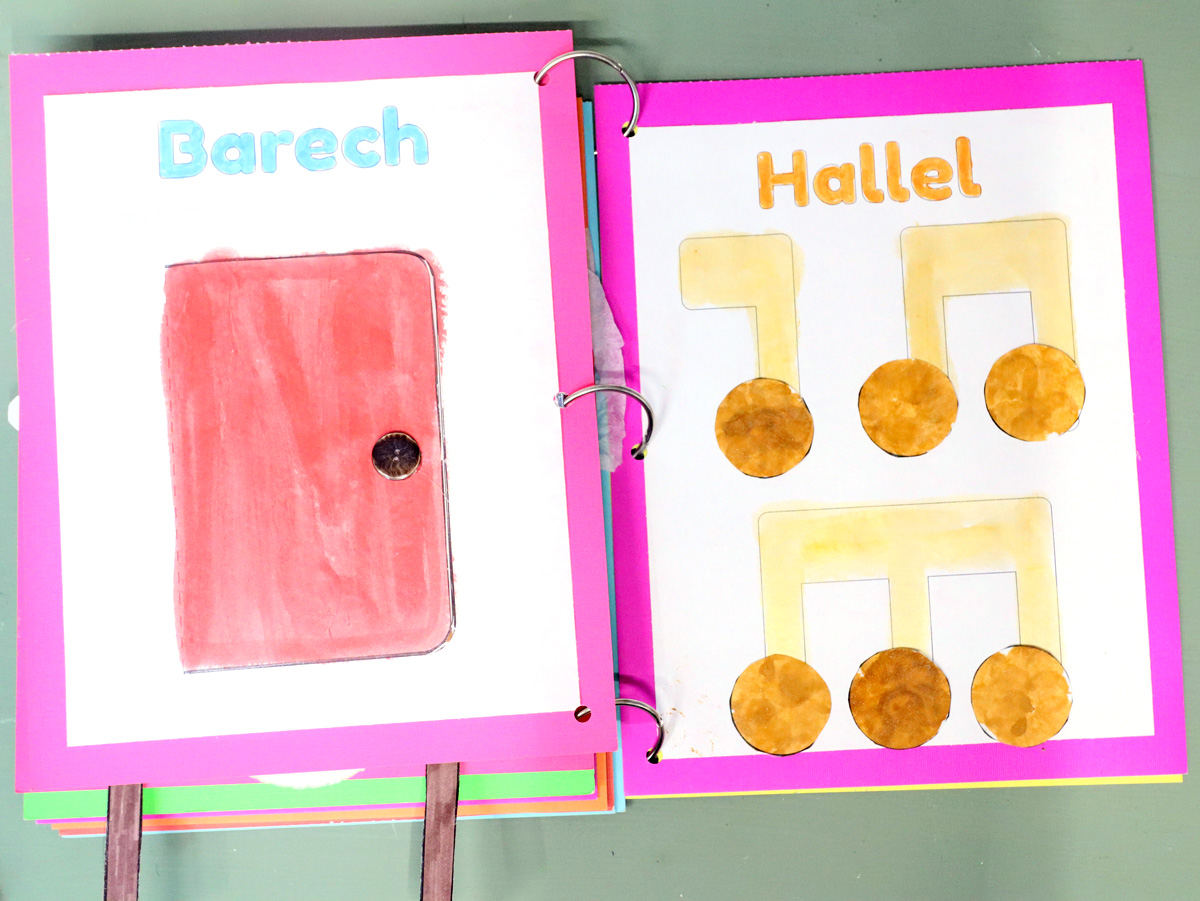
Here, we’re getting into the parts of the Seder where kids are less involved and usually sleeping. They’re also less kid-friendly. So they’re not so likely to be following with their own Haggadah at this stage. However, I still designed pages to appeal to them, as they are likely to play with this outside of Seder time, and for the educational factor.
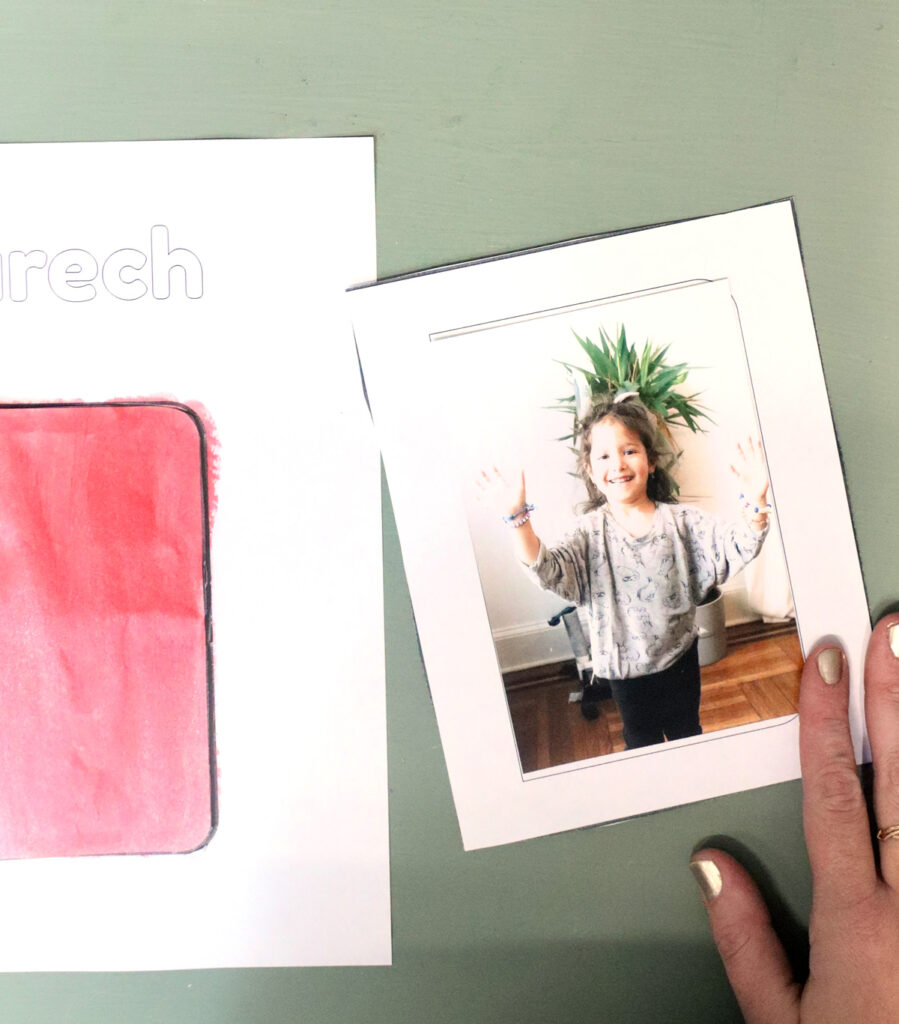
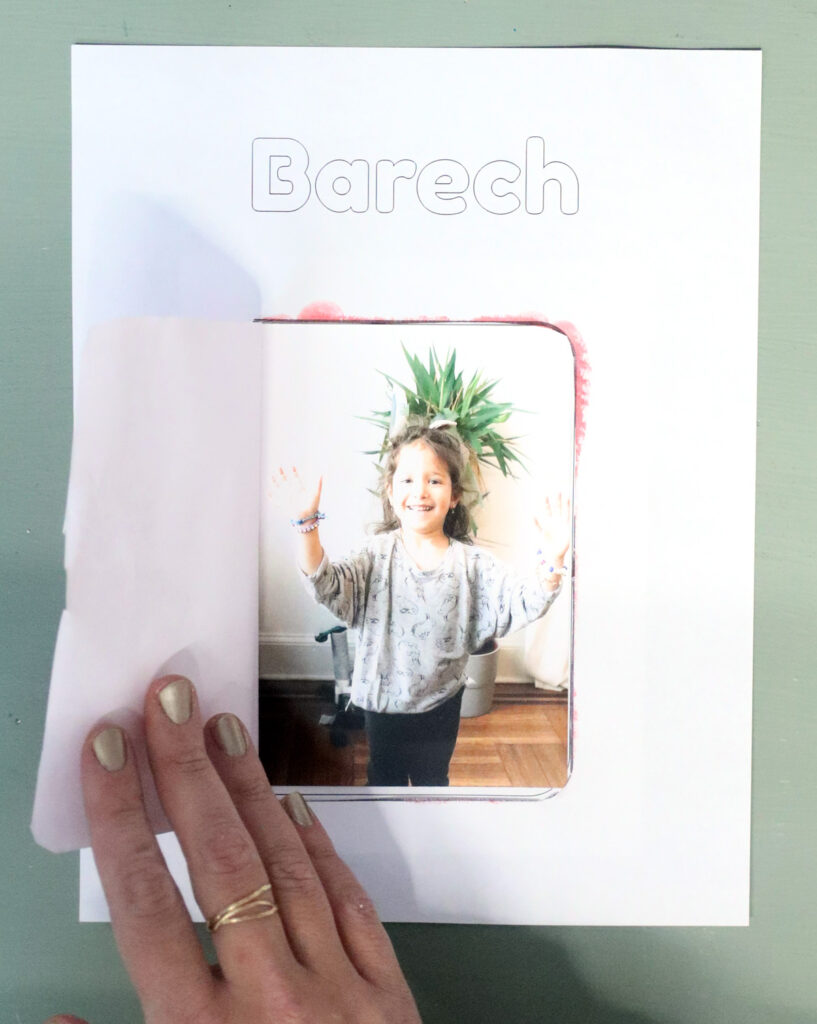
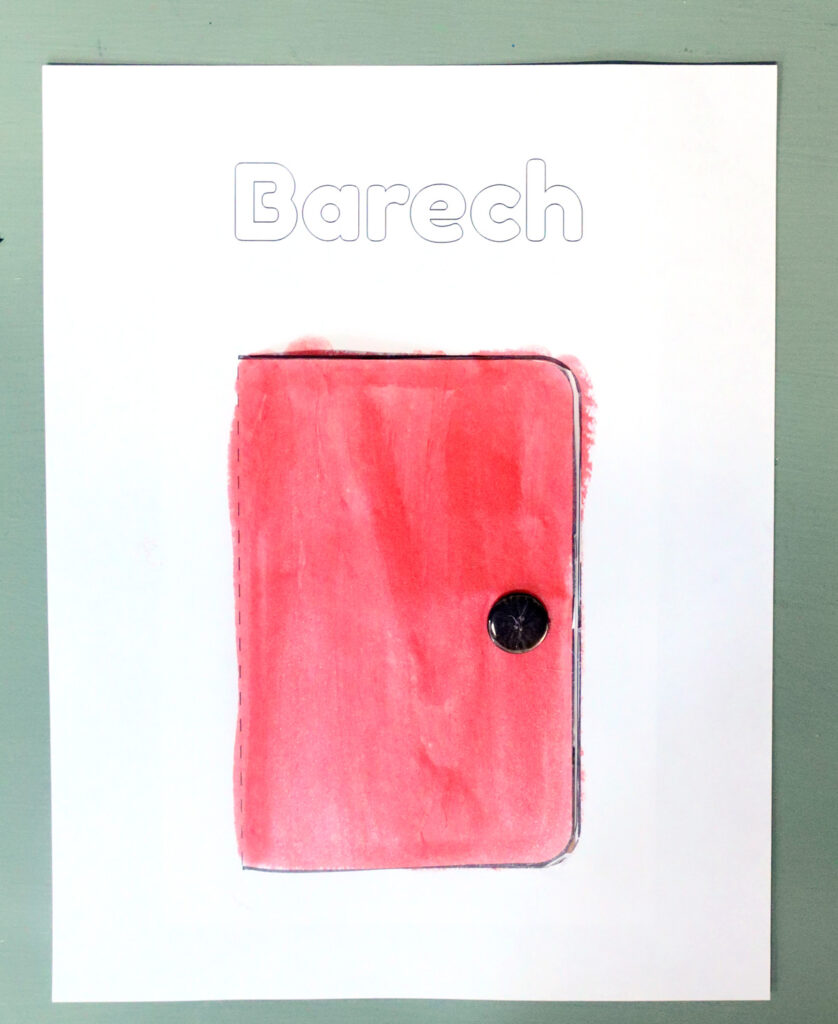
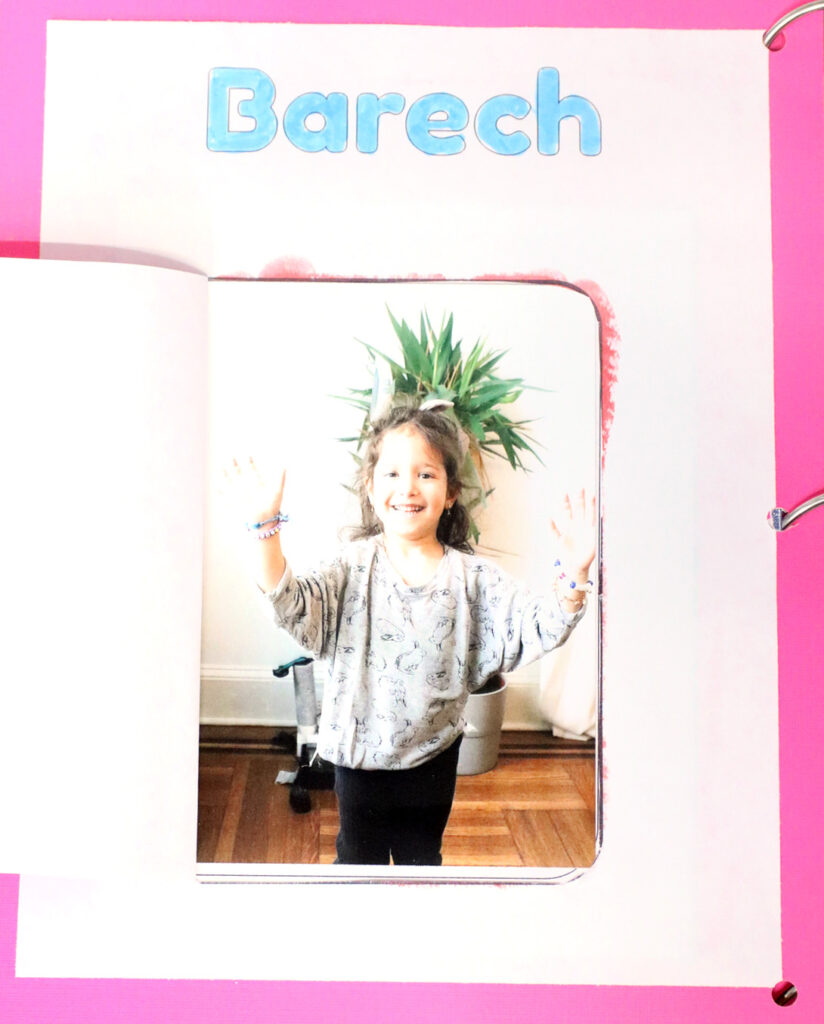
For Barech, the Birkat Hamazon (grace) is recited and it’s not so relatable for young kids. We focused on what comes after: opening the door for Elijah. The door opens, and on this one you actually get a template for a photo to put behind it. Alternatively, kids can draw self-portraits there.
I took a photo of my four year old waving “hi” for this.
You can also reuse the Kiddush cup template from Kaddish to make Elijah’s cup – decorate it with adhesive gems, sequins, etc.
I glued a button to the door as a “handle” – totally optional, and a bead works too.
Hallel was really challenging. My kids have in the past brought home Haggadah crafts with the songs they learned in the Hallel spot (which is a great idea and you can repeat it – but I can’t create a template for that because I don’t know which songs you’ll be teaching!)
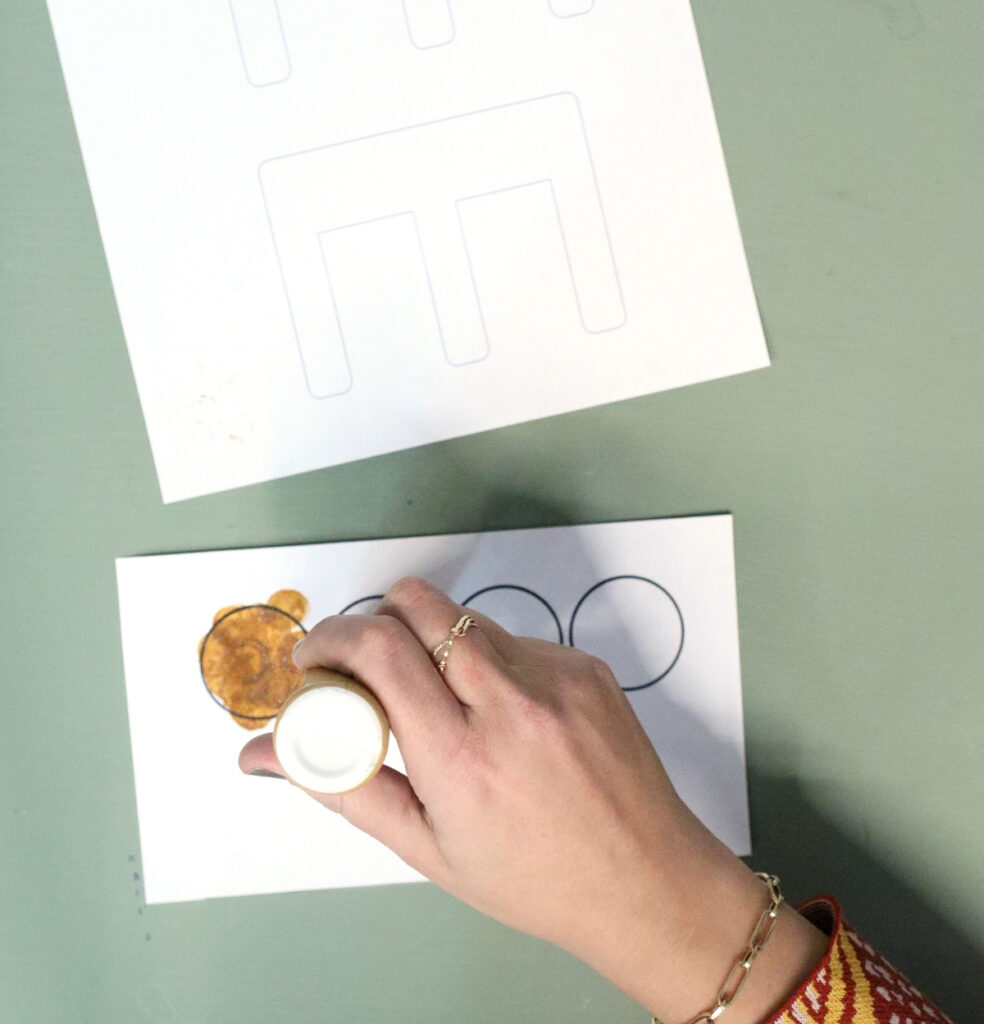
I went with musical notes and made circles that can be matched up to complete the note. They are laminated and attach with Velcro coin. In a more coherent-minded world, I would have made it a color matching game – with the circles and the base notes the same color, and they need to attach the circles to the notes.
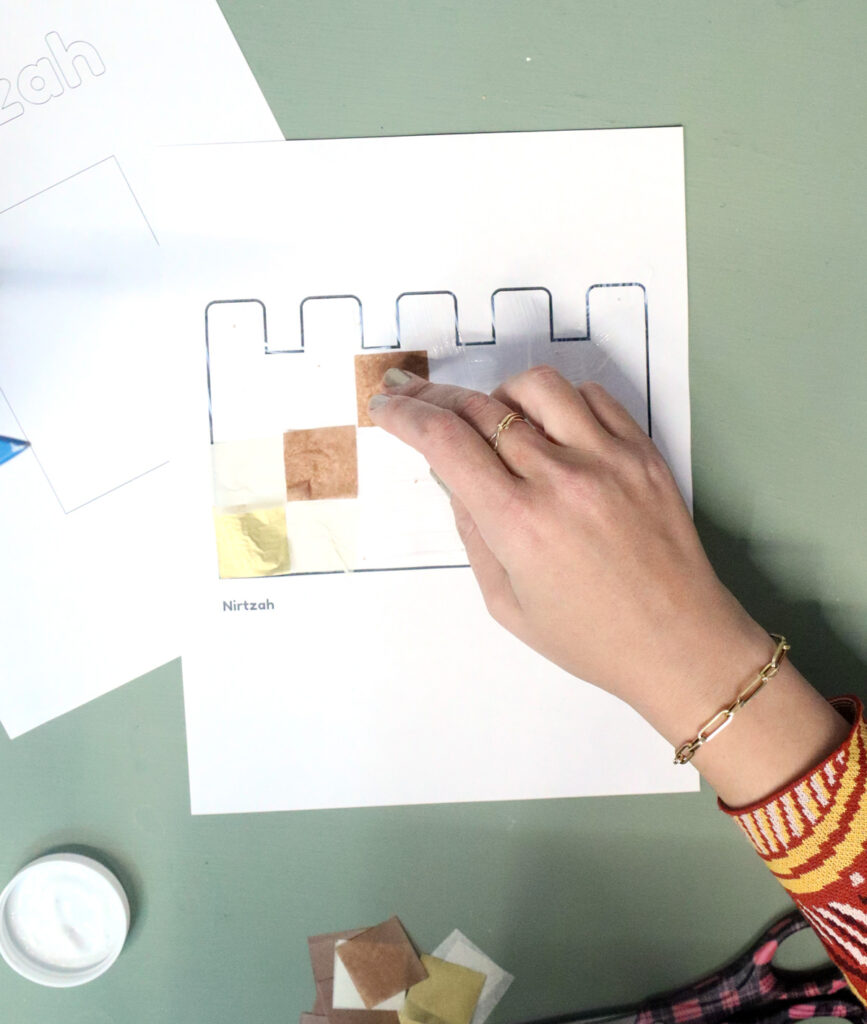
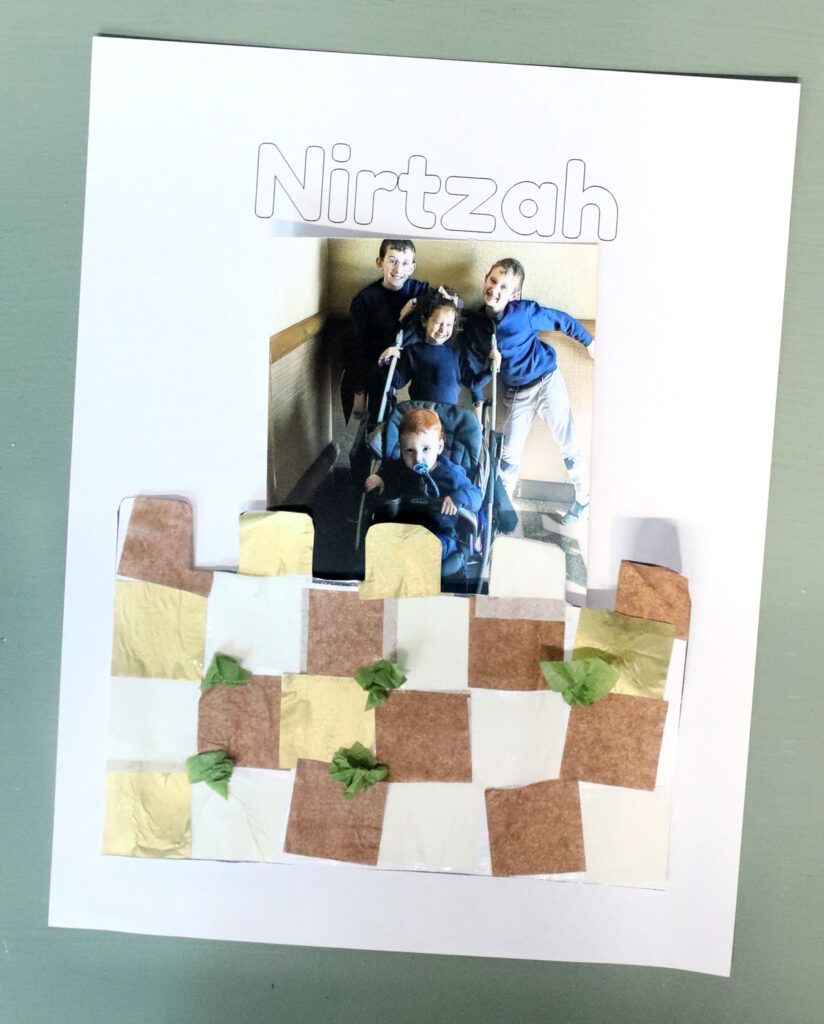
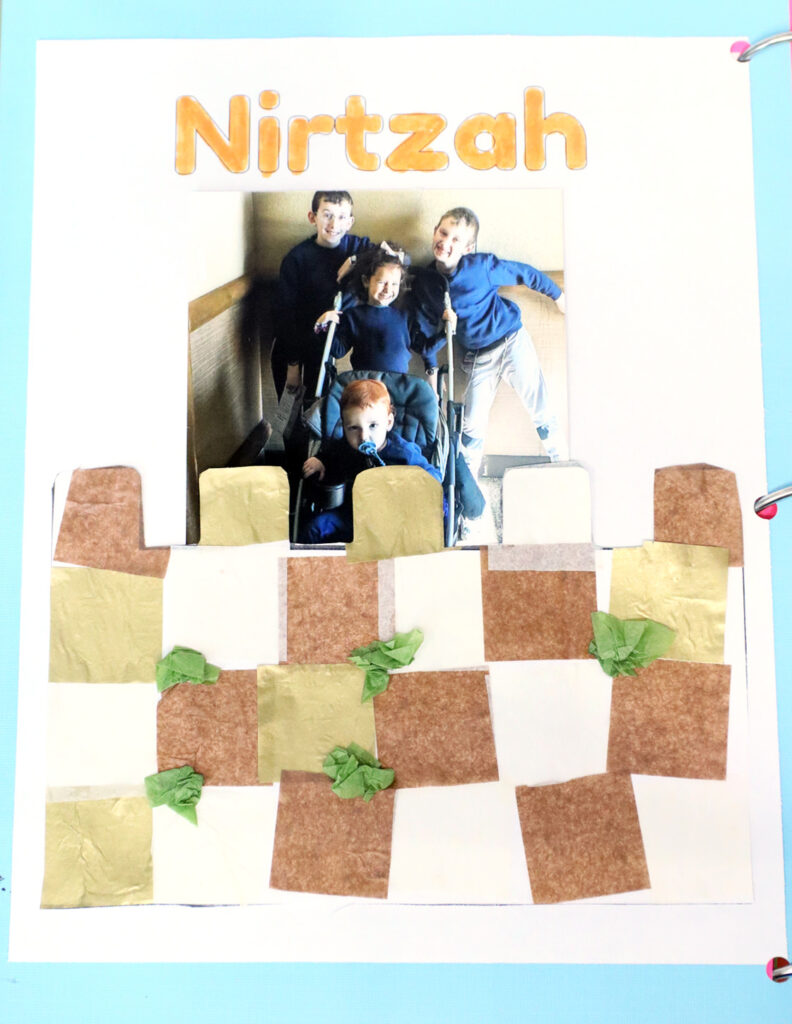
Nirtzah

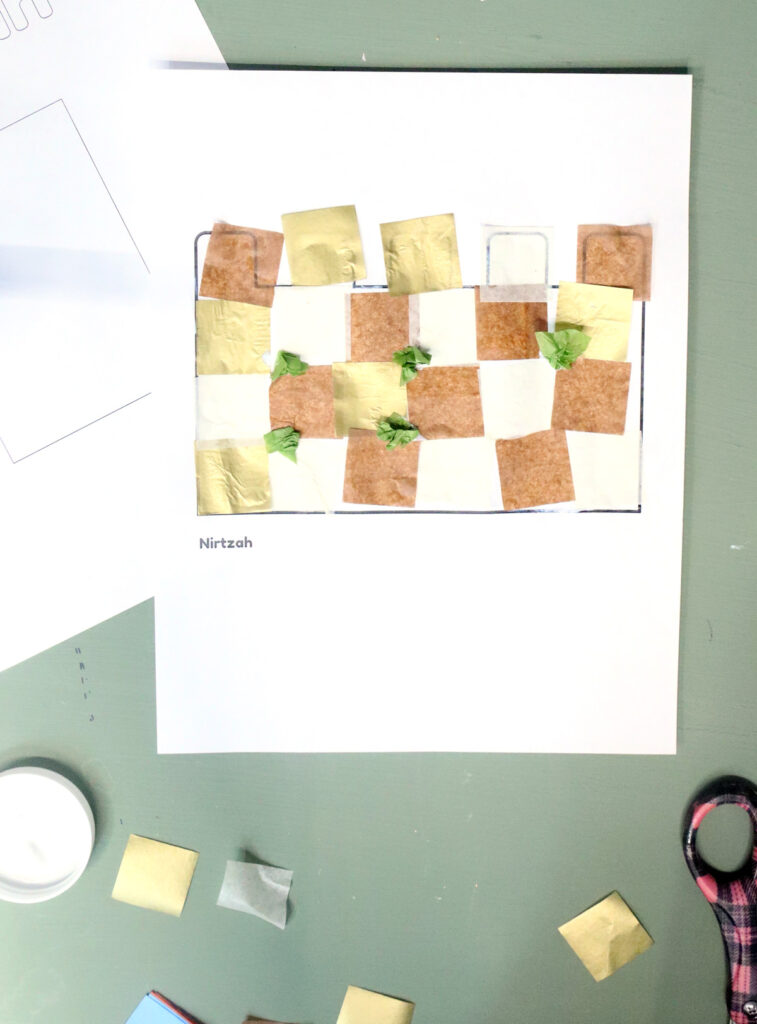
Nirtzah was a fun one – with a “next year in Jerusalem” theme. There is a wall that we decorated with cream, gold, and brown tissue paper squares to be like a Jerusalem Stone wall. Scrunched up tissue paper make the grass between the cracks.
You can also do stamping with a square piece of sponge for this. Or, use any paper squares.
We printed a family photo to put behind the wall to place us in Jerusalem. There is a template for photo placement. Encourage kids to bring a family photo to school for this, or just do a photo of each child.
Just a reminder, you can get the template (including a printable version of all these ideas and instructions) here or here!
How to Assemble the Haggadah Craft
The instructions showcase the steps that I used to assemble it how I did it – obviously, do what you want here to adapt it to your crafting needs!
You need
This list is not all-encompassing and includes basic supplies used
- The templates printed on cardstock
- A laminating machine with 3 mil laminating sheets
- Coloring supplies: Do a Dot markers, OOLY Chunkies Paint Sticks, Markers, Crayons for rubbings, Washable kids’ paint, etc
- Kid-friendly scissors
- Optional: colorful cardstock paper for backing
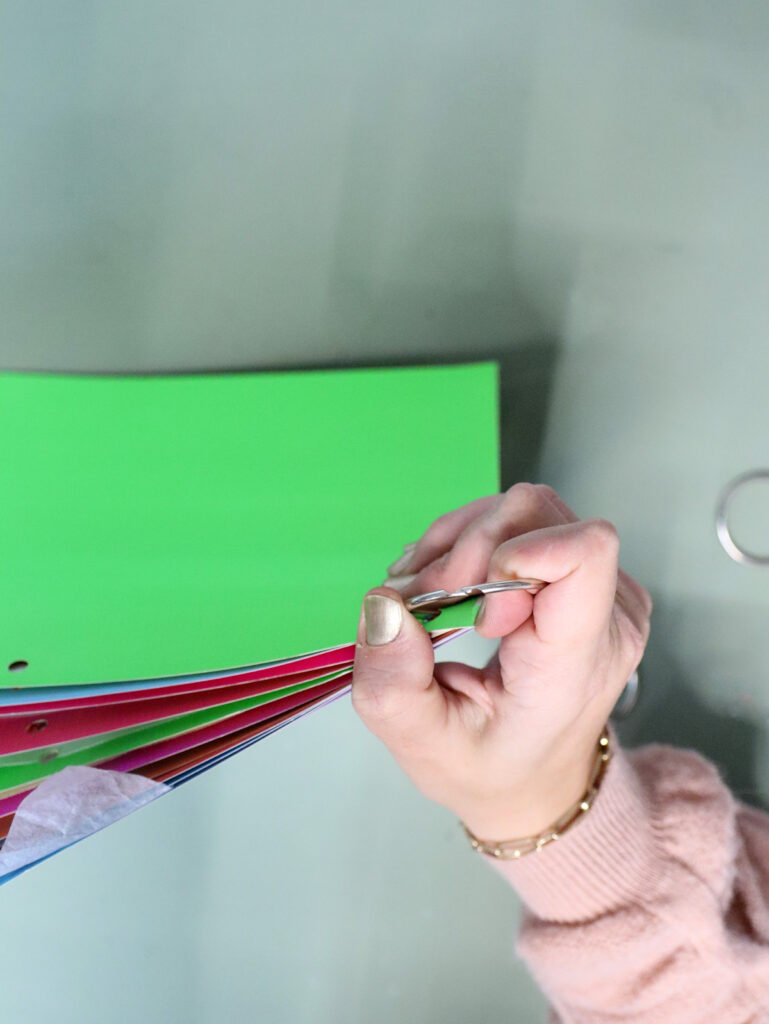
- Hole Punch
- Book Rings
- Glue (white glue or glue stick)
- Mod Podge
- Paint brushes
- Brad Pins
- Velcro coins
- Silver poster board, assorted glitter and patterned cardstock or scrapbook paper
- Tissue paper squares
- Optional embellishments such as sequins, craft buttons, gems can be used throughout
- Loads more assorted crafts supplies and embellishments throughout
Assembling the Base/each page
Remember: you can assemble this how you want! These instructions follow the process that I used.
1. Craft and laminate the parts that need laminating accounting for dry time.
2. Cut out laminated parts. Attach per page instructions.
3. Trim a bit off each of the edges.
4. Glue it to the background page.
5. Prepare all your pages. I glued mine back to back but you don’t have to.
6. Punch 3 holes in your pages – I did the first one and used that as a template for the others.
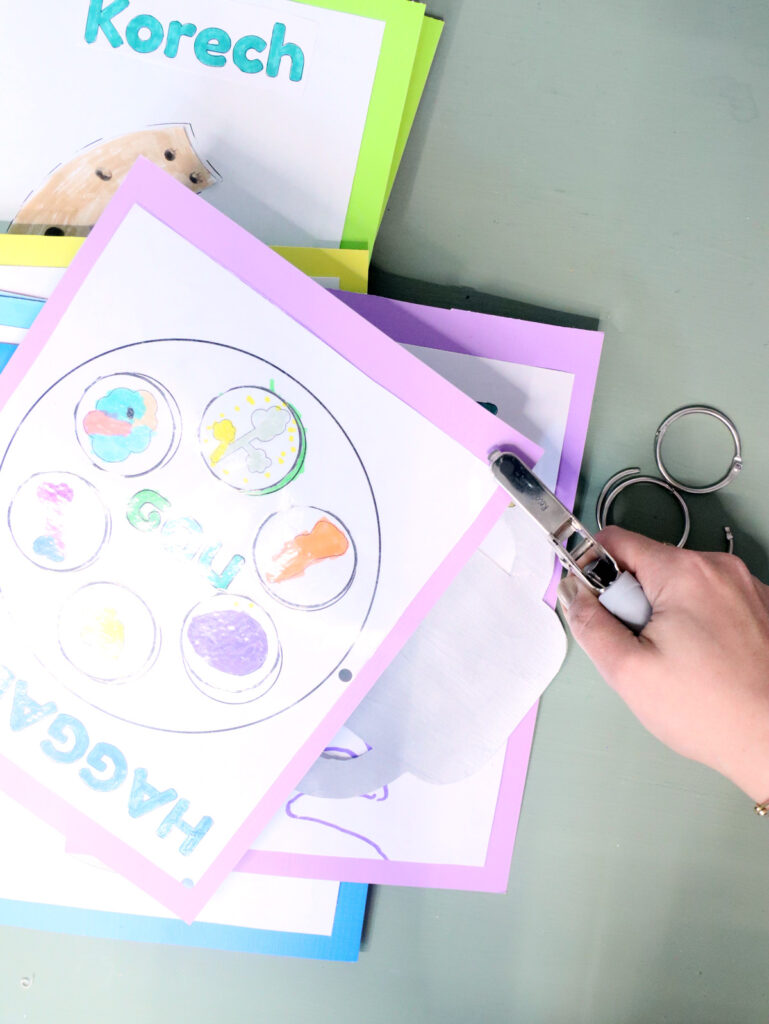
7. Connect them using book rings!
Step by Step Assembly by Page
Template assembly guidelines:
- Thinner lines are not cut at all
- Thick lines are cut
- Dashed lines are folded
Cover
- Color in the parts.
- Cut them out
- Glue them in the correct spot – and do NOT use my photo as a reference! A glued them where she wanted to.
- Laminate your cover.

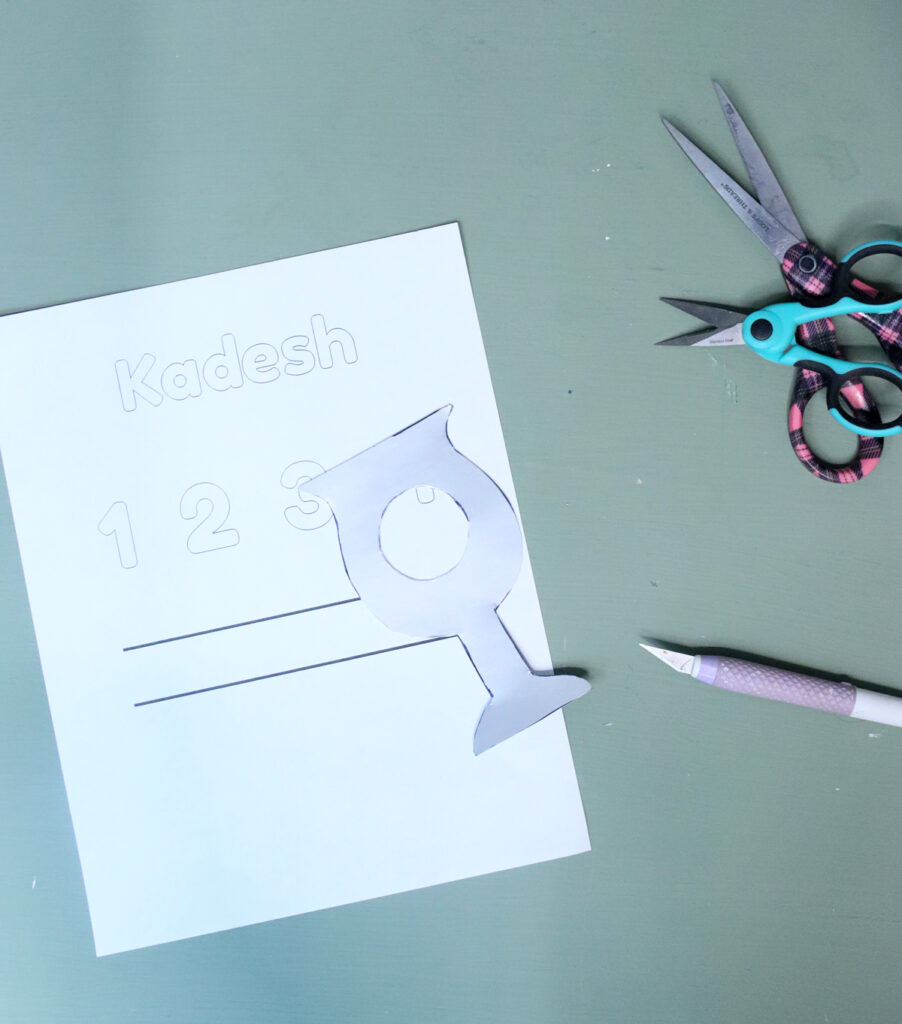
Kadesh
- Trace the Kiddush cup template on silver poster board.
- Cut it out.
- Cut out the center. To help young kids, you can “start” it with a craft knife.
- Cut the slits on the two bold lines on the base page.
- Slide the leg of the kiddush cup behind the ribbon formed between the two slits. The circular hole sits on the number cup you’re up to.

Urchatz
- Cut out your washing cup and paint it silver. Laminate it when dry.
- Trace two hands on the bottom of the base page.
- Cut a piece of white tissue paper. Attach it to the back part of the lip of the cup.
- Attach the cup with a brad pin.

Karpas
- Do a dot your potato and cut it out. Laminate it when dry.
- Do a dot your bowl.
- Trace the part of the bowl that the potato will dip into (the bottom half of the salt water) onto a translucent blue page divider. Cut it out.
- Glue the divider in place around the bottom curved ege. Cut the slit on the bowl for the potato (optional if adding on the blue divider).

Yachatz
- Place the matzah template on a LEGO baseplate.
- Use a crayon to color over it, revealing the texture.
- Laminate your matzah halves.
- Color the base matzah. Attach the two halves of the matzah to the base with Velcro coins.
Maggid
- Cut out the “Haggadah” from glitter cardstock and fold it in half.
- Trace and glue on a cover.
- Glue it to the base page.
- Glue a photograph of the child “playing” the story of Passover inside the Haggadah.
Mah Nishtanah
- Draw pictures of each of the questions, using simple shapes. You can show kids an example such as my drawings which uses very basic shapes that kids can follow to some degree. The template (cut-out) page should have the “on every other night” picture and the base page has the “but tonight” picture.
- Cut out each square from the template and fold on the dashed line. Glue the dashed line portion to match the top strip of the base page.
- Tip: you can use double-sided tape for this page to make it easier for kids to glue correctly and neatly, and not glue the flap down by mistake.

Ten Plagues
- Paint and cut out the spinner template. When cutting out the opening on the spinner, save the piece in-shape to use as a template too. Laminate it when dry.
- Trace the triangle opening on a sheet of clear acetate (or any clear sheet of plastic).
- Color with red sharpie and glue in the “blood” spot.
- Draw frogs in the next one.
- Dip a pencil eraser in black paint and dot on for lice.
- Cut a magazine clipping lion for wild animals, using the triangle cutout as a template. (Note: in a classroom setting, kids can choose a wild animal clipping and a teacher can trace the template on it for them to cut out).
- Stick on animal stickers for pestilence.
- Dot red dots for boils.
- Make ice and fire hail using blue and red glitter glue.
- Make fingerprints using a green stamp pad.
- Finish off the grasshoppers with a leg, eye, and antennae.
- Color the Darkness section in black and add eye stickers.
- Make “closed eyes” of the Firstborn.
- Attach the spinner by the center points using a brad pin.
Splitting Sea
- Paint a layer of Mod podge on the big rectangle on the base page.
- Gently pour on clean craft sand like you would glitter.
- When dry, seal with another layer of Mod Podge.
- On the template page: pour blue paint onto a tray/plate. Dip in a sponge and dab it on the page. Let it remain bubbly, don’t try to smooth it.
- When dry, cut out your template page. Fold toward the back on the dotted line.
- Glue the folded part to the edges of the sand part so that the sea can be opened to reveal the dry land inside.
Rachtzah
- Color the template silver using a paint stick and cut it out. Laminate it when dry.
- Cut a swatch of fabric and fold it to look like a towel, and glue it on. (Note: this is less kid-friendly, a teacher or parent may need to do this with a glue gun. It just adds some fun texture for the kids).
- Paint your child’s hand with washable paint. Stamp it on a clean sheet of cardstock. When dry, cut roughly around the outline and laminate.
- Attach the hands with brad pins.
- Attach the washing cup with a Velcro coin.
- Tip: this page is somewhat crowded, so plan it out before attaching anything permanently!
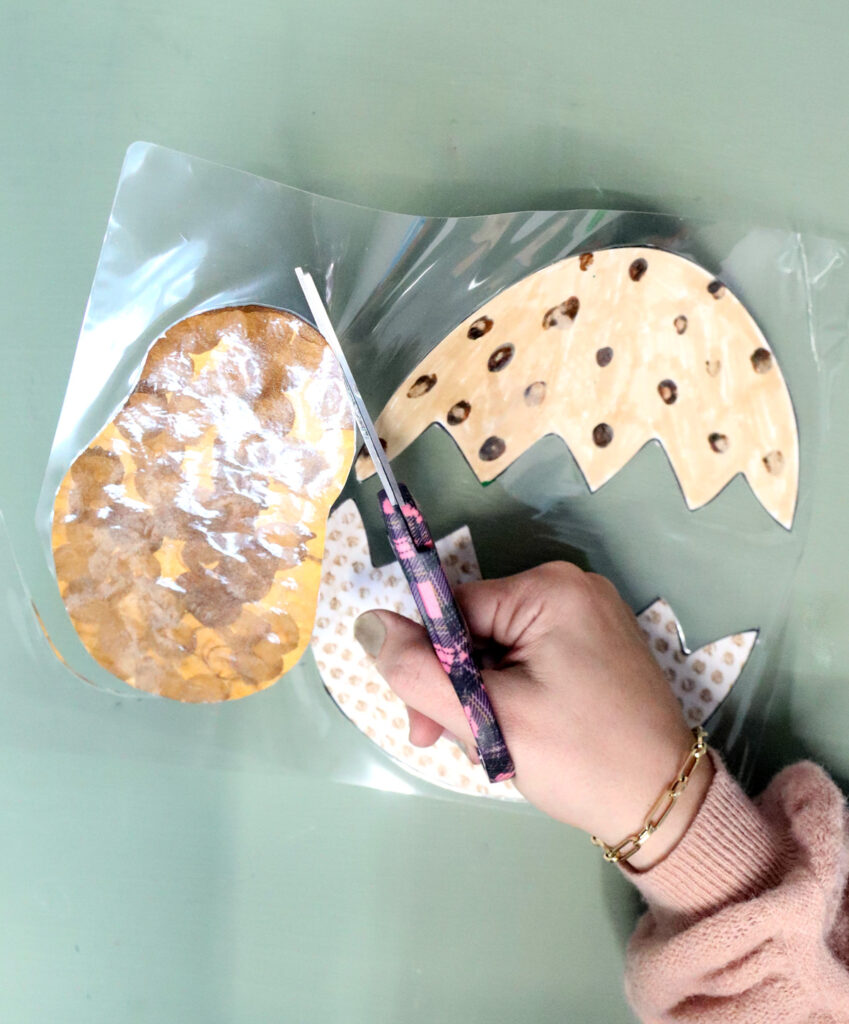
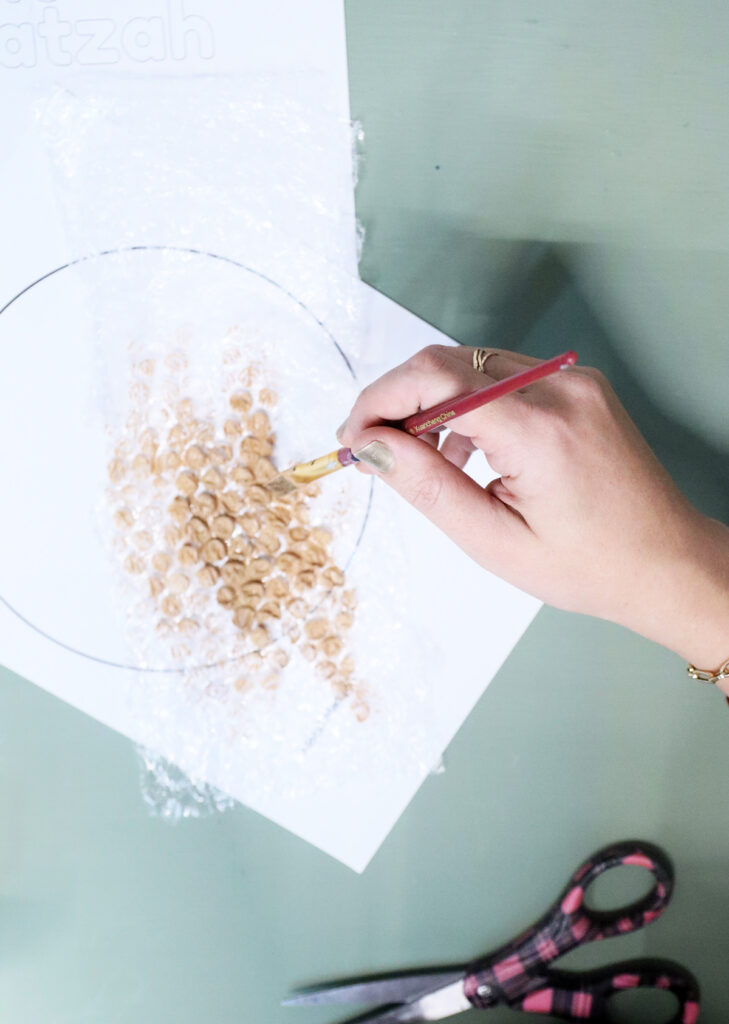
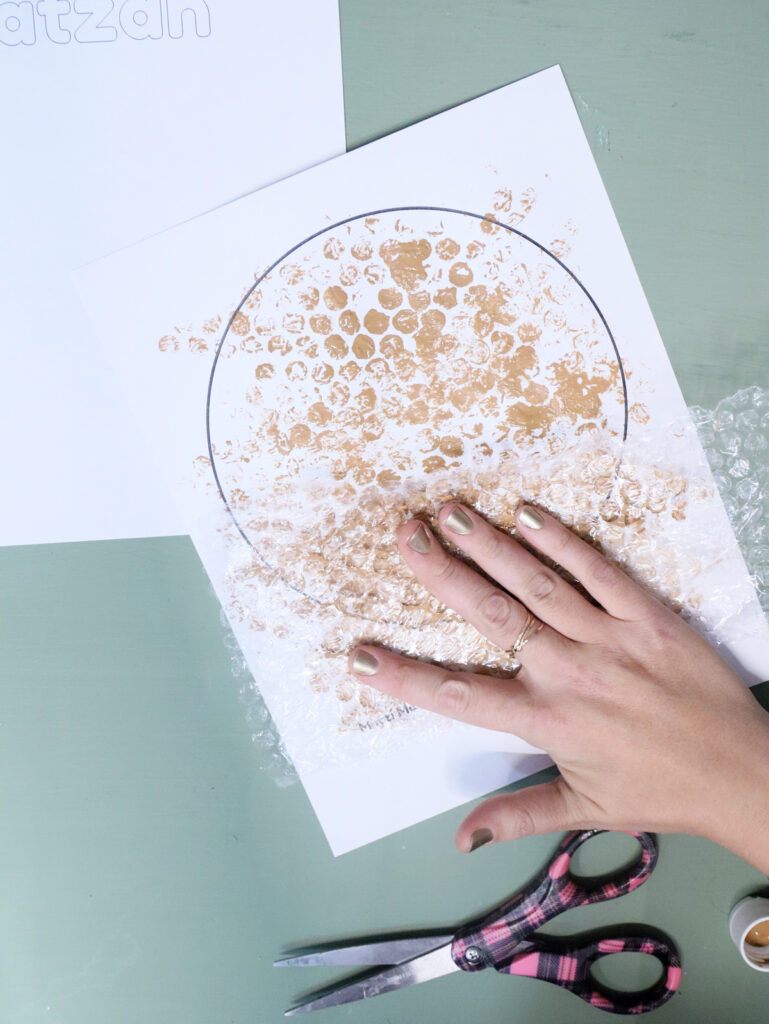
Motzi Matzah
- Spread some brown paint on a piece of bubble wrap. Press it onto the matzah paint-side down.
- Do this in increments until your Matzah template is covered in bubble wrap dots.
- When dry, cut out and laminate.
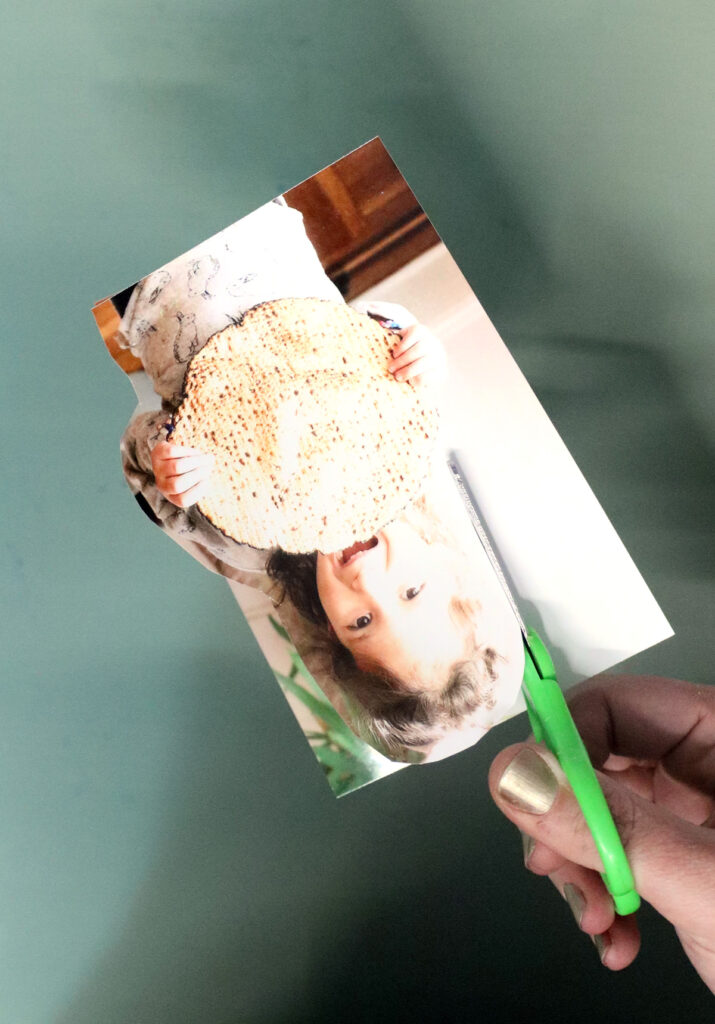
- Take a photo of the child saying “ah” or pretending to eat matzah.
- Cut it out roughly. Glue it on the base page.
- Attach the matzah with Velcro coin.
Marror
- Do a dot the Marror template. Laminate when dry.
- Paint the bowl with paint sticks. Cut the slit.
- Dot on bits of glue on the bowl inside/top.
- Crumple up reddish tissue paper squares and put them on the glue dots.
- Attach the Marror with hook and loop.
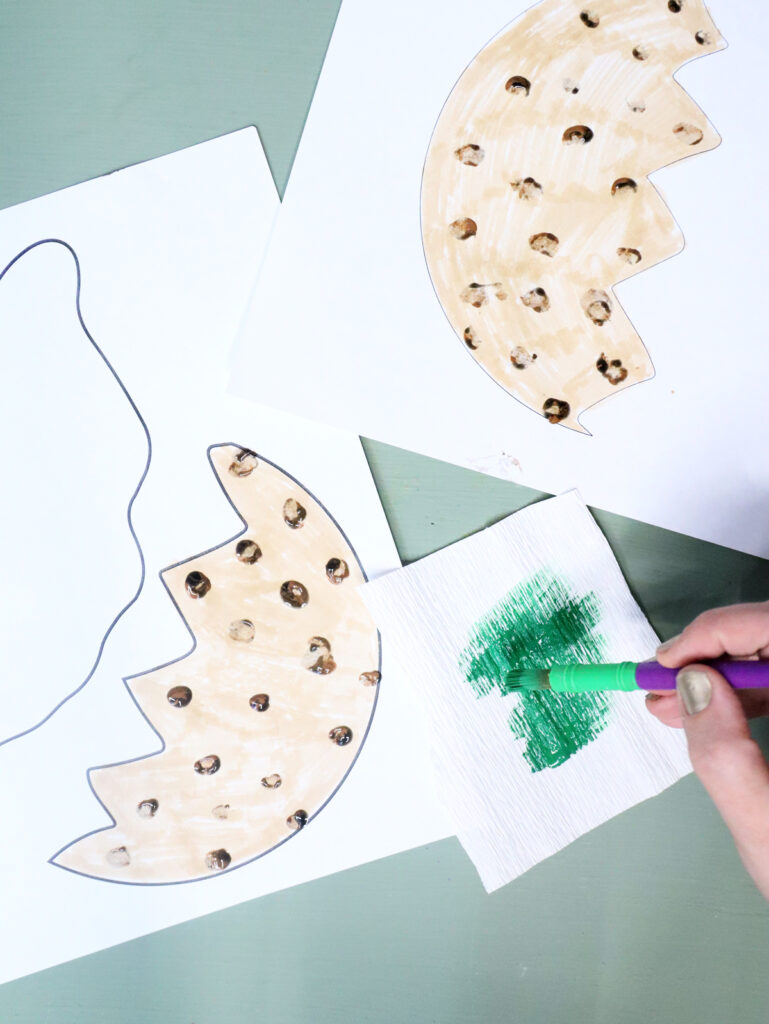
Korech
- Color the Matzah base and template light brown.
- Use a cotton swab to dot on brown paint.
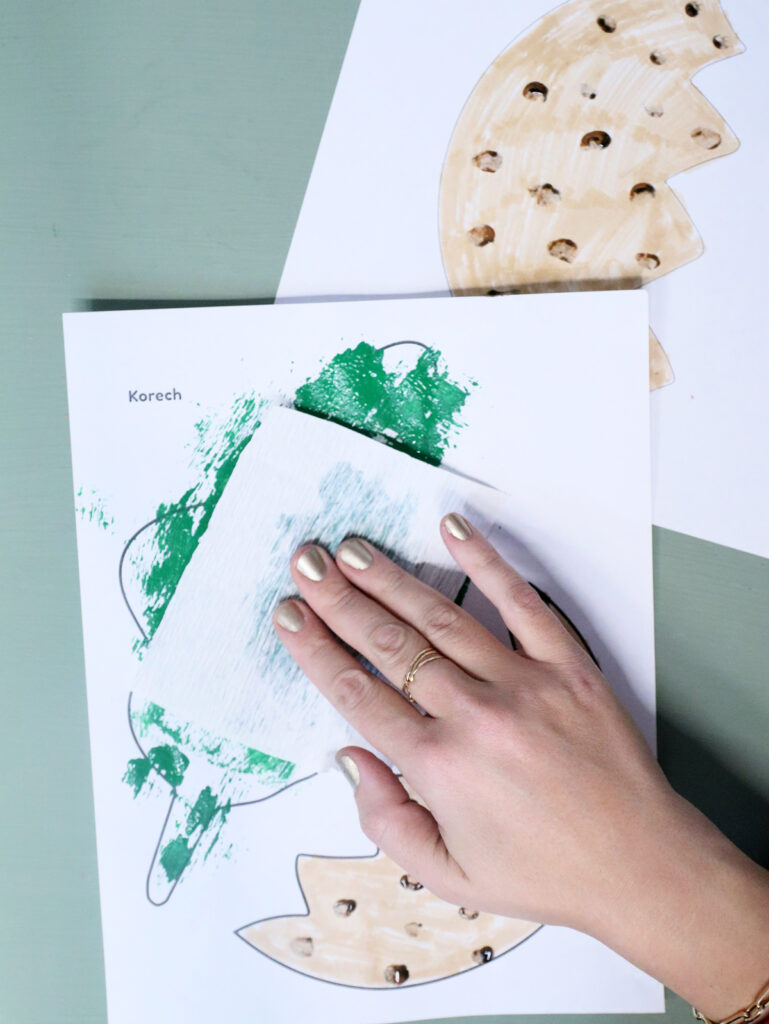
- Paint some green paint onto crepe paper. Use it as a stamp to paint the Marror green.
- When dry, cut out and laminate the maror and the matzah half that’s on the template page.
- Attach the layers with hook and loop coins.
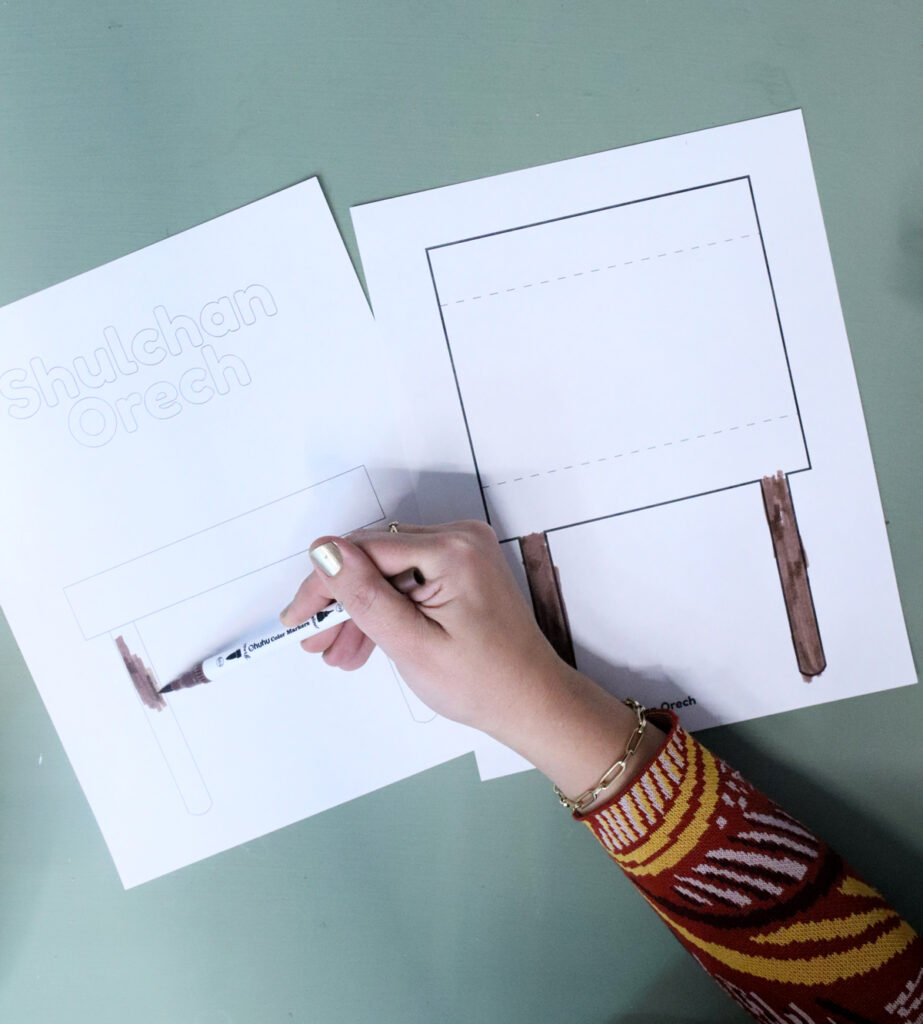
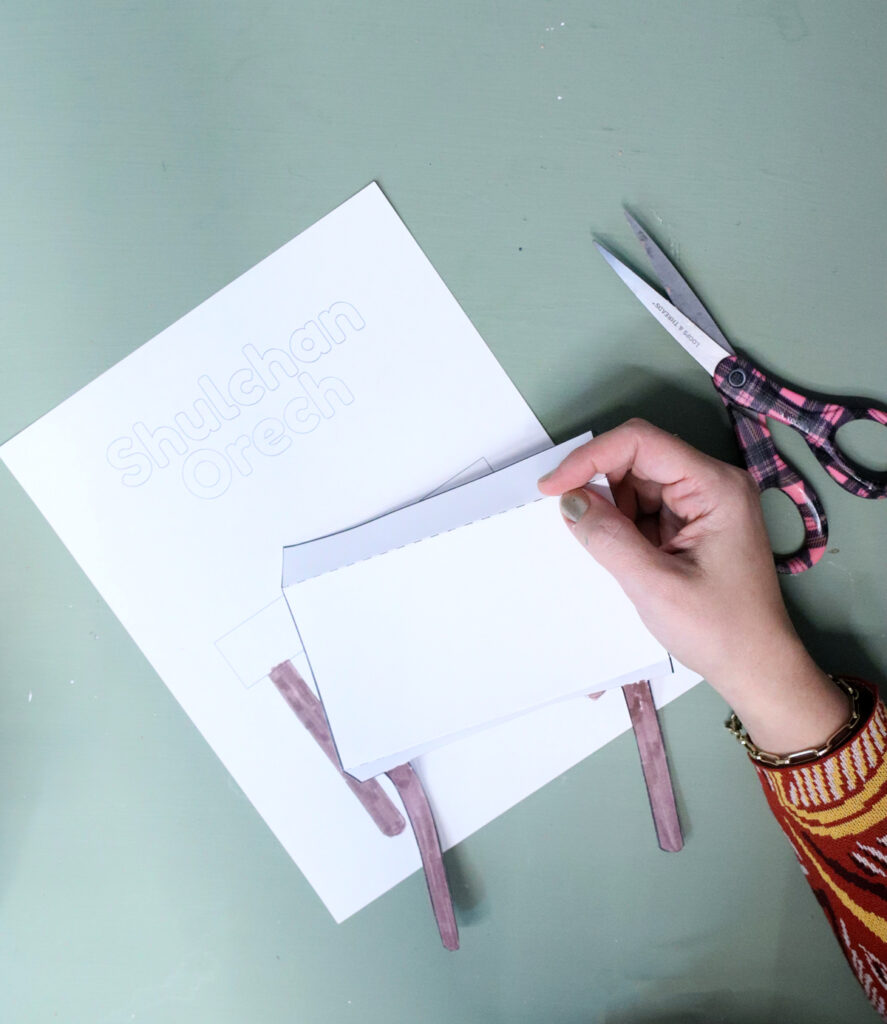
Shulchan Orech
- Color the table legs on both pages.
- Cut out the table template. Fold on the dotted lines.
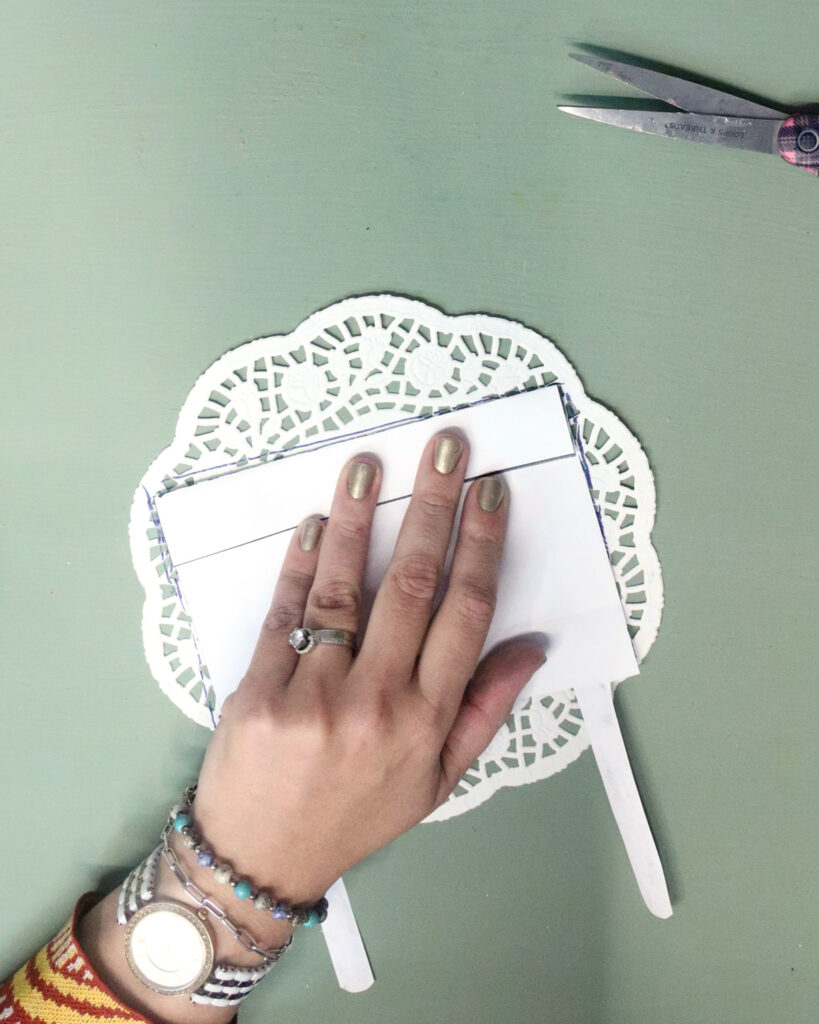
- Trace the table on the back of a doily so you’re cutting off the top and sides to fit your table.
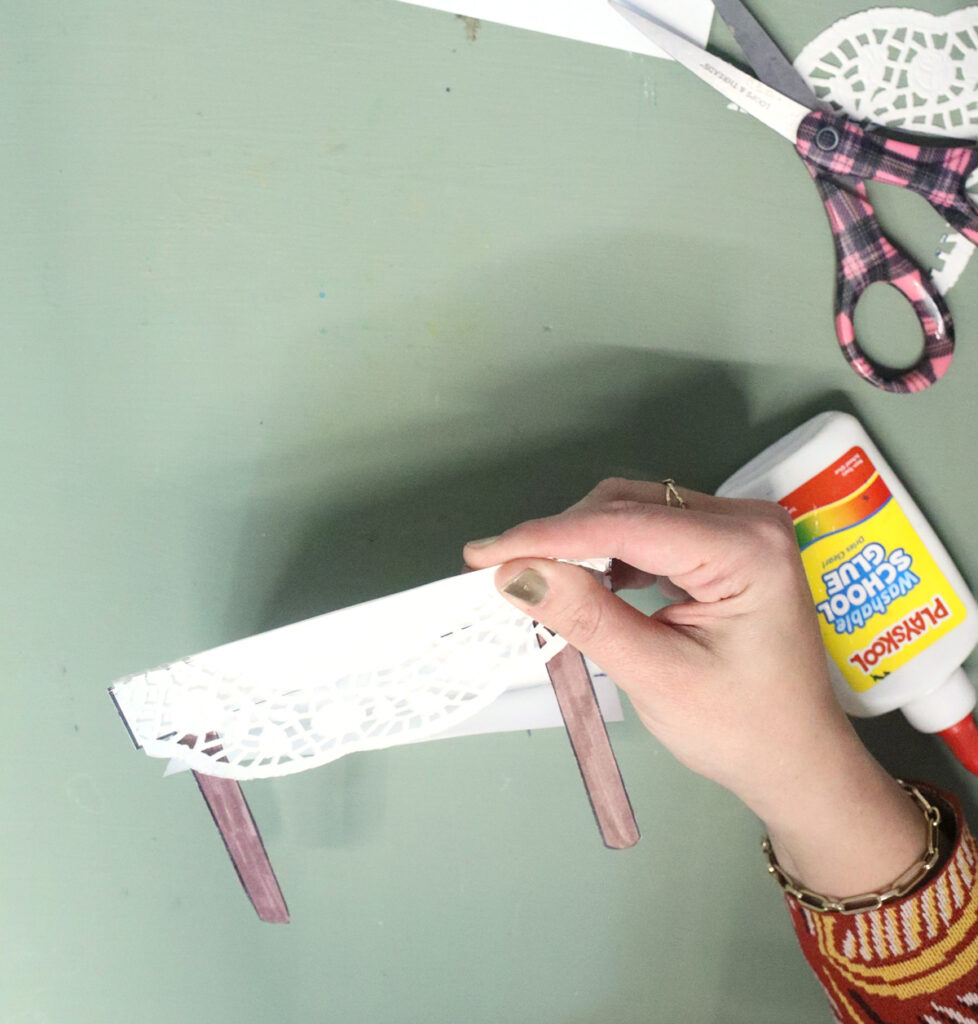
- Glue it on the table and fold down the front edge.
- Glue the back folded down part of the table on the base table portion that corresponds.

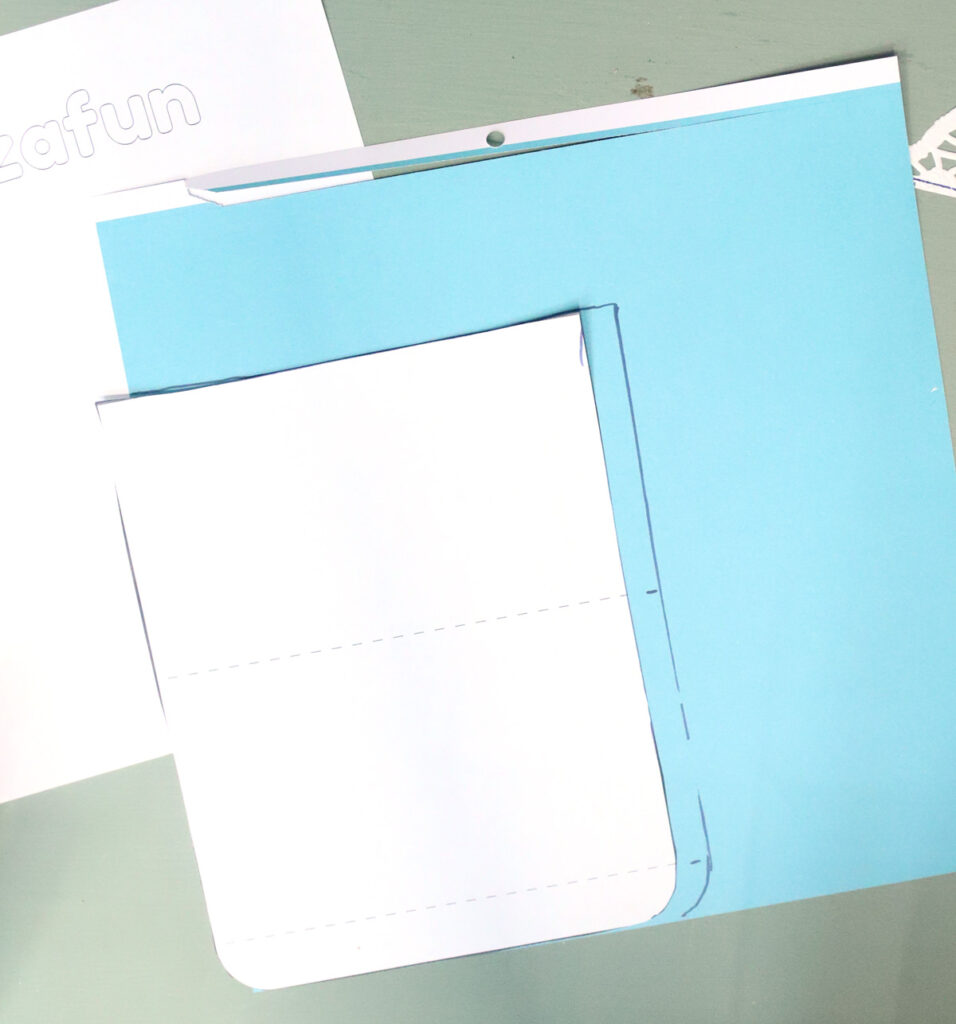
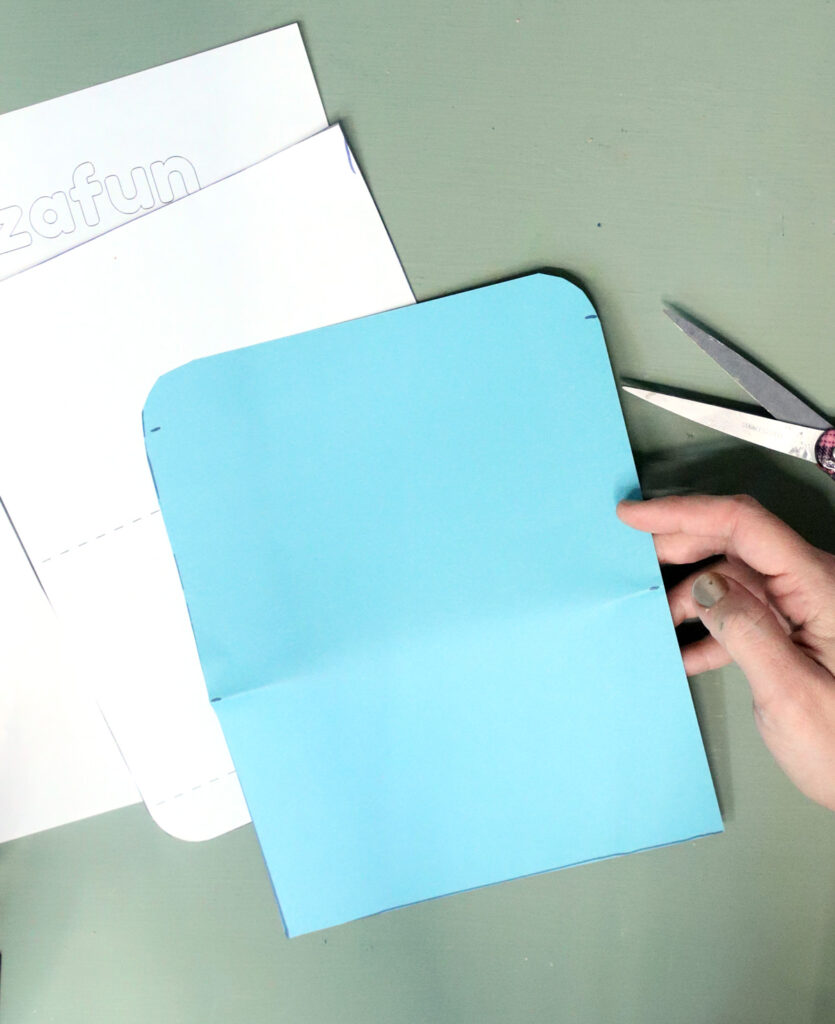
Tzafun
- Trace the template on scrapbook paper. Note: the one I’m using is 2-sided, with a pattern on one side and blue on the other.
- Mark the fold lines and fold those.
- Tape the sides of the rectangle shut, making sure to leave the top flap untaped.
- Attach a hook and loop coin to hold it closed.
- Attach it to your page and go ahead, and steal half the Yachatz matzah to use as the Afikoman.
Barech
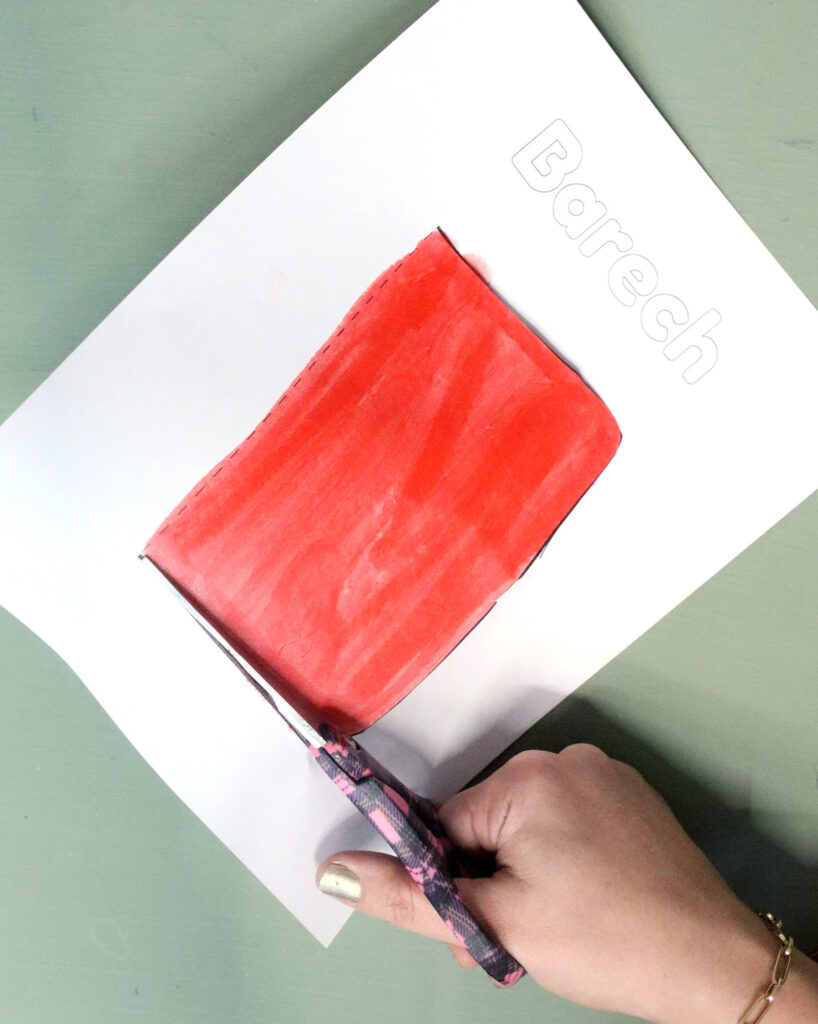
- Paint and cut the door. Fold it back on the dotted line.
- Cut out the outer template. Print a photo of the child waving “hi,” and, making sure that the important parts fit inside the inner shape, glue it in place.
- Glue the rectangular template behind the open door.
- Glue on a button doorknob.
Hallel
- Paint the circles with Do a Dot markers and the base musical notes with paint sticks.
- Cut out the circles and laminate when dry.
- Attach them to the base using Velcro coins.
Nirtzah
- Spread some Mod Podge (or glue) on the wall template and stick on brown-ish tissue paper squares. Don’t worry if it’s not neat.
- Scrunch up green squares and stick them between the brown ones.
- Cut out the wall shape when dry.
- Glue a photo – preferably one of the whole family but it can also be one of the child – in the rectangle on the base.
- Glue the wall on top of it.
Your interactive Haggadah craft for kids is complete! Just a reminder, you can get the template here or here!